Kettlebell training is the unsung hero of today’s armchair athlete. The reason being—despite its name, it offers absolutely no ‘bells’ or whistles to your current workout. In fact, they are actually kind of boring, plain, simple, and barbaric. However, despite its humble presentation, kettlebells may be one of the best ways to build strength, flexibility, and cardio, especially in the legs, back and arms.
If you want to get the most of a kettlebell workout, the best advice we can give you is to make sure that you are following an approved regimen, otherwise you could literally ‘throwing’ your results away. To get you on the right track, we asked champion athlete and professional trainer, Steve Cotter, to share an excerpt from his recent book.
The following is an excerpt from Kettlebell Training (Human Kinetics, 2013), written by Steve Cotter. All text and images provided by Human Kinetics.
Introduction
In the last few years, there has been a significant increase in the popularity of kettlebells and kettlebell sport, a previously little-known fitness tool and ethnic sport originating from Russia. Athletes, coaches, personal trainers, fitness enthusiasts, and busy professionals looking to accomplish a lot of exercise in a short amount of time have all gravitated toward this remarkable all-in-one fitness method that seamlessly combines strength training, cardiorespiratory conditioning, core stabilization, coordination, and dynamic mobility into one intense workout. This rapid growth in interest and the associated emerging industry of professional kettlebell trainers that it has spawned necessitates a clear, concise book to explain the what, why, and how of kettlebells and to guide new users through safe and effective kettlebell training practice. This book, Kettlebell Training, provides the necessary information and technical expertise to lead you through this invigorating form of fitness training.
A fundamental component of kettlebell training is the use of this fitness tool to work the entire body as a functional unit. Unlike bodybuilding protocols that isolate muscle groups and train them independently, kettlebell training takes a more athletic approach and integrates the mind and body together. Most of the kettlebell exercises are performed while standing and train the movements along with the muscles. They work multiple joints in multiple planes of motion. As such, it is important to have a clear understanding of the training method and safe biomechanics of this dynamic movement system.
Kettlebell Training begins by introducing kettlebells as an ideal fitness solution in the busy modern world we live in. Instead of working individual components of fitness independently as is the traditional approach for gym-goers, with kettlebells you will combine such fitness goals as muscle toning, cardiorespiratory conditioning, muscular stamina, fat loss, and increased strength and power simultaneously due to the comprehensive, holistic nature of kettlebell training. Further, you will increase the general fitness attributes of agility, balance, coordination, strength, power, and endurance. If ever there were an all-in-one fitness program, kettlebell training is it!
Single Swing
The single swing is the foundational movement of all the classical lifts. Within this exercise, you will find many of the universal principles and unique aspects of kettlebell training, such as inertia, pendulum grip endurance, and anatomical breathing. The swing needs to be mastered before moving on to the other classical lift exercises (e.g., clean, snatch). It cannot be understated: All other kettlebell lifts build upon the foundation of the swing.
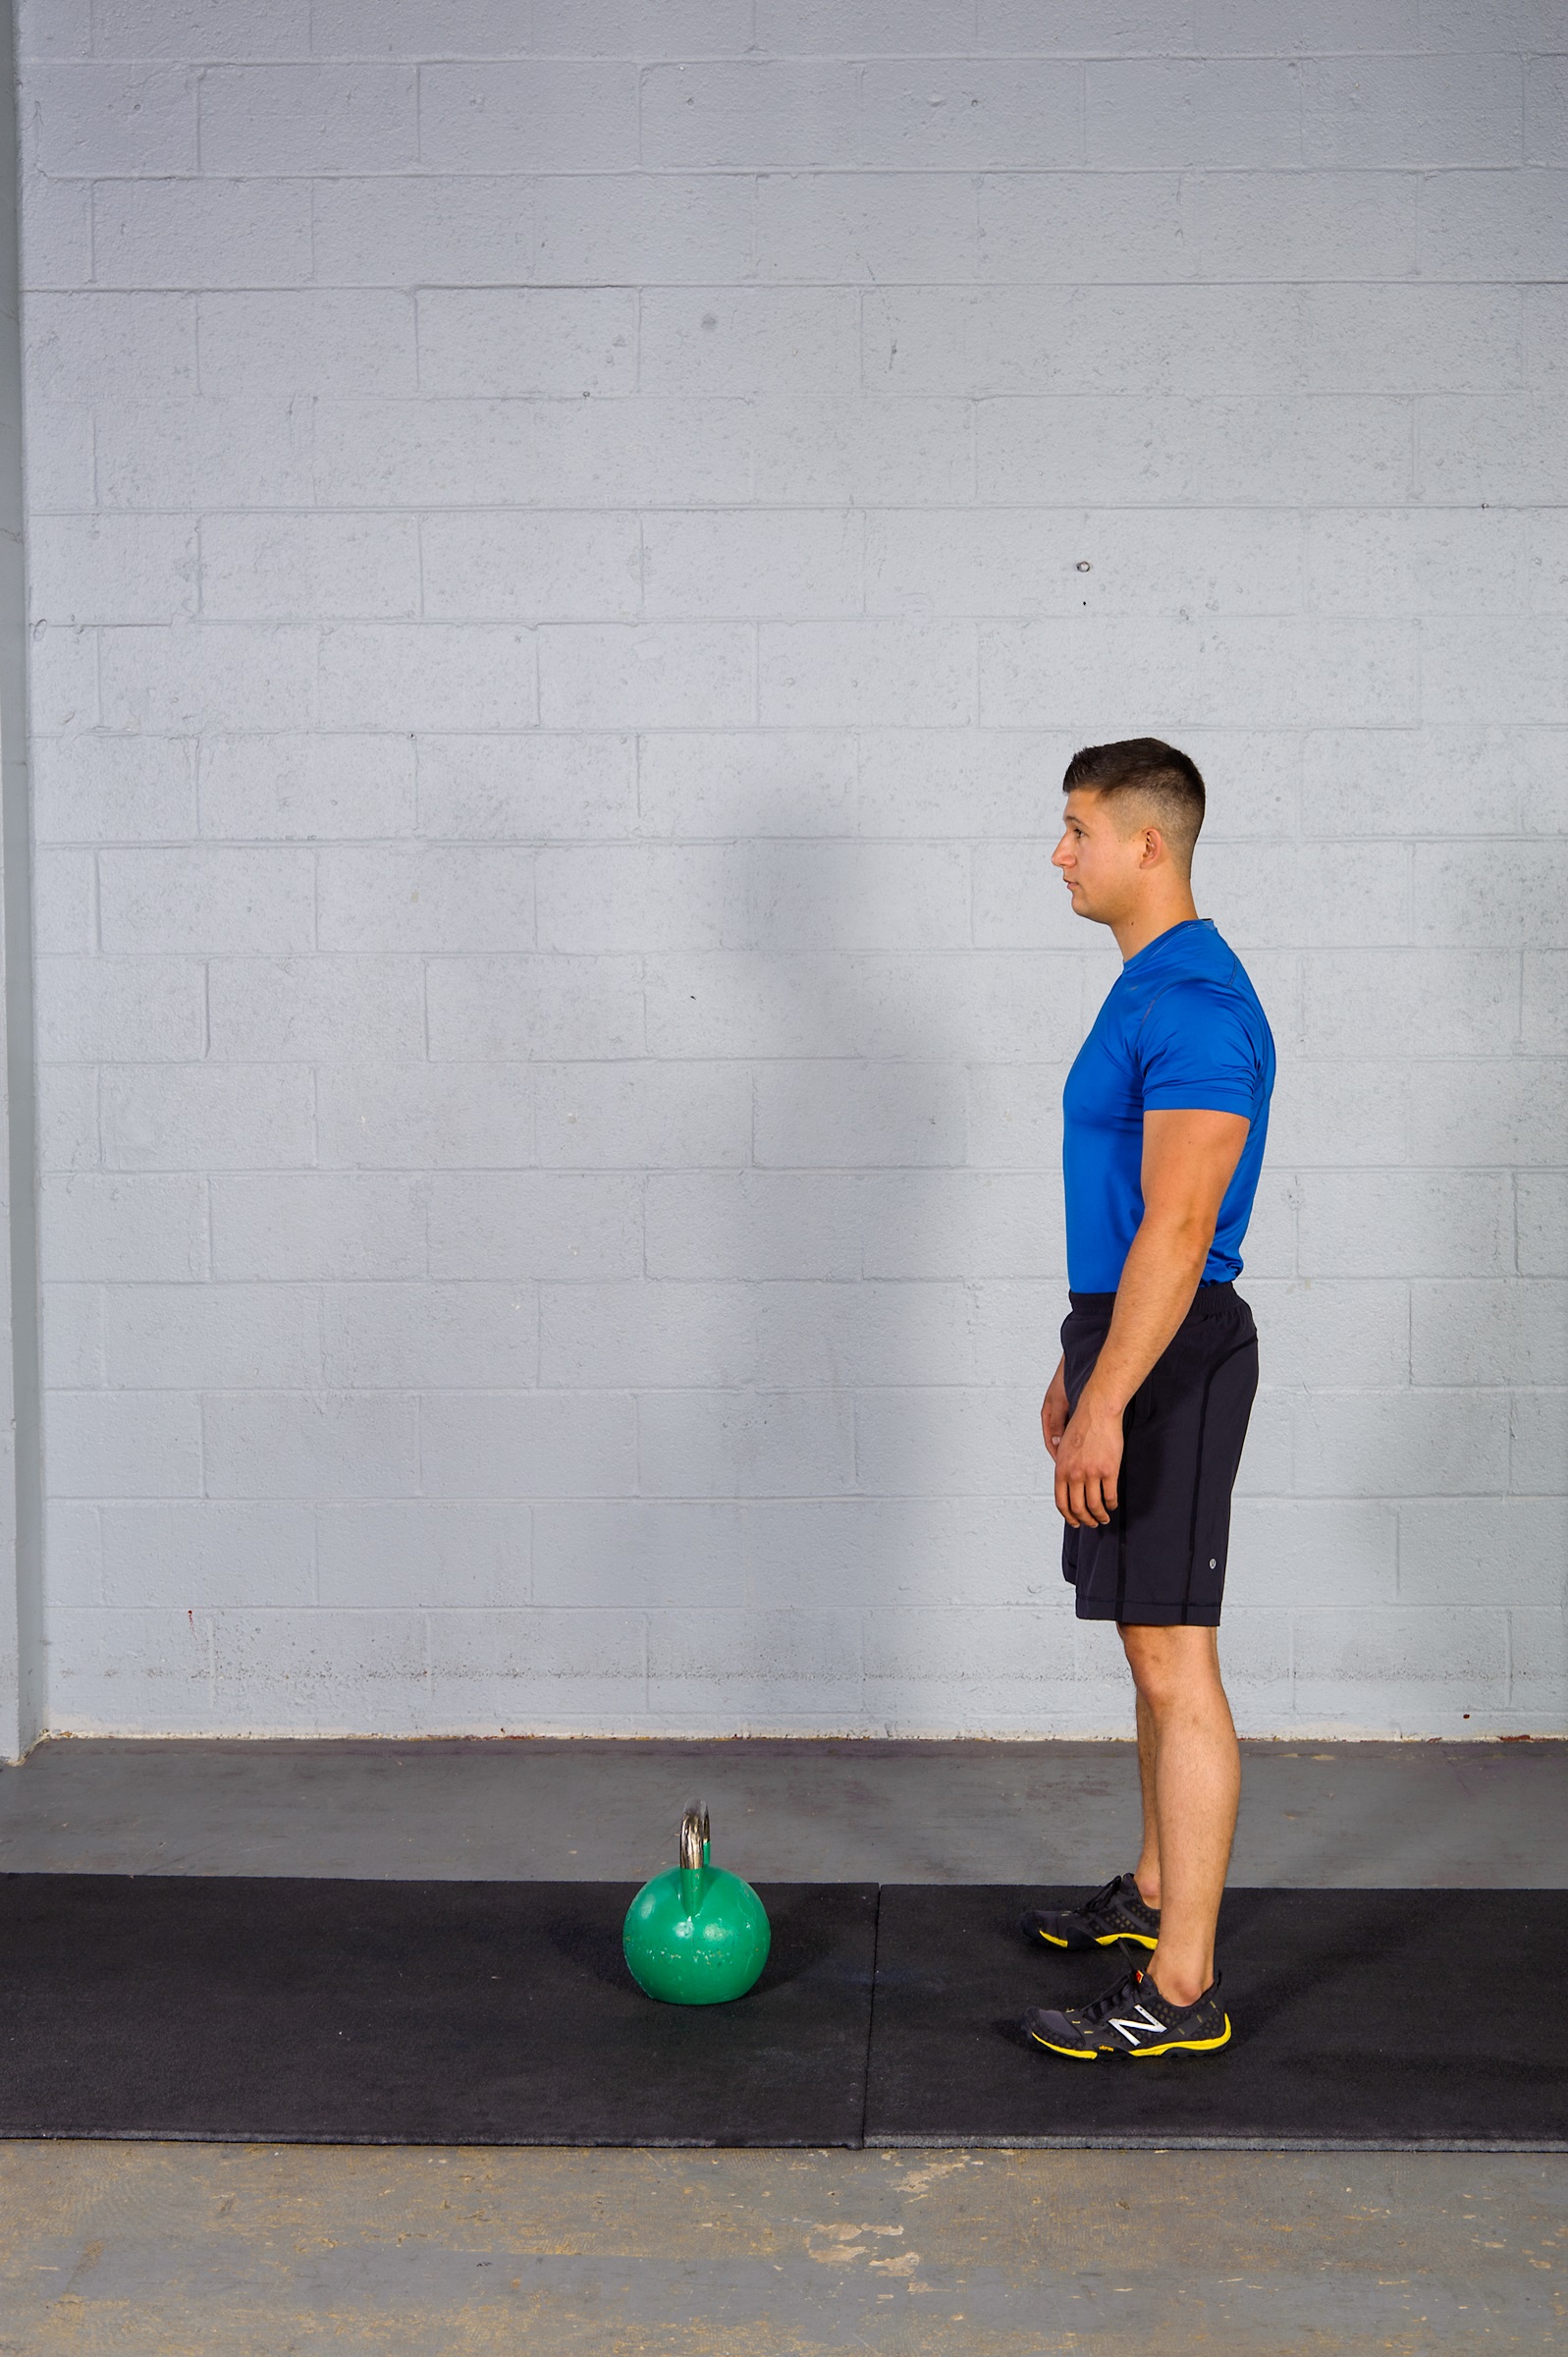
Figure 6.10a
To perform this exercise, stand with the feet hip-width apart and with one kettlebell on the floor in front of you (see figure 6.10a). Sit back with the hips (think box squat) and with one hand, grab the handle with the fingers (see figure 6.10b). Thumb positioning for the swing can vary depending on the individual and the training goals. There are three options:
1. Thumb forward, which allows for faster pacing due to minimized motion (creates a shallower downswing) and seems to be more comfortable for those with shoulder tightness because there is no rotation at the shoulder during this position.
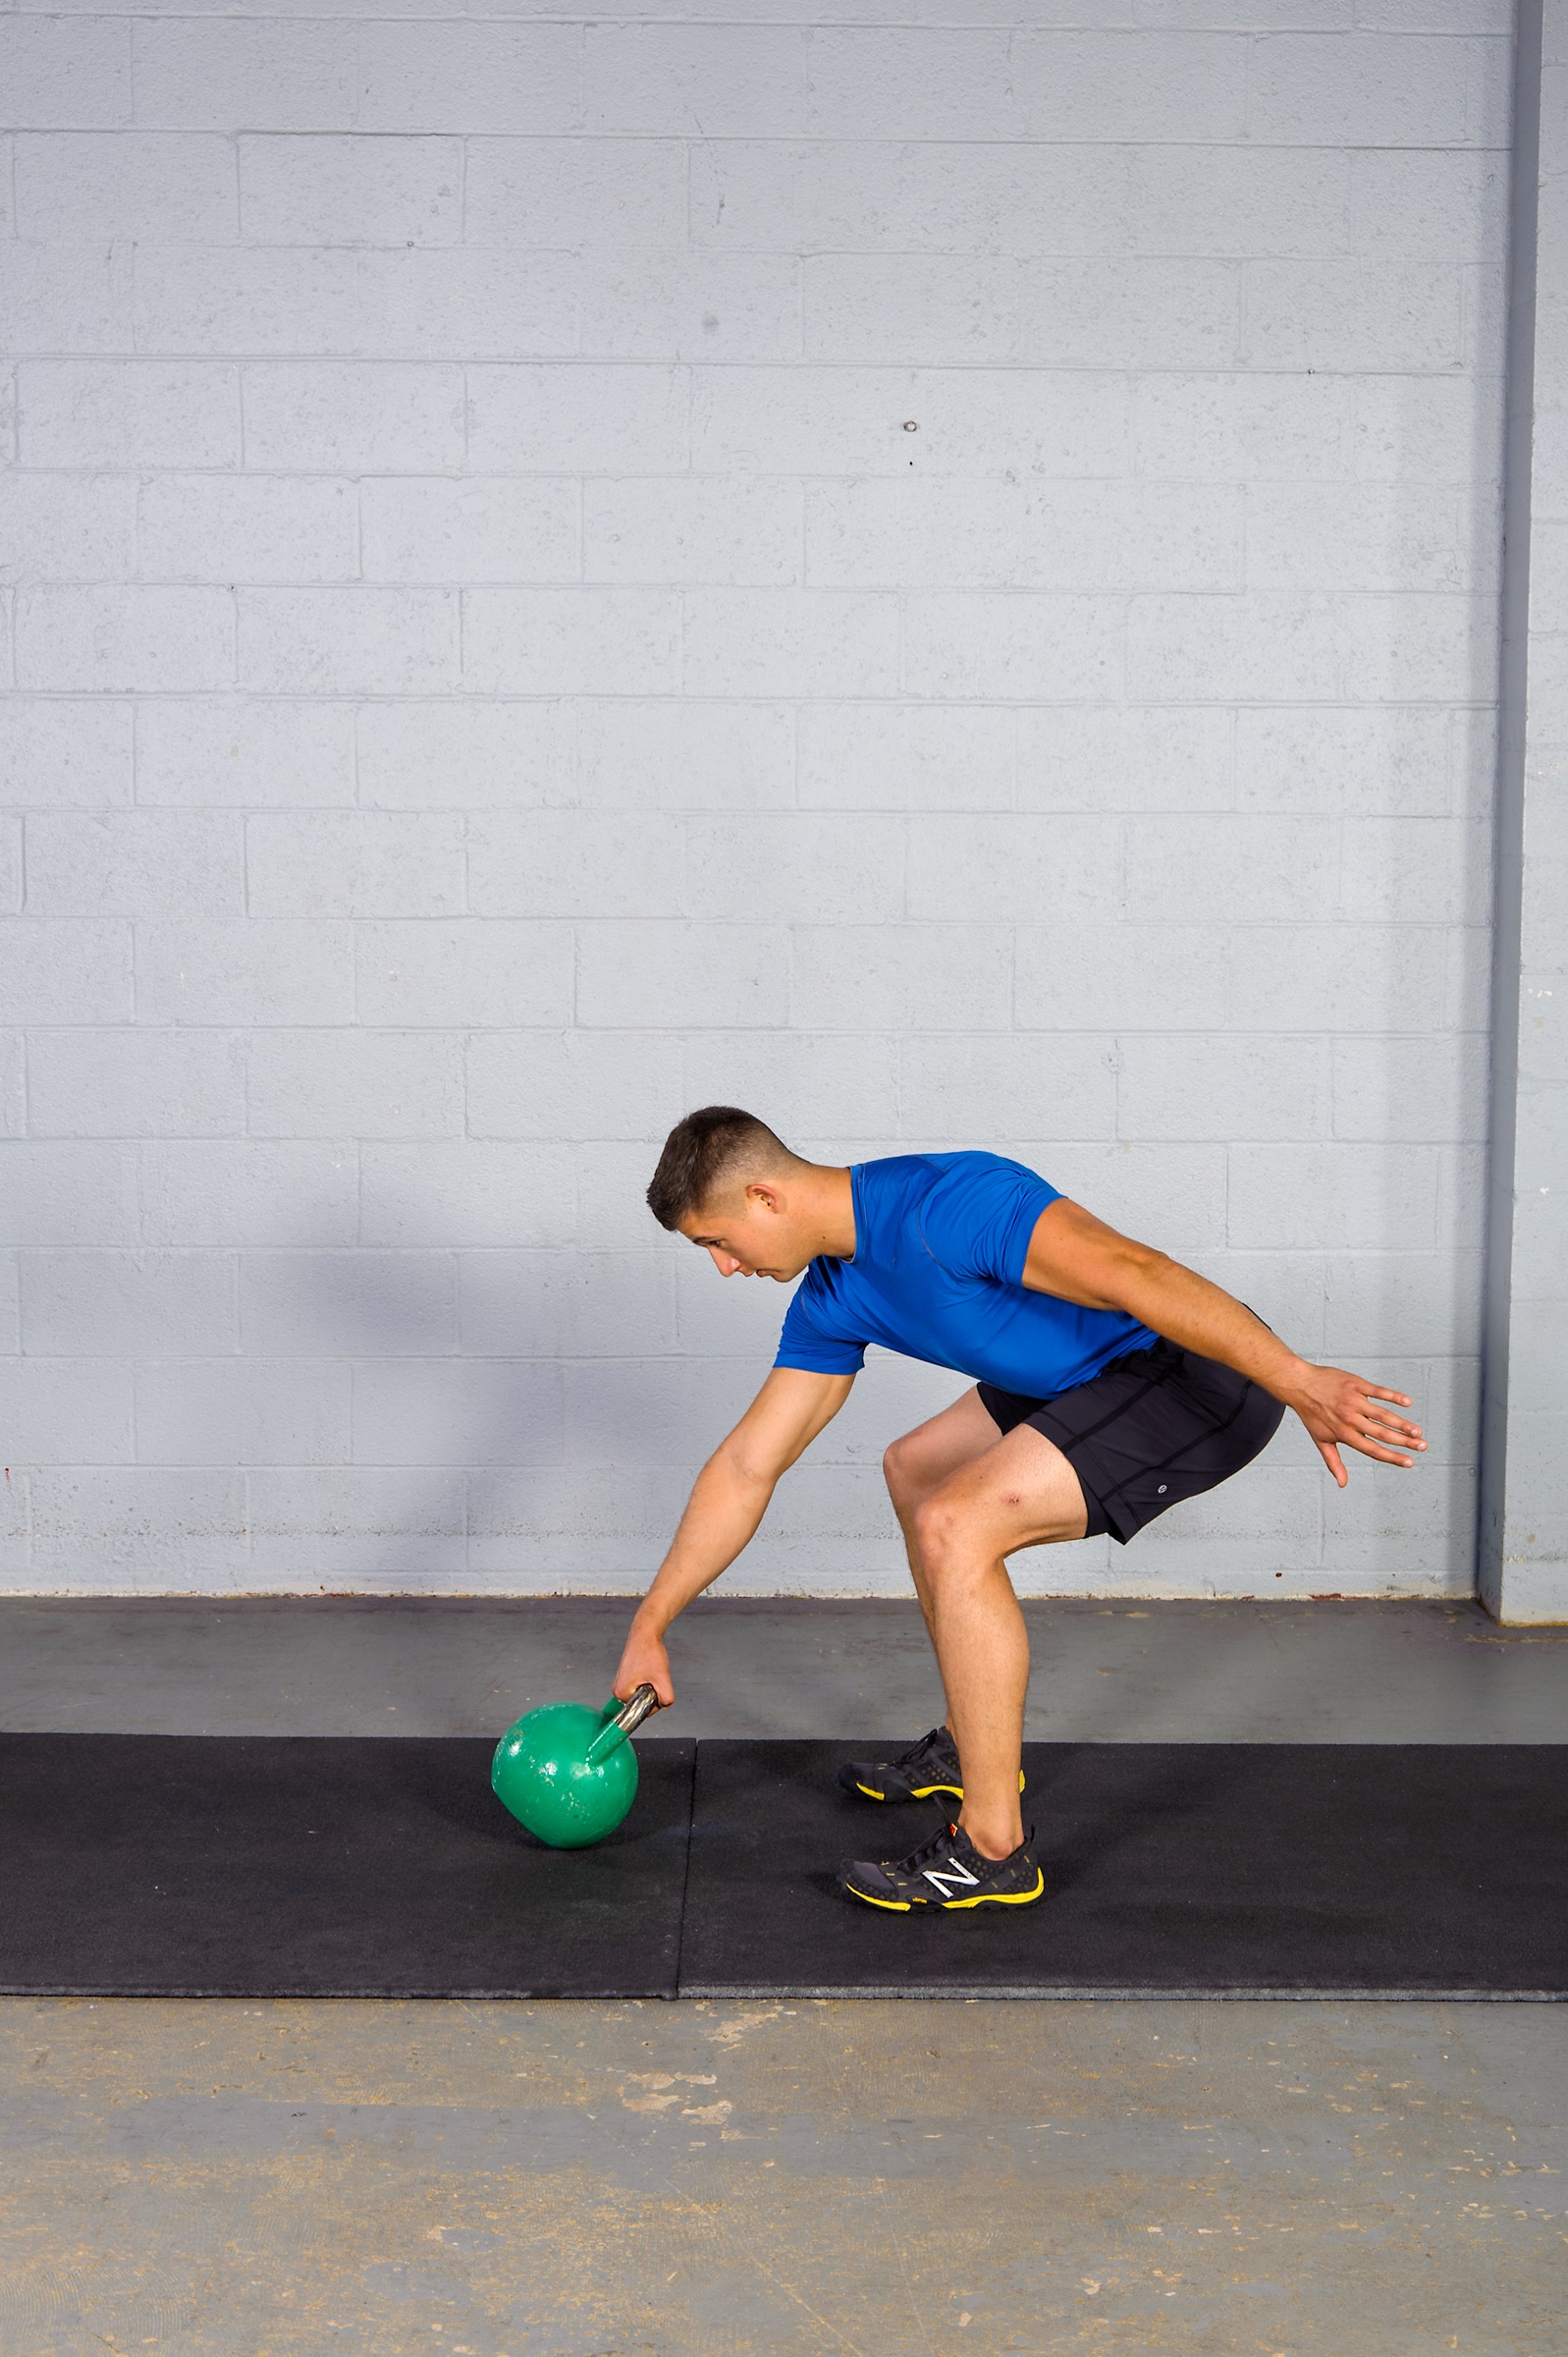
Figure 6.10b
2. Thumb back, which provides better grip endurance by distributing some of the stress from the forearm to the triceps and creates more of a momentum-based movement because of the spiral nature of this variation (thus, there is a greater range of motion to reduce and produce force).
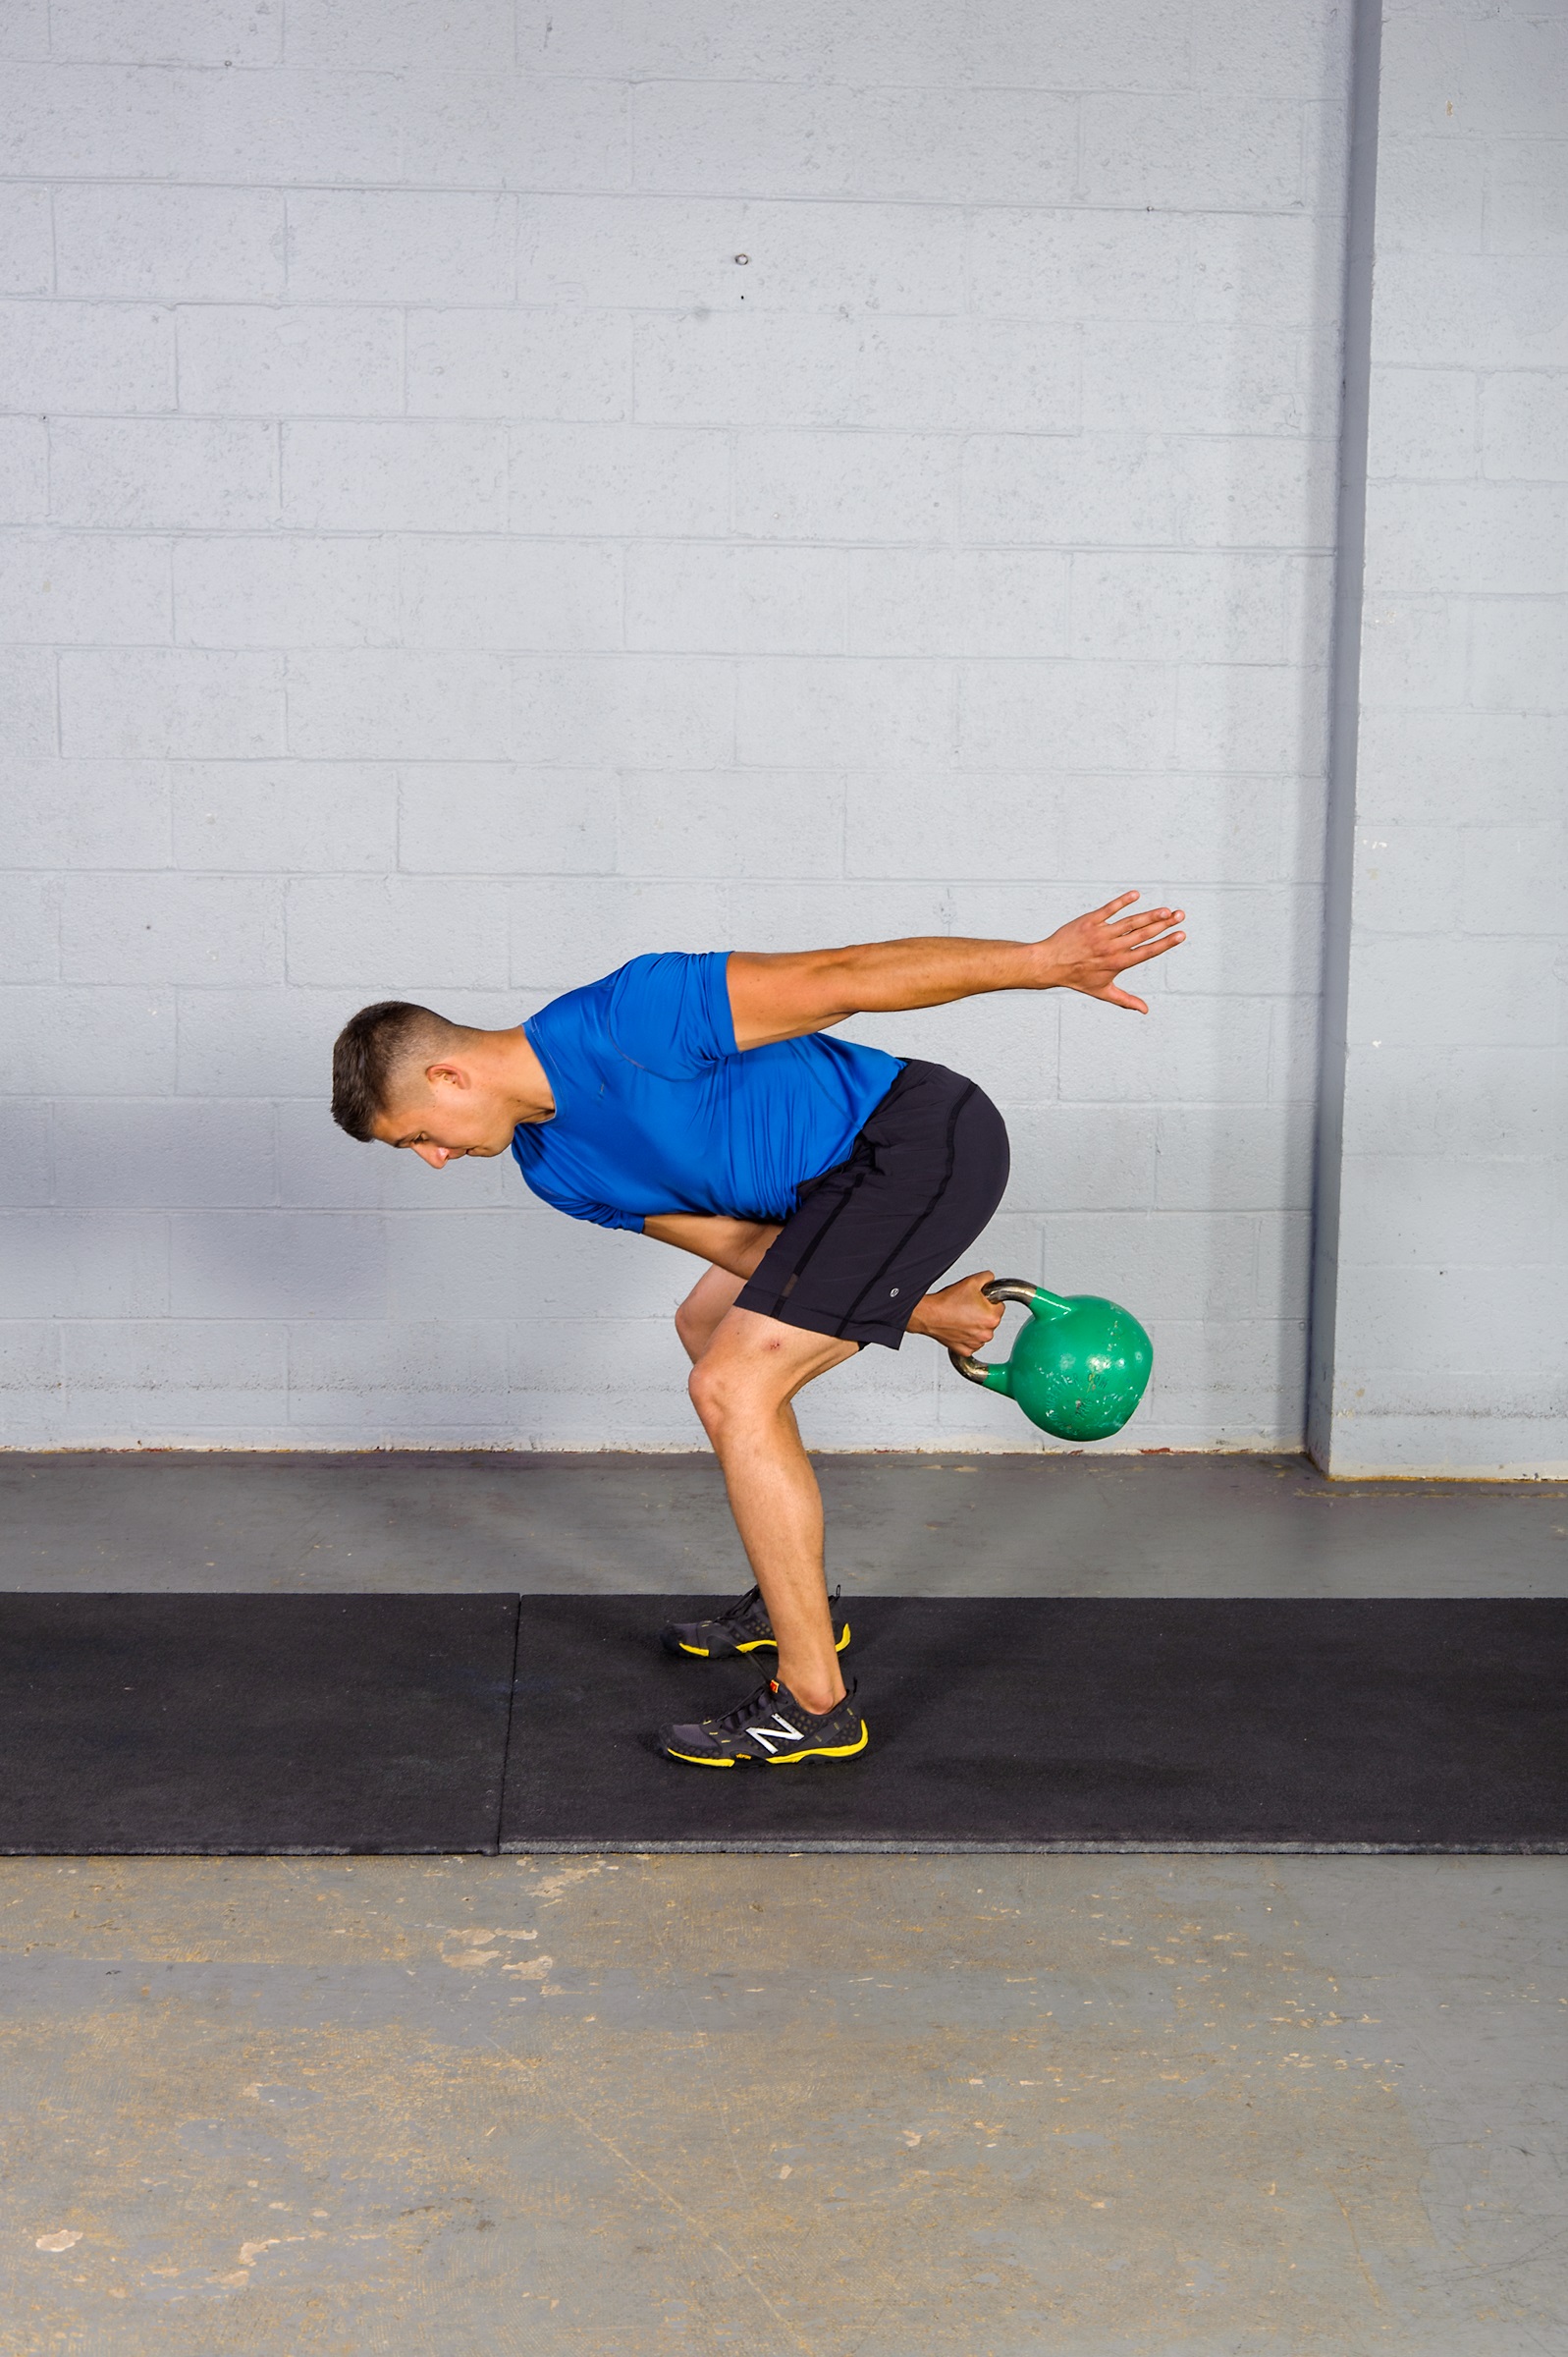
Figure 6.10c
3. Neutral thumb, which distributes stress more equally along the grip, arms, and shoulders.
Next, keep the shoulders back and chest lifted as if you are going to do a deadlift, and as you begin to stand, swing the kettlebell between your legs (see figure 6.10c). When the swing reaches its end point behind you, stand up completely, extending the ankles, knees, hips, and torso (see figure 6.10d). Sustain this pendulum swing through the duration of the set.
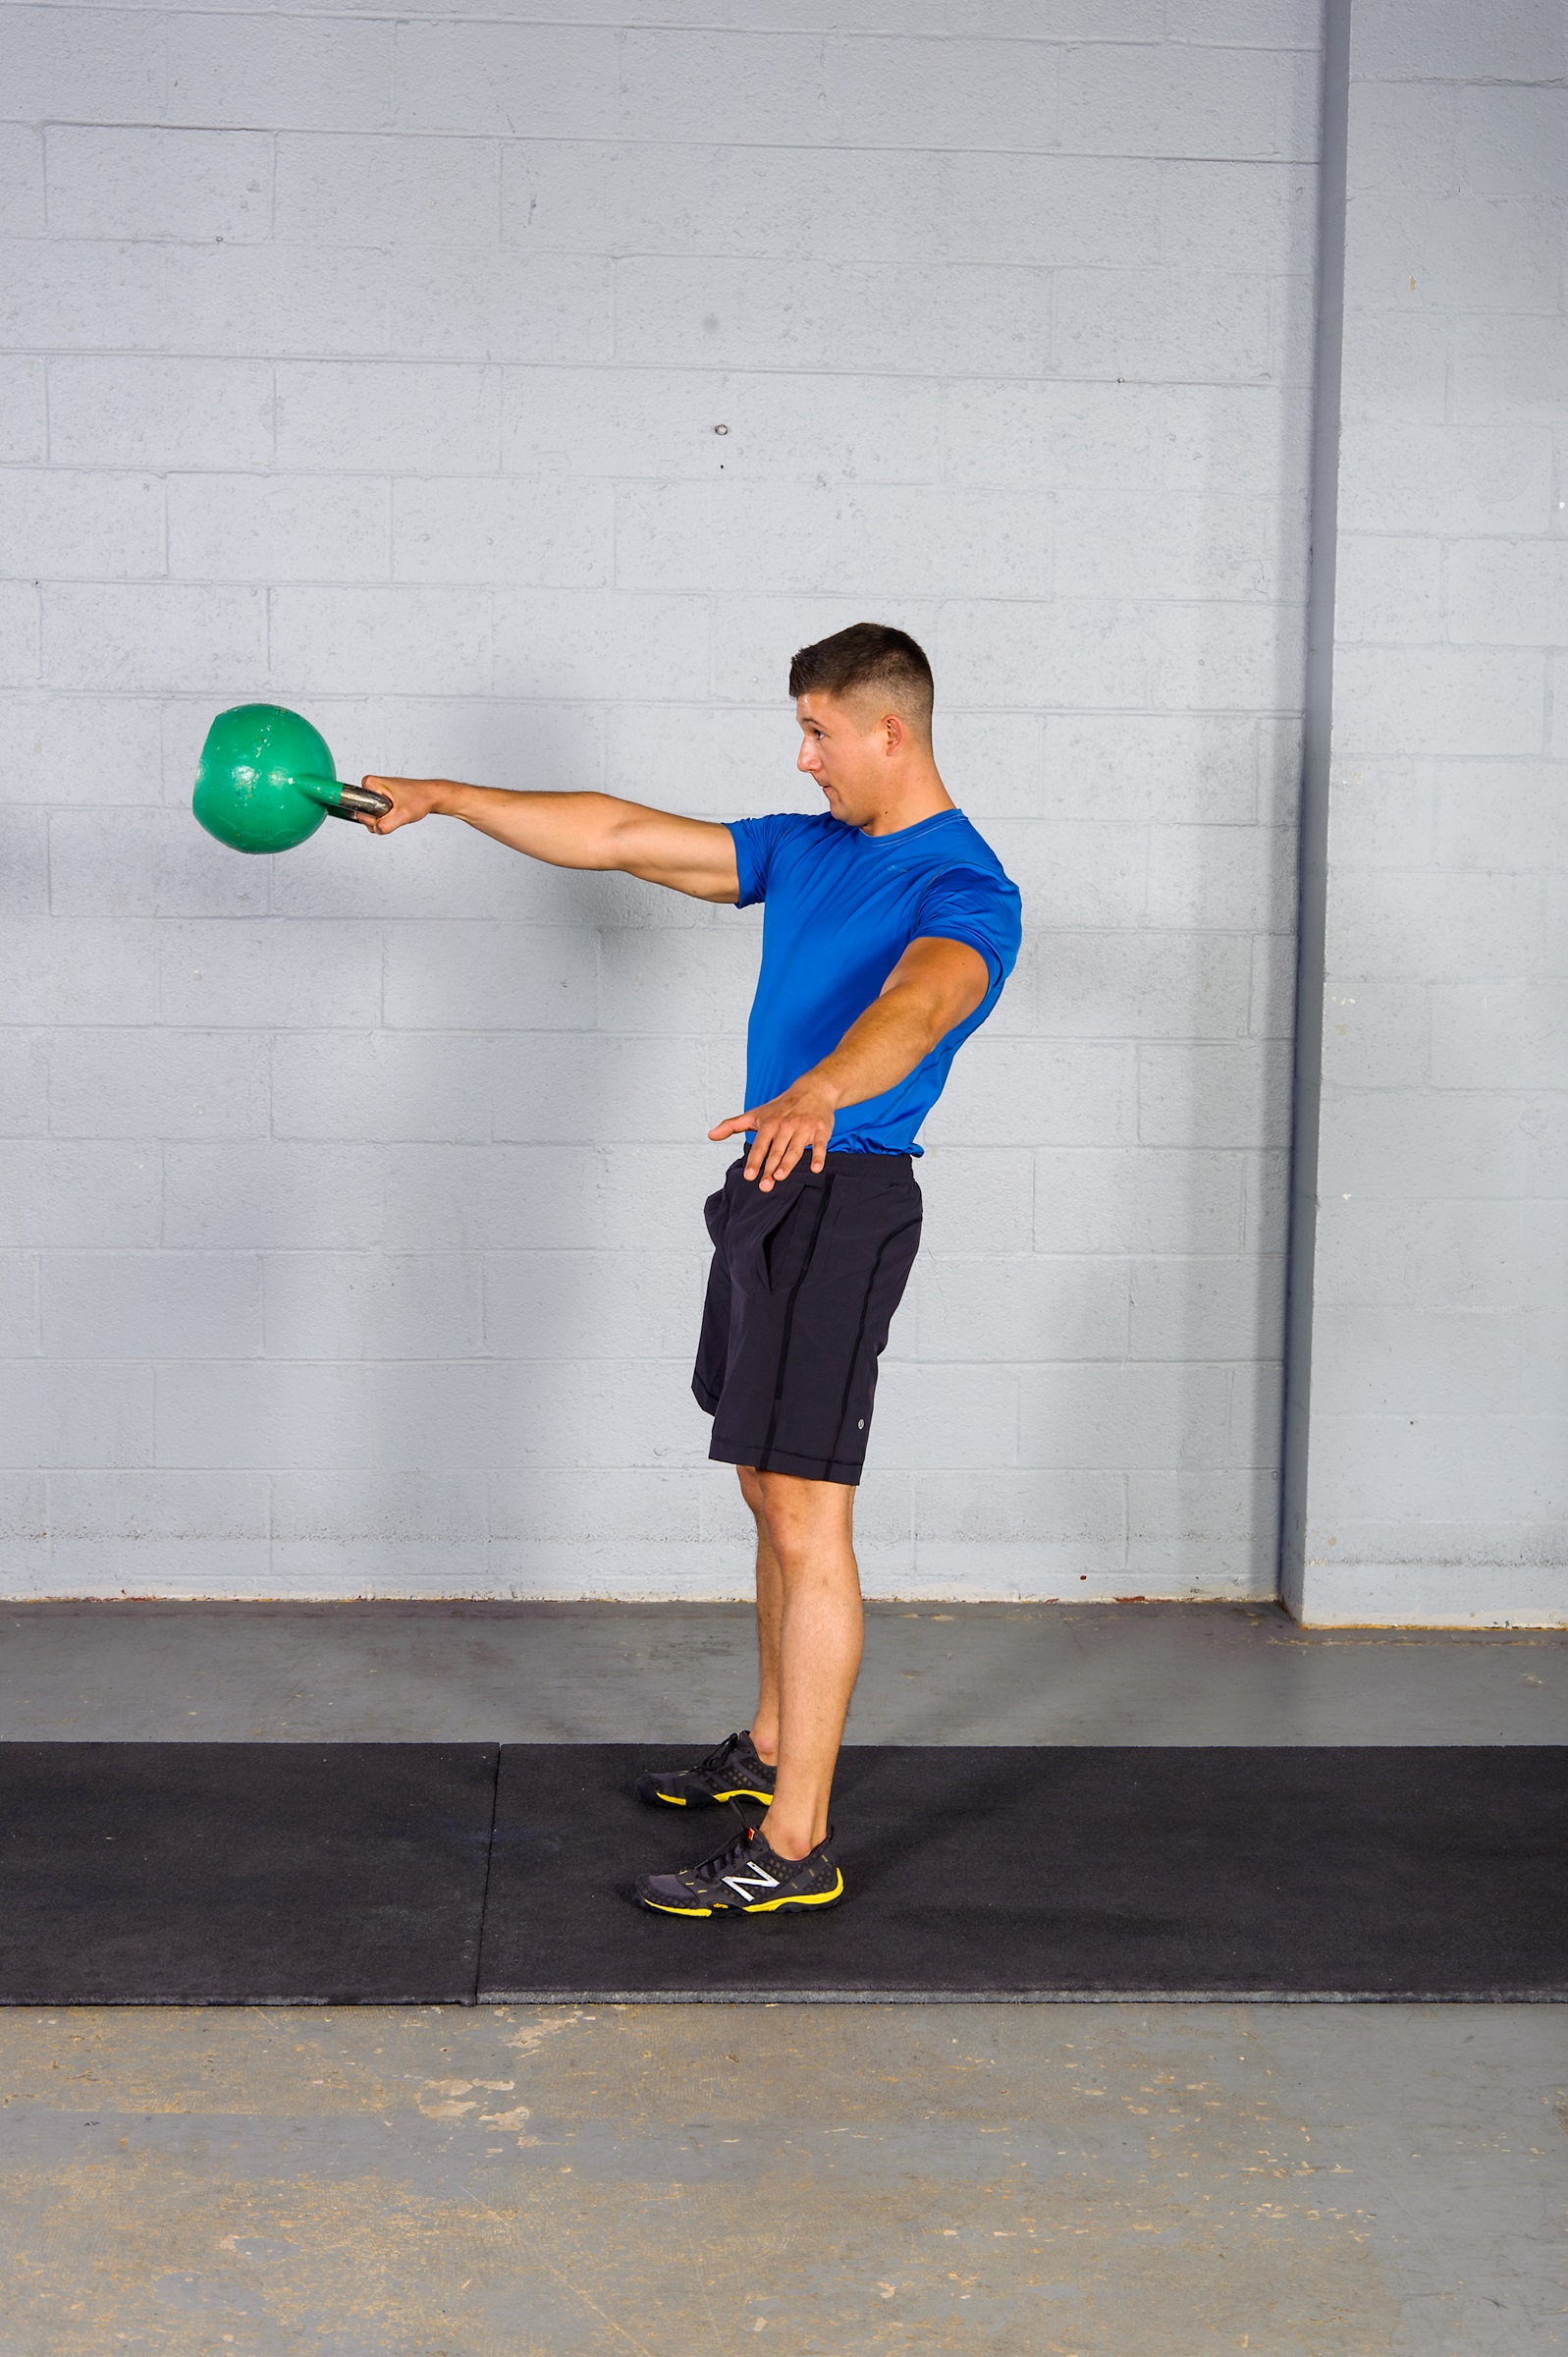
Figure 6.10d
When performing this exercise, use one or two cycles of anatomical breathing (a cycle is defined as one exhalation and one inhalation). There are two variations you can use: Exhale at the back of the downswing and inhale during the upswing (one breath cycle), or exhale at the back of the downswing, inhale, exhale as the kettlebell transitions from the horizontal to the vertical plane at the top of the forward swing, and inhale as the kettlebell drops again preceding the next backswing (two breath cycles for every one swing).
Key Principles
• The pendulum is a perfect analogy for a good kettlebell swing because it relies upon mechanical energy conservation in order to sustain the movement indefinitely. Swinging the kettlebell this way creates a more momentum-based movement, which allows for greater work capacity in addition to less stress on the lower back and grip via efficient deceleration of the bell during the downswing.
• Maximize the connection between the arm and torso on the upswing, ensuring optimal power transfer from the lower body to the kettlebell.
• Relax the arm completely and visualize it as a rope that starts at the base of the neck and ends at the fingertips.
• Deflect back via the hips at the top of the upswing to counterbalance the weight in front of the body and as a catalyst to complete hip extension. Maintain deflection as you drop the kettlebell into the downswing until you feel the triceps come into contact with the rib cage. At that point, softly absorb the downward force with a slight bend of the knees and ankles and then crease the hips into the pendulum spring mechanics.
Single Clean
The single clean is a natural progression from the swing and is the intermediary point between the swing and many of the overhead lifts. The clean introduces hand insertion, alignment points connected to the rack position, and positioning of the kettlebell in the hand in order to avoid injury and grip fatigue. It also teaches you how to use your legs to transmit vertical power from the lower to upper body. With practice, your clean becomes a smooth, rhythmic movement that you can sustain for extended lengths of time, although it may take hundreds of practice reps before it flows and becomes polished.

Figure 6.11a
Resting the kettlebell on the forearm is a distinguishing characteristic of kettlebells that makes them behave differently than dumbbells and makes them effective for developing the fitness that comes with high-repetition resistance training. By placing most of the load on the forearm, the muscles of the hand and grip are able to relax.
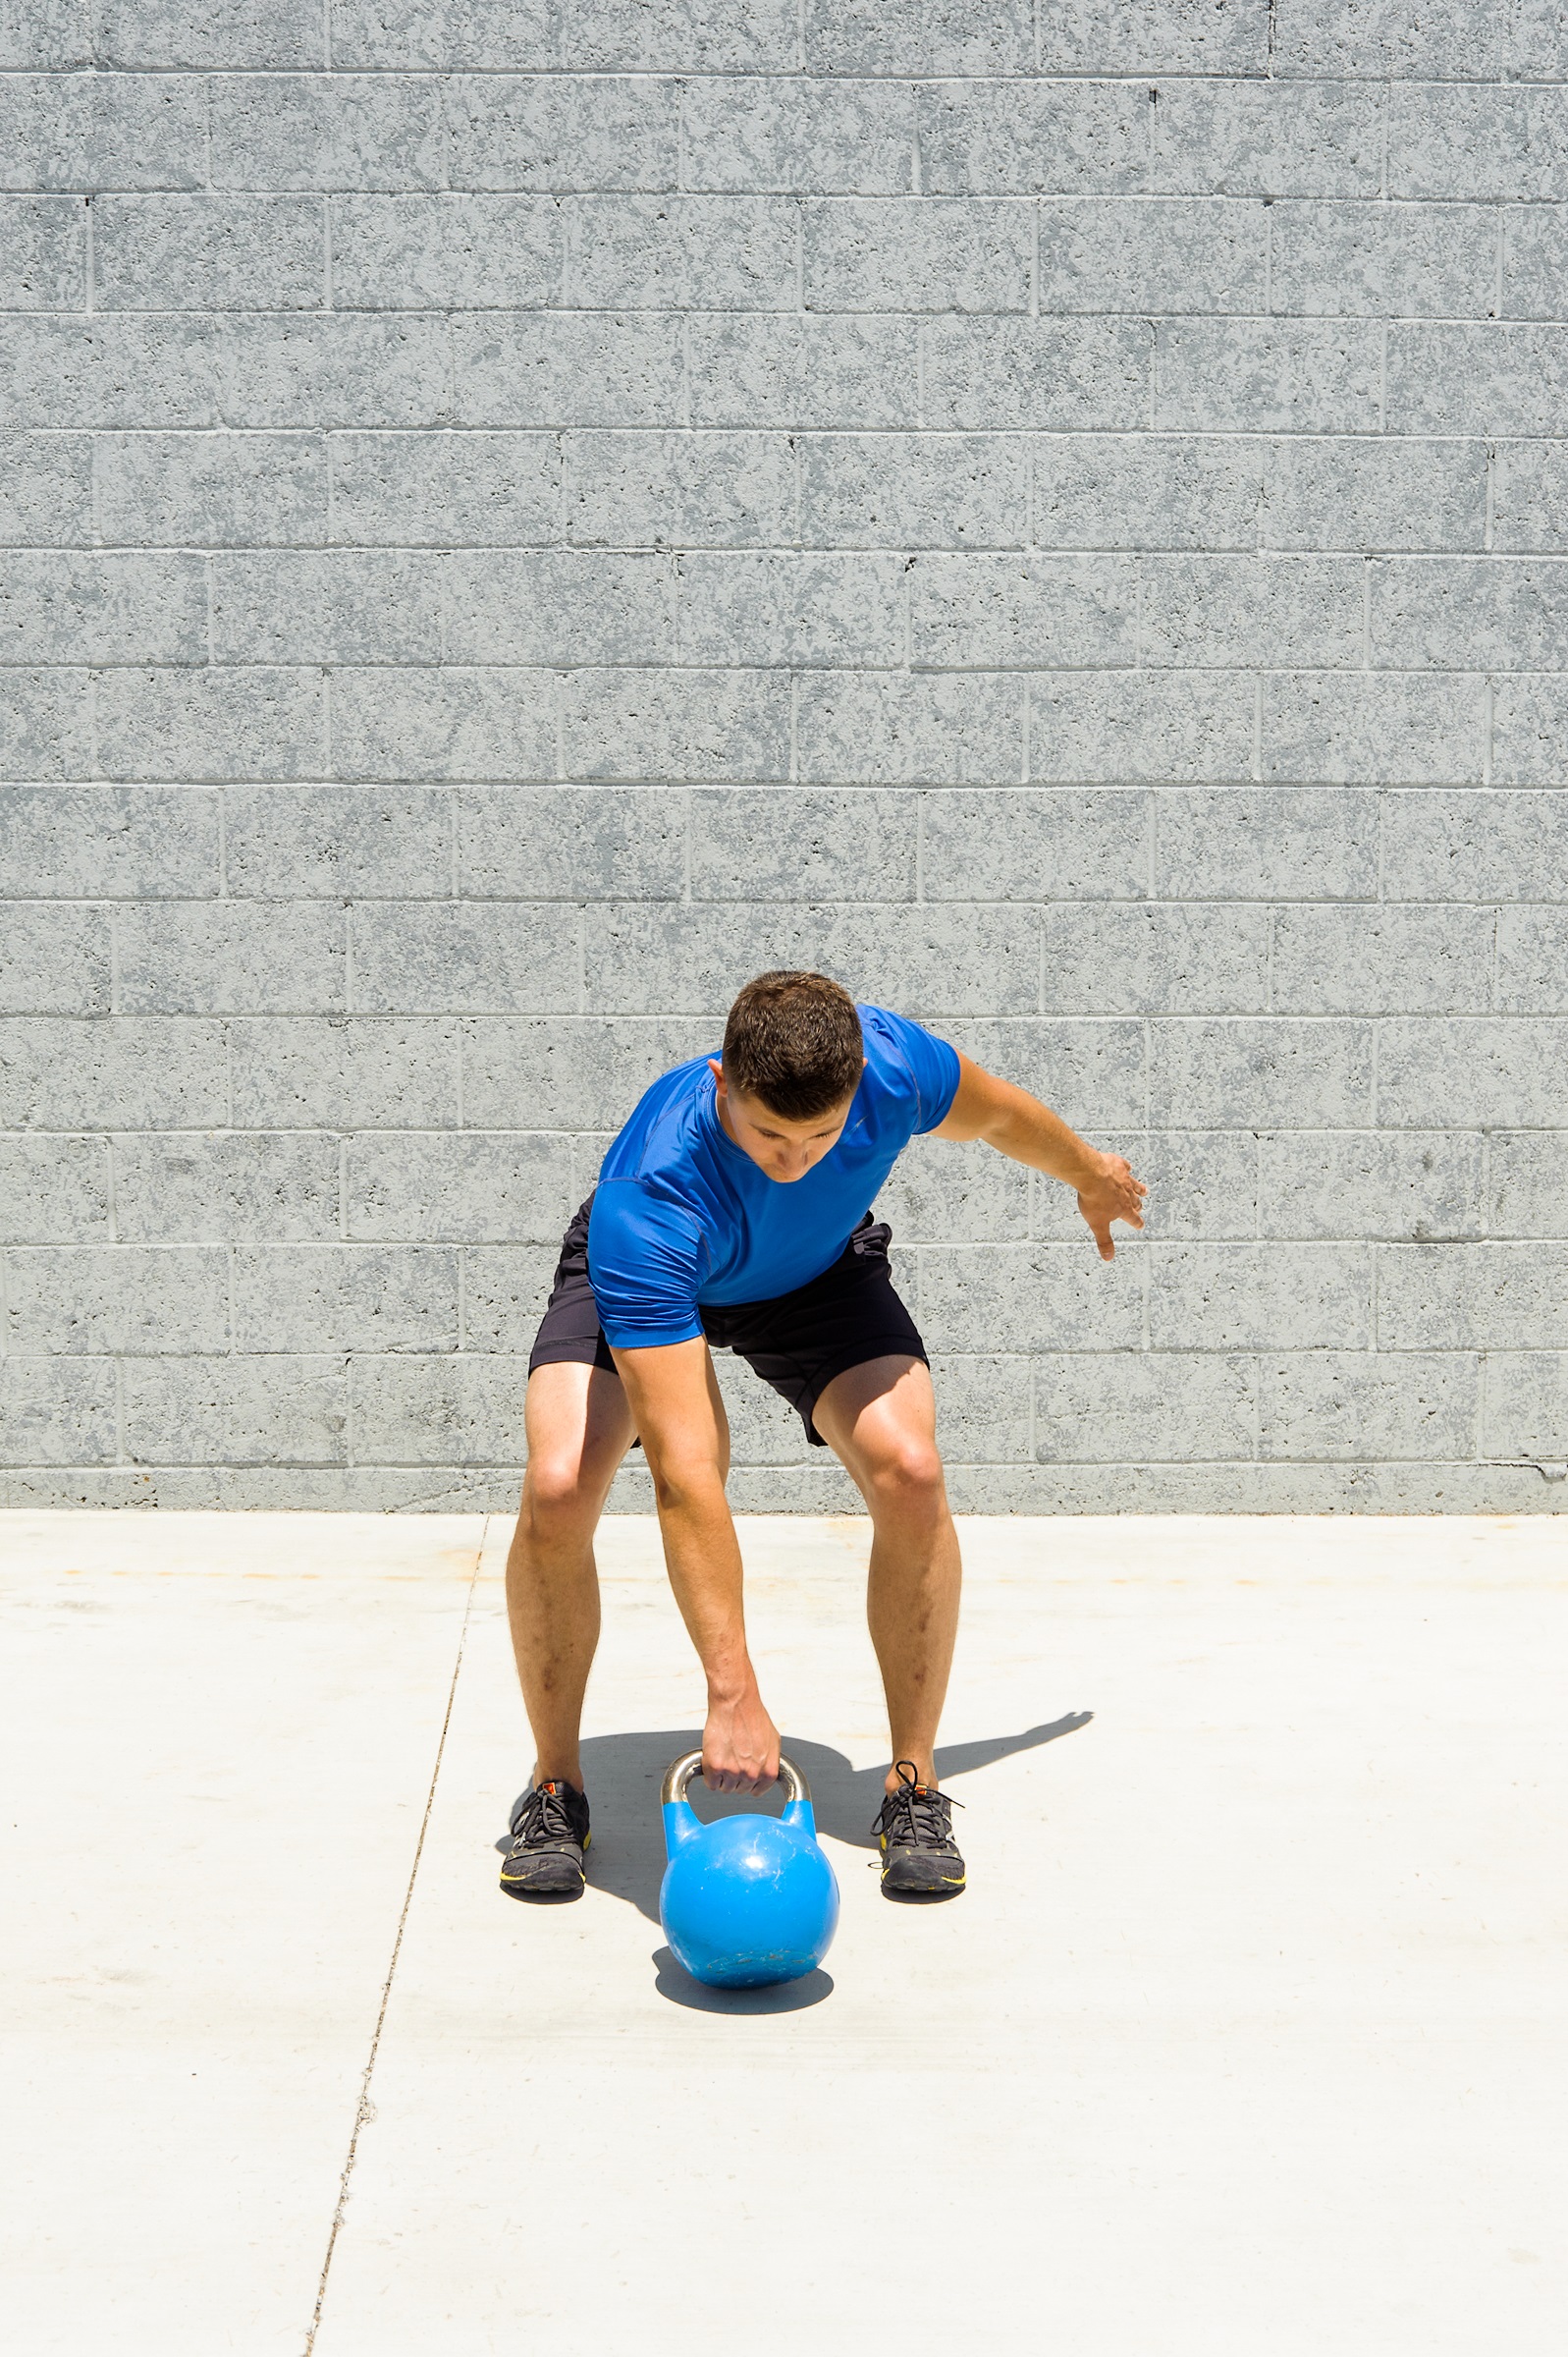
Figure 6.11b
It takes practice before the kettlebell will move smoothly in your hand and into position. Sometimes you will have bad reps and the kettlebell will crash into your forearm. To make this learning process a little kinder, you can wear wrist wraps or wristbands. In time your technique will become more polished and the kettlebell will just float into position on your arm in cleans and snatches, and at that point you may prefer to not use any wraps at all. However, it is an option for those with more tender arms—no sense giving yourself bruises if you don’t need to.
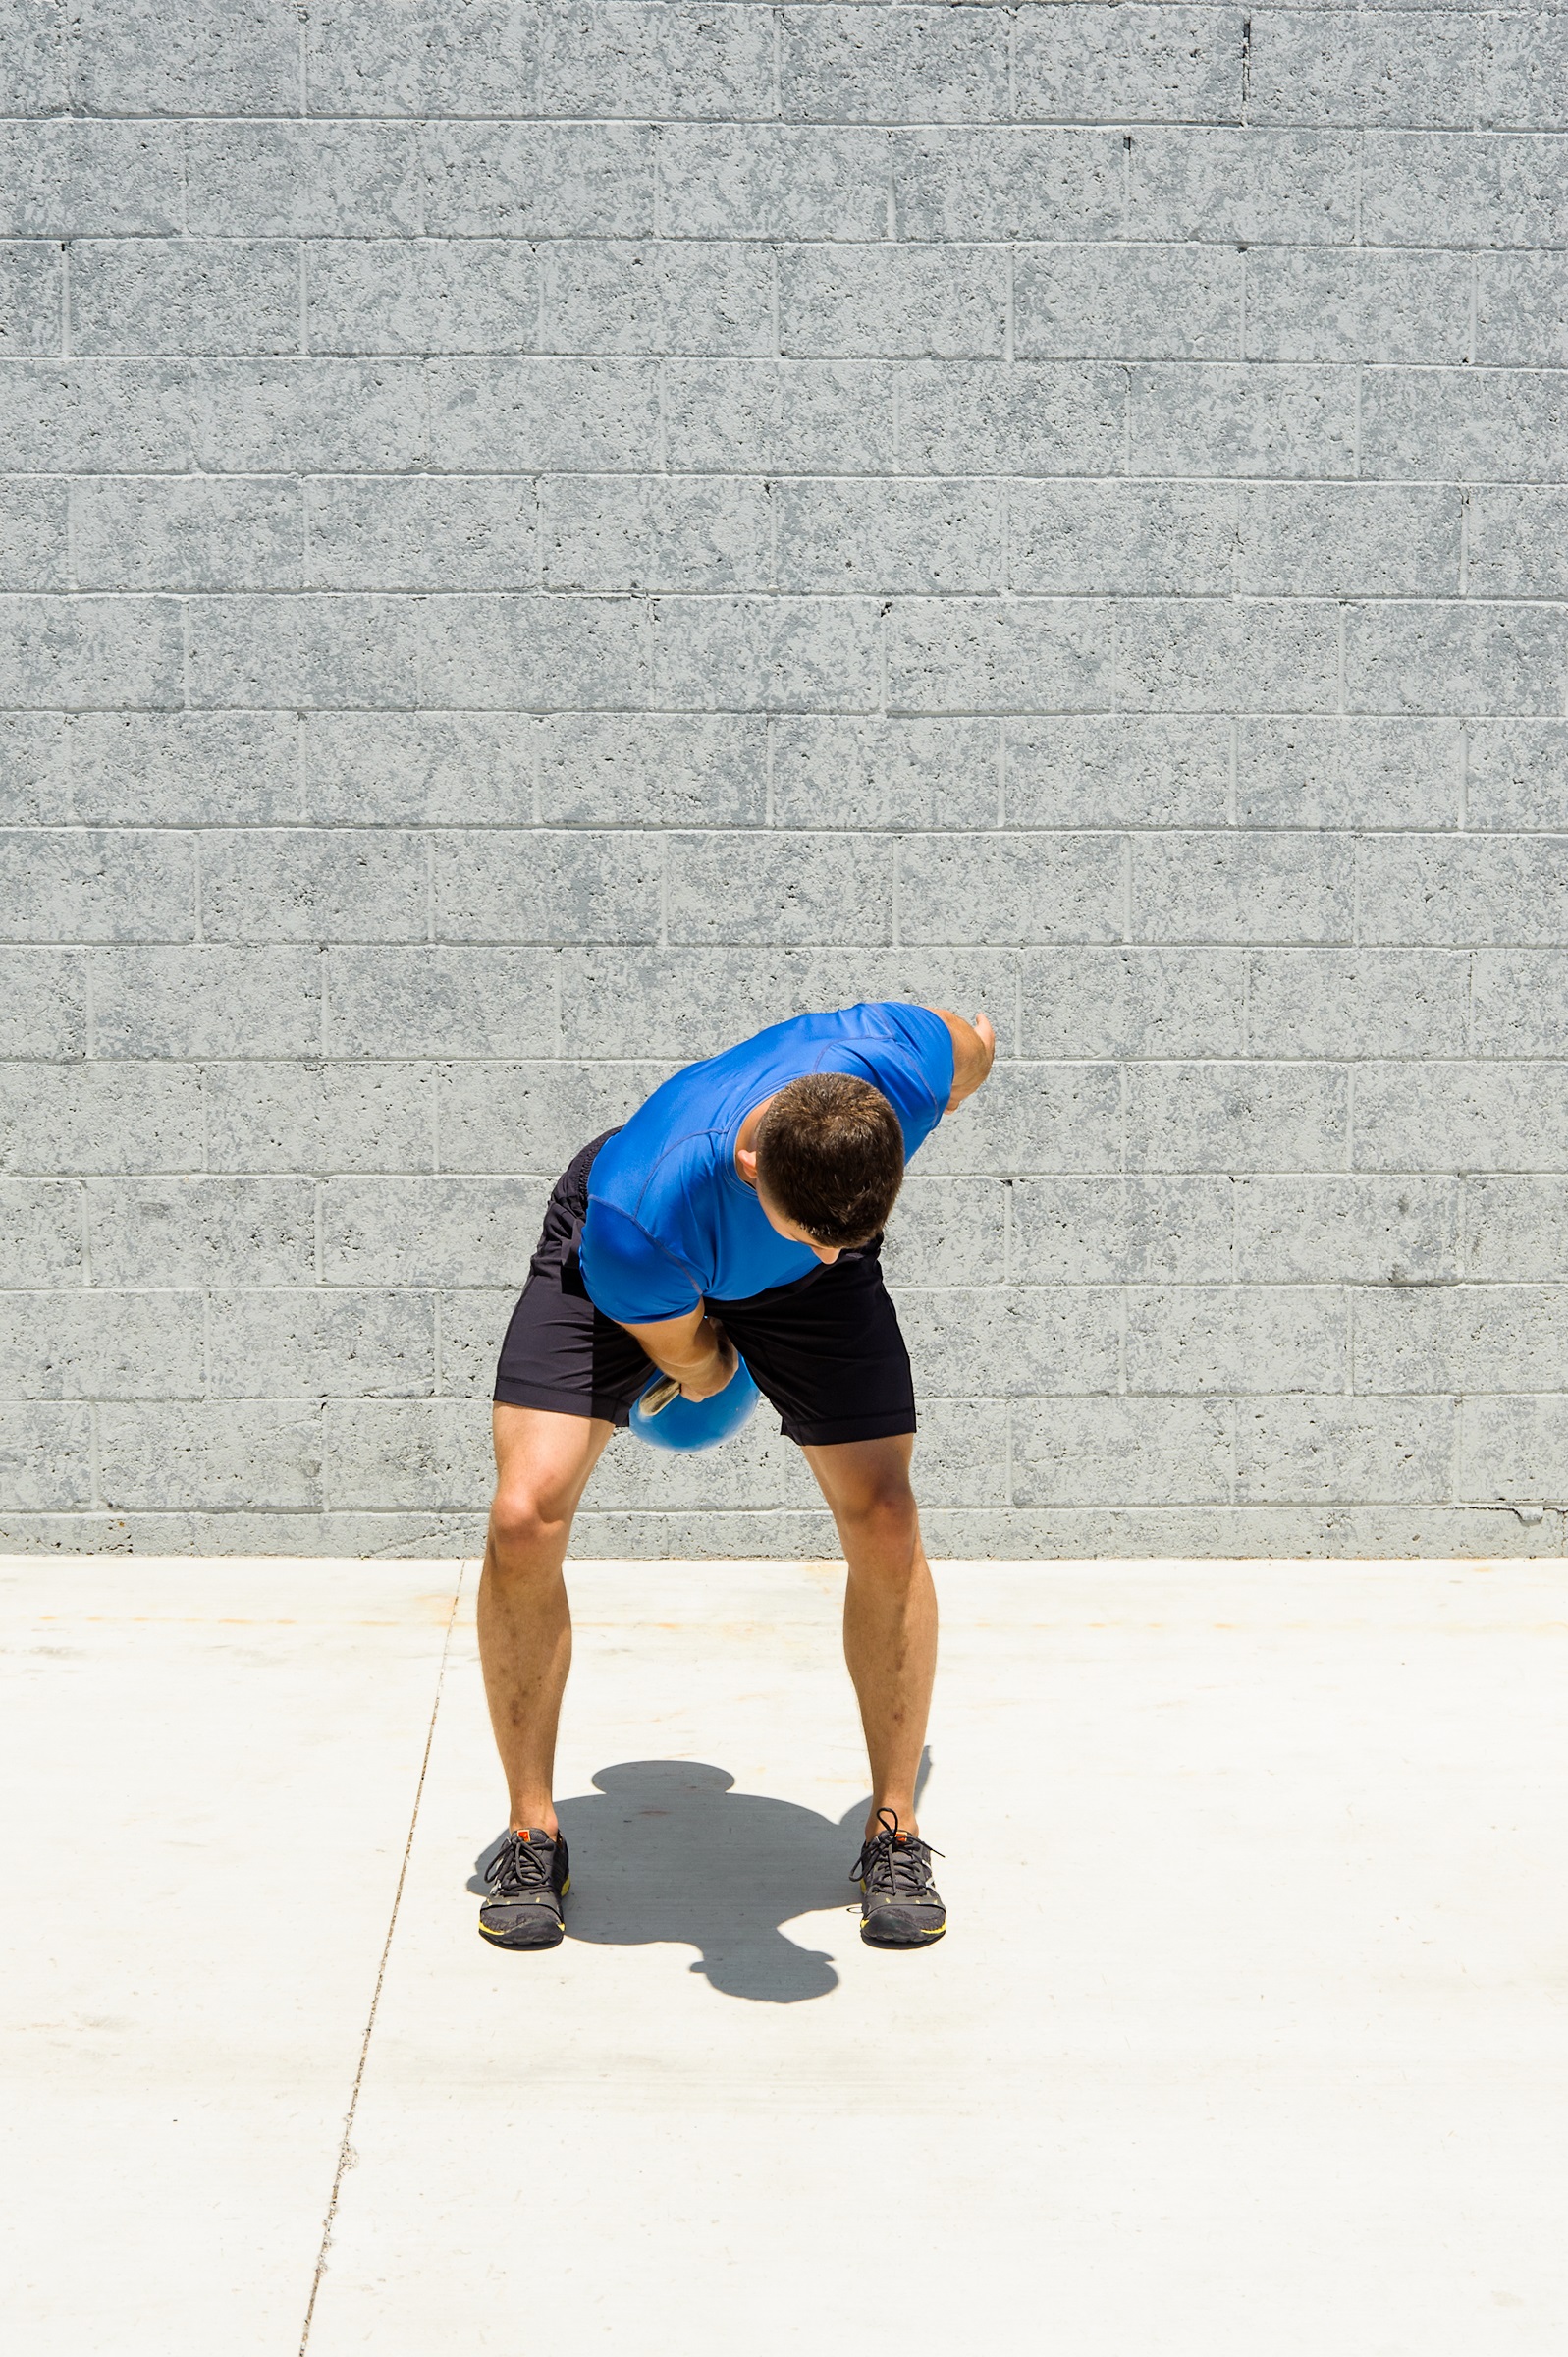
Figure 6.11c
With the kettlebell on the floor, sit back with your hips and grip with the handle with the fingers of one hand (see figure 6.11a and b). Swing the kettlebell back through your legs as you did in the one-handed swing (see figure 6.11c) and as it swings forward, keep your forearm braced against your body (see figure 6.11d). During the swing, your arm comes away from the body as inertia pulls the kettlebell forward and up.
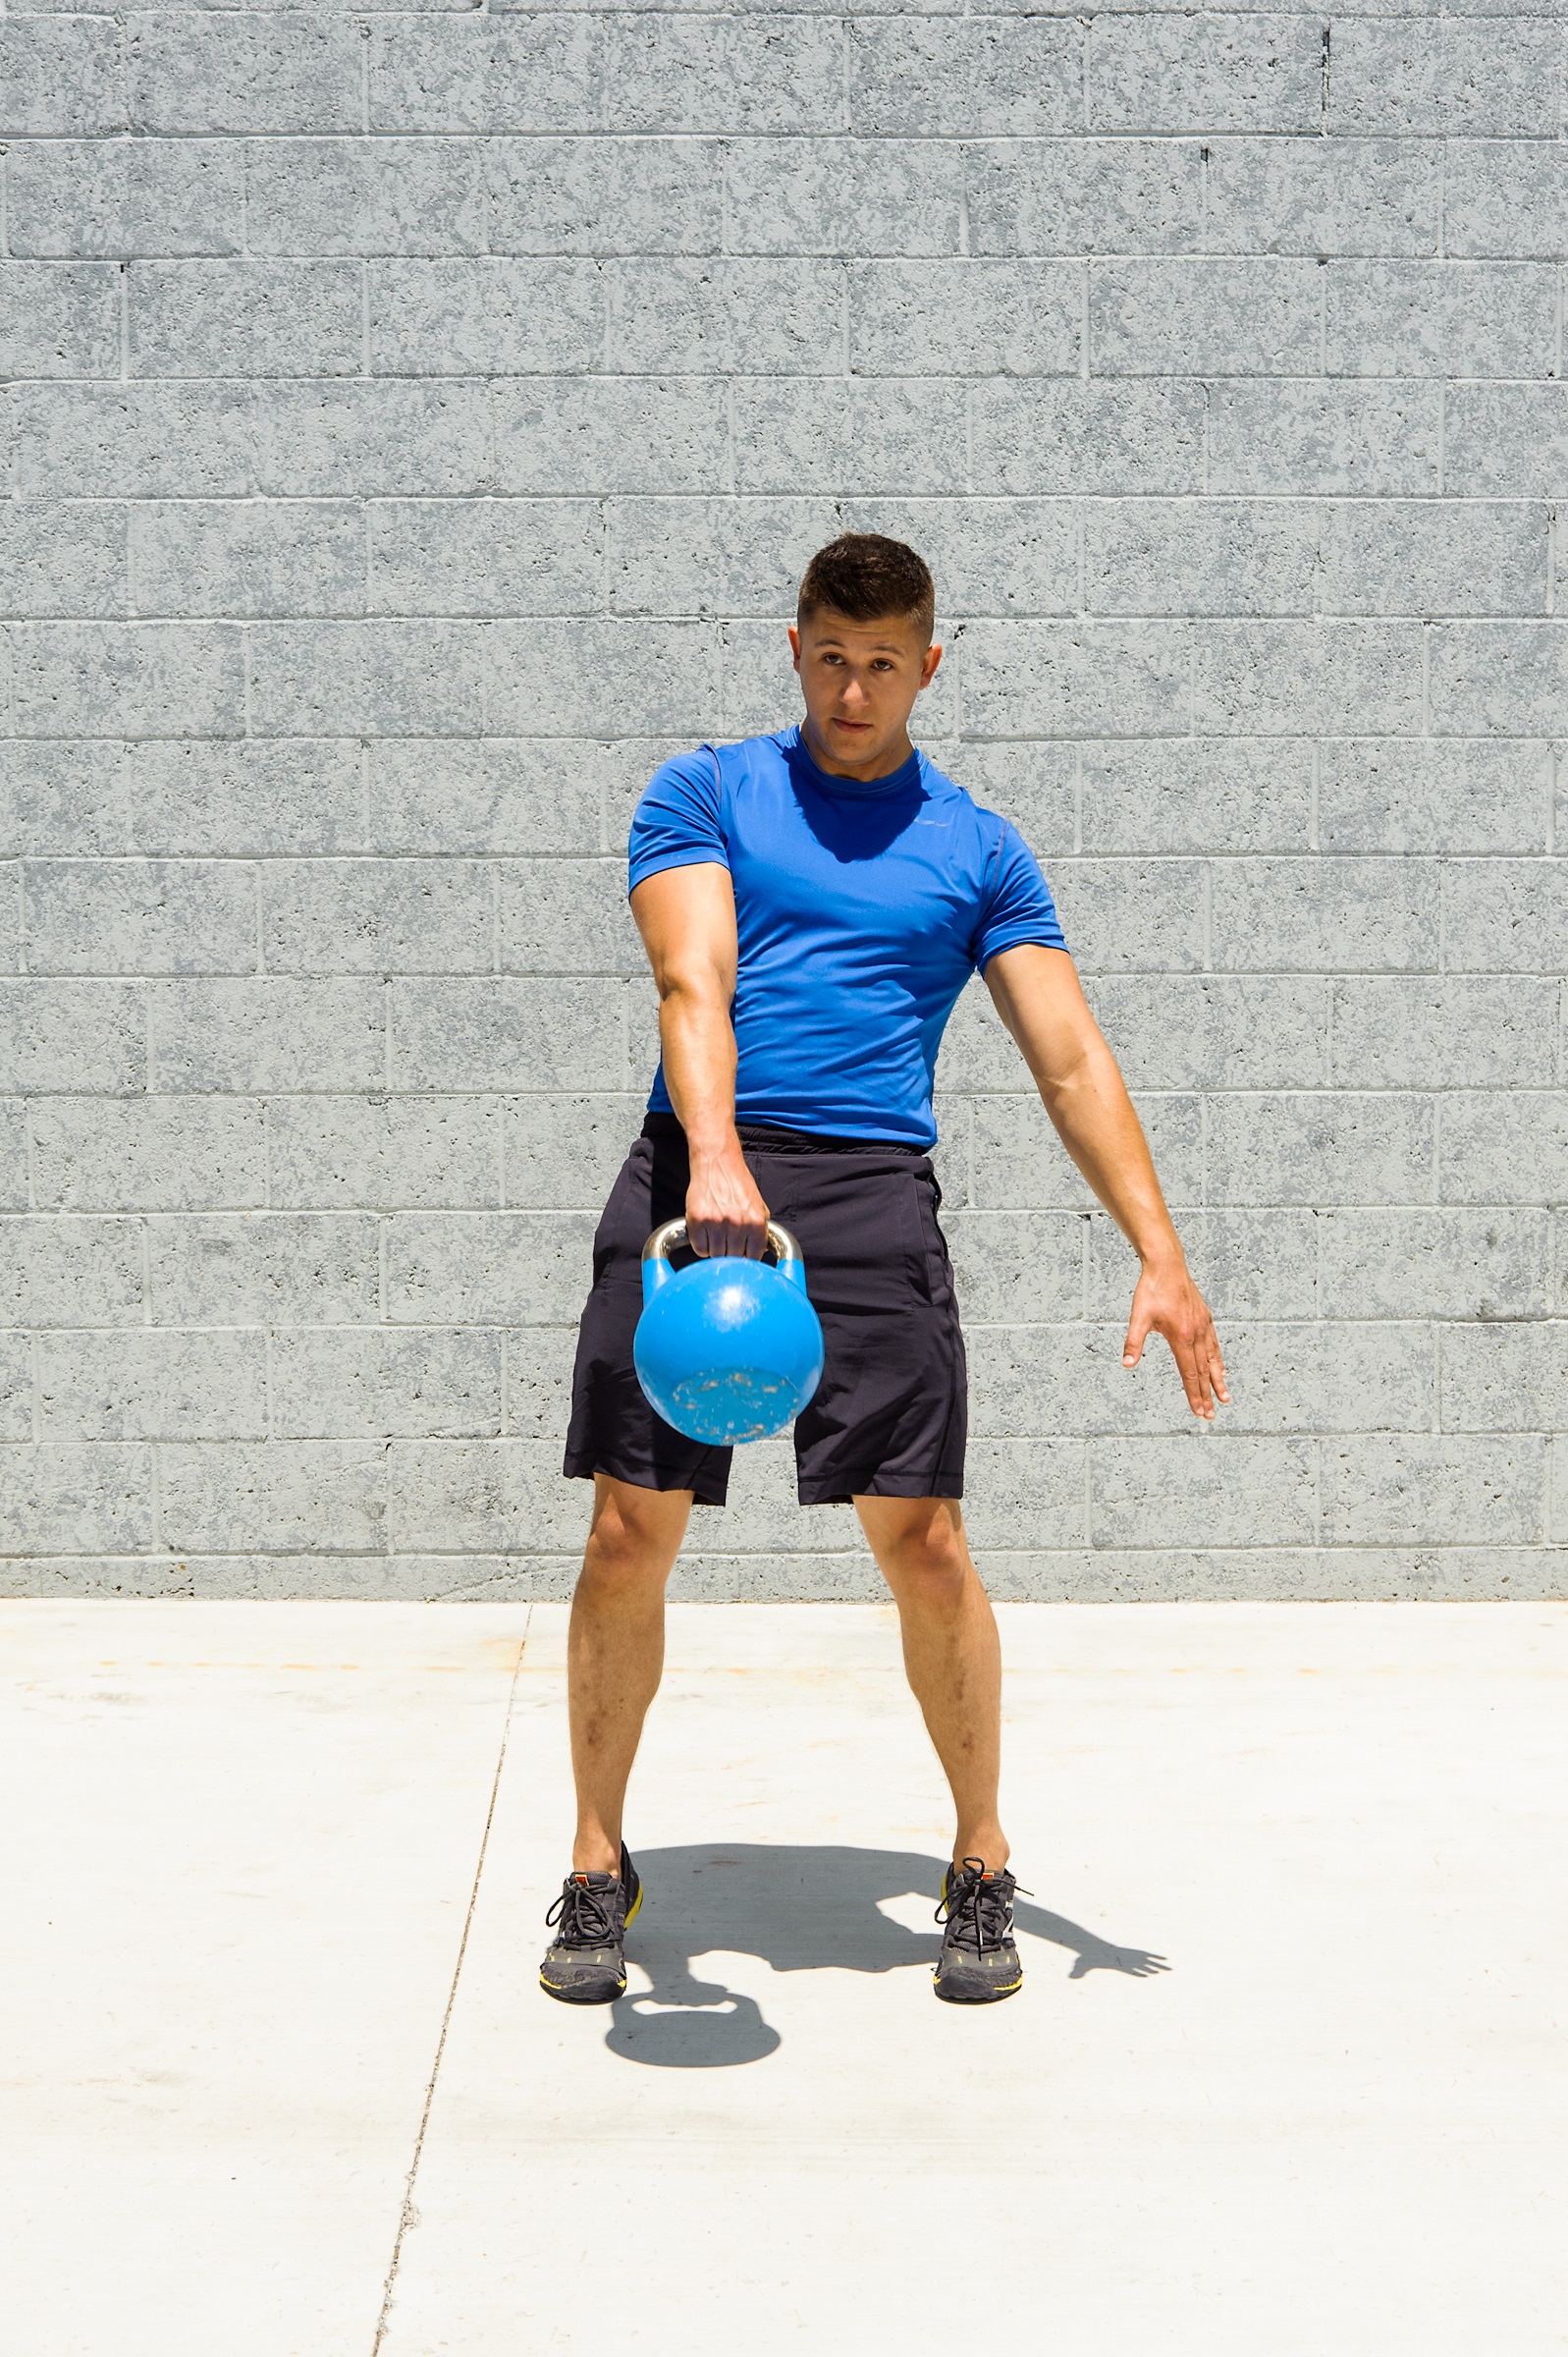
Figure 6.11d
During the clean, on the other hand, the arm does not disconnect from body, and at the point where the arm would disconnect during the swing, it instead moves vertically along the front of your body. Imagine you are standing inside a chimney. The walls of the chimney block you so that you cannot move out or to the side; you can only move the kettlebell up and down the chimney wall. When the hips reach forward extension, pull with the hip on the working side and give a gentle tug with your trapezius on the same side, pulling the kettlebell up the chimney (see figure 6.11e).

Figure 6.11e
Before the kettlebell settles to the chest, loosen your grip and open your hand to insert your fingers as deeply into the handle as you can at a curved angle until the medial portion of your forearm, the ulna, blocks you from inserting the hand any further (see figure 6.11f ).
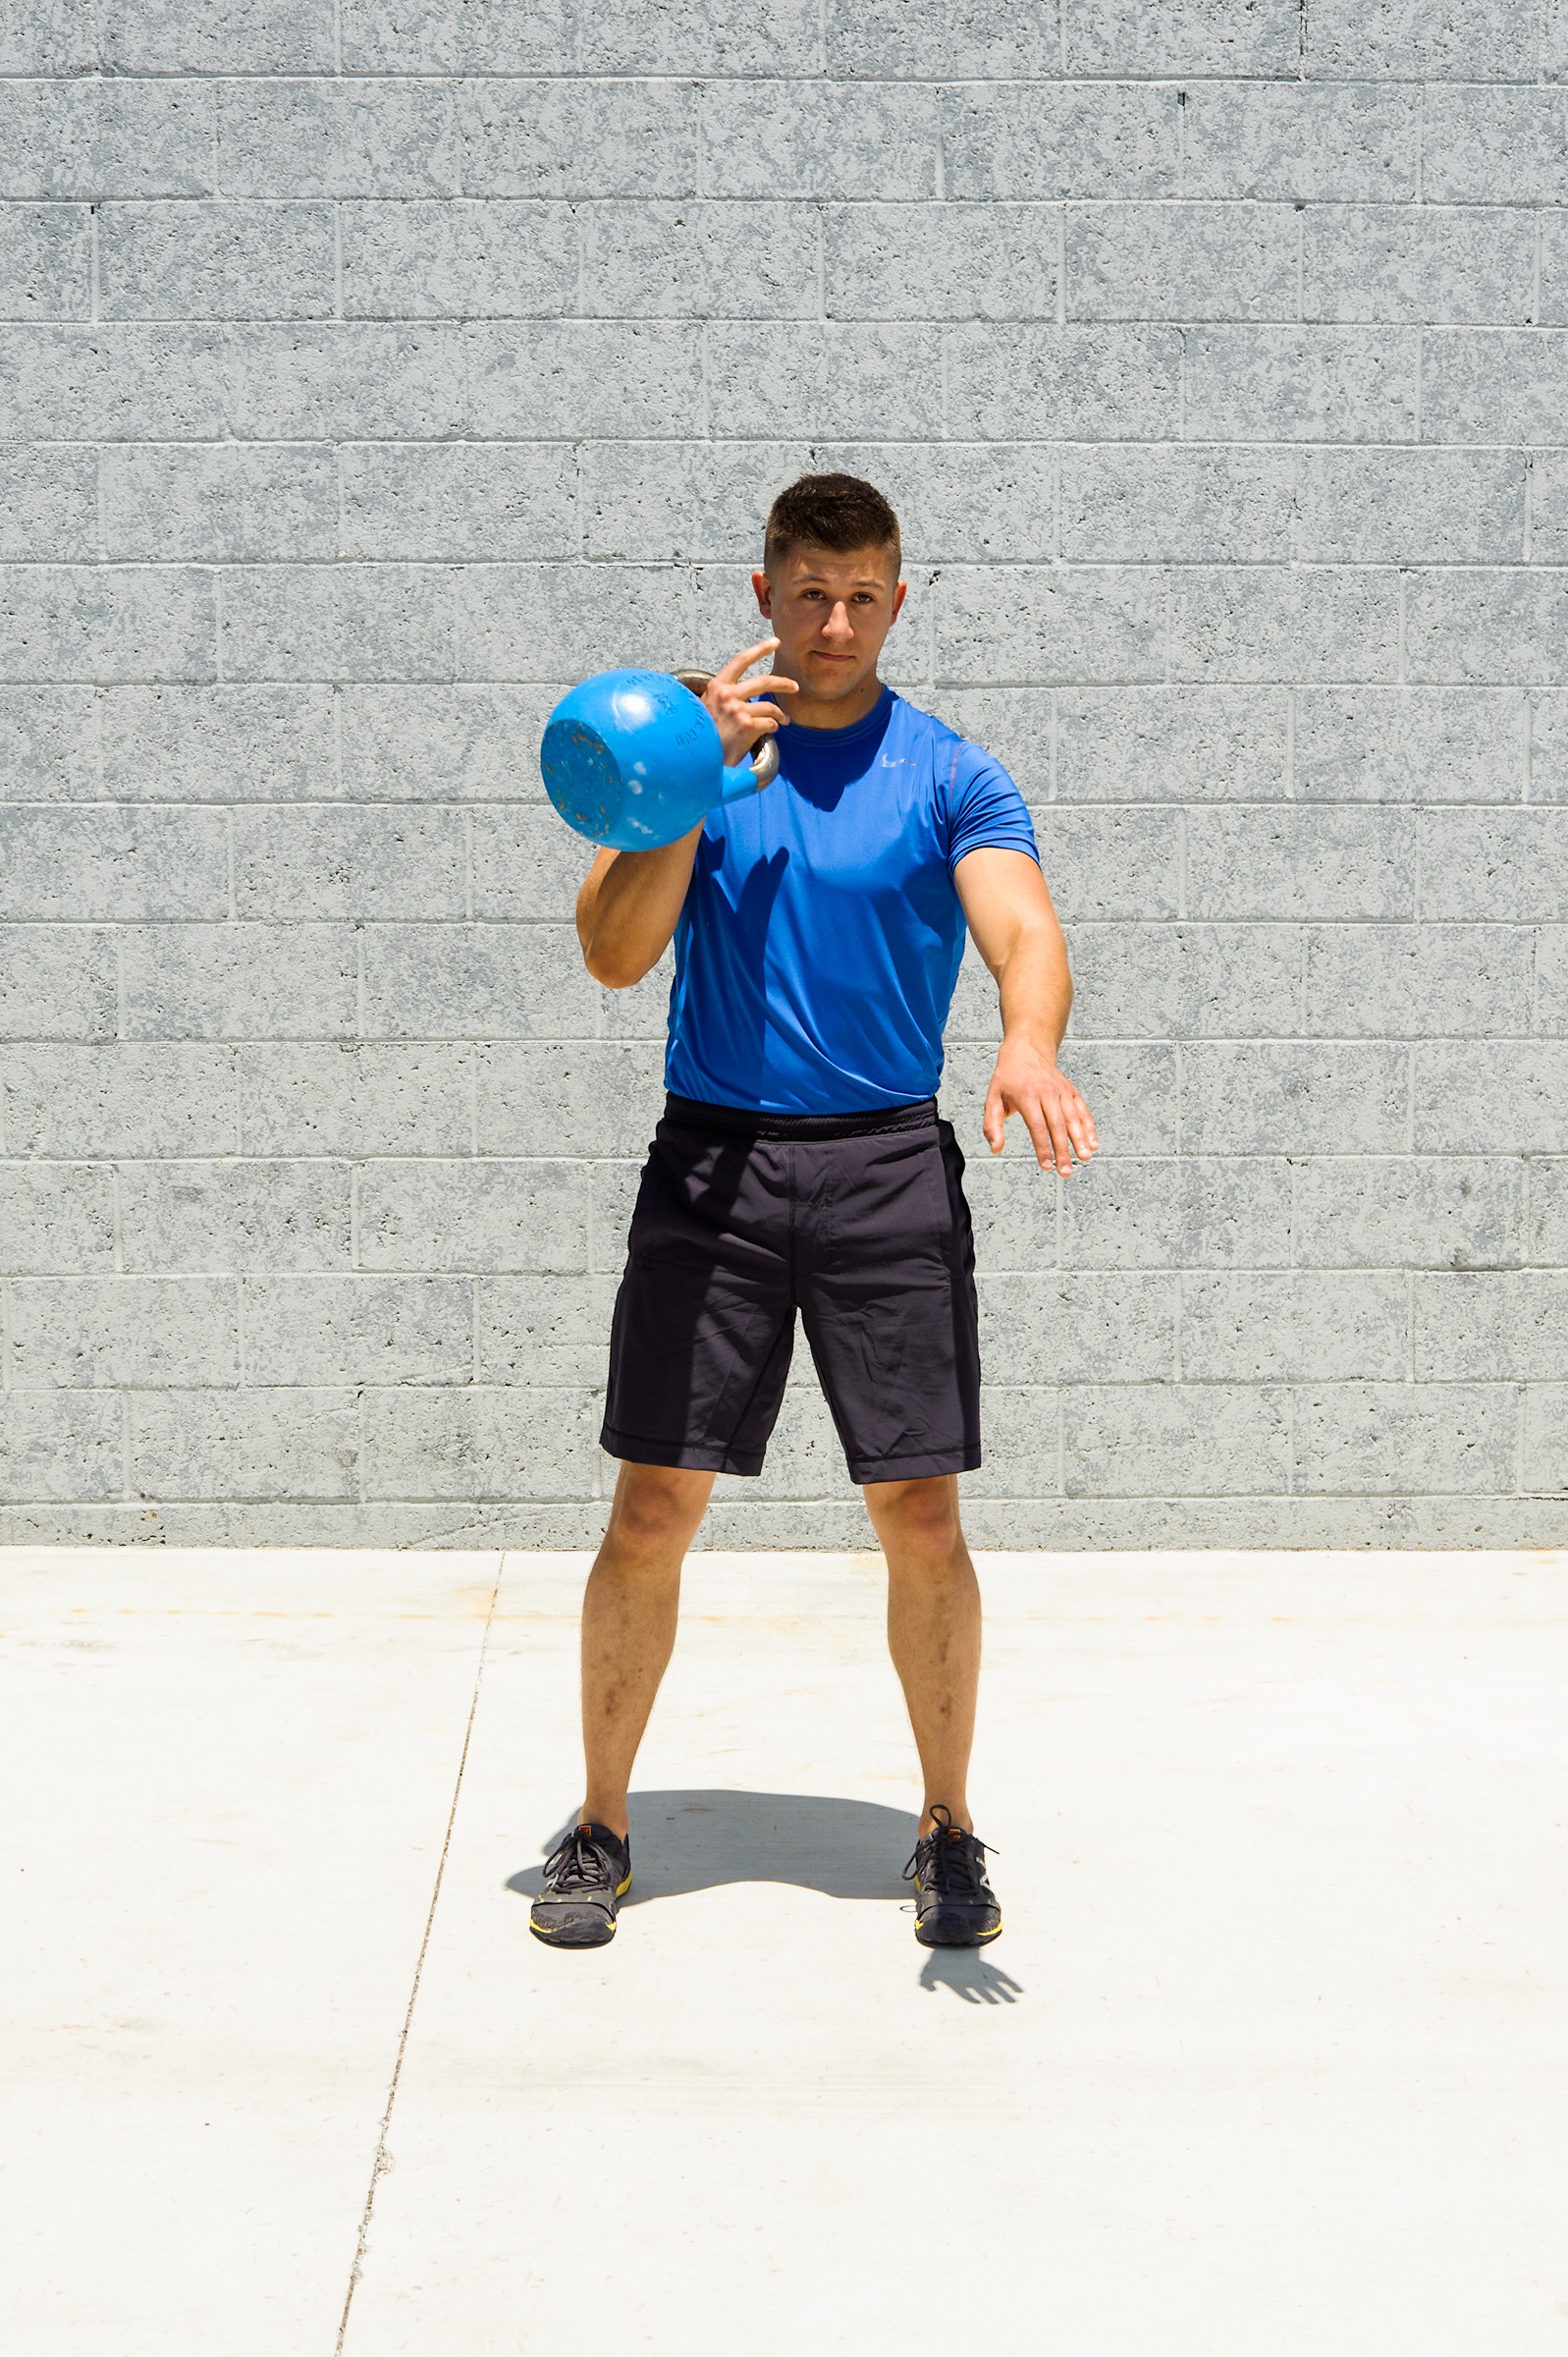
Figure 6.11f
Complete the vertical pull by letting the kettlebell rest on your chest and arm (see figure 6.11g) into what is called the rack position. This is the top position of the clean. Here are the key alignment points in the top rack portion of the clean technique:

Figure 6.11g
• The kettlebell is medial to the lateral shoulder (toward the midline). If the kettlebell shifts away from the midline, it will bring the load outside your base of support and require more effort to hold.
• Find the ideal placement of the kettlebell between your chest and shoulder and your upper arm. One useful tip is to put the kettlebell in the triangle that is formed with the elbow, forearm, and chest. Keep the kettlebell between the forearm and the chest by moving the upper body back and rotating the palm away from you to about a 45-degree angle.
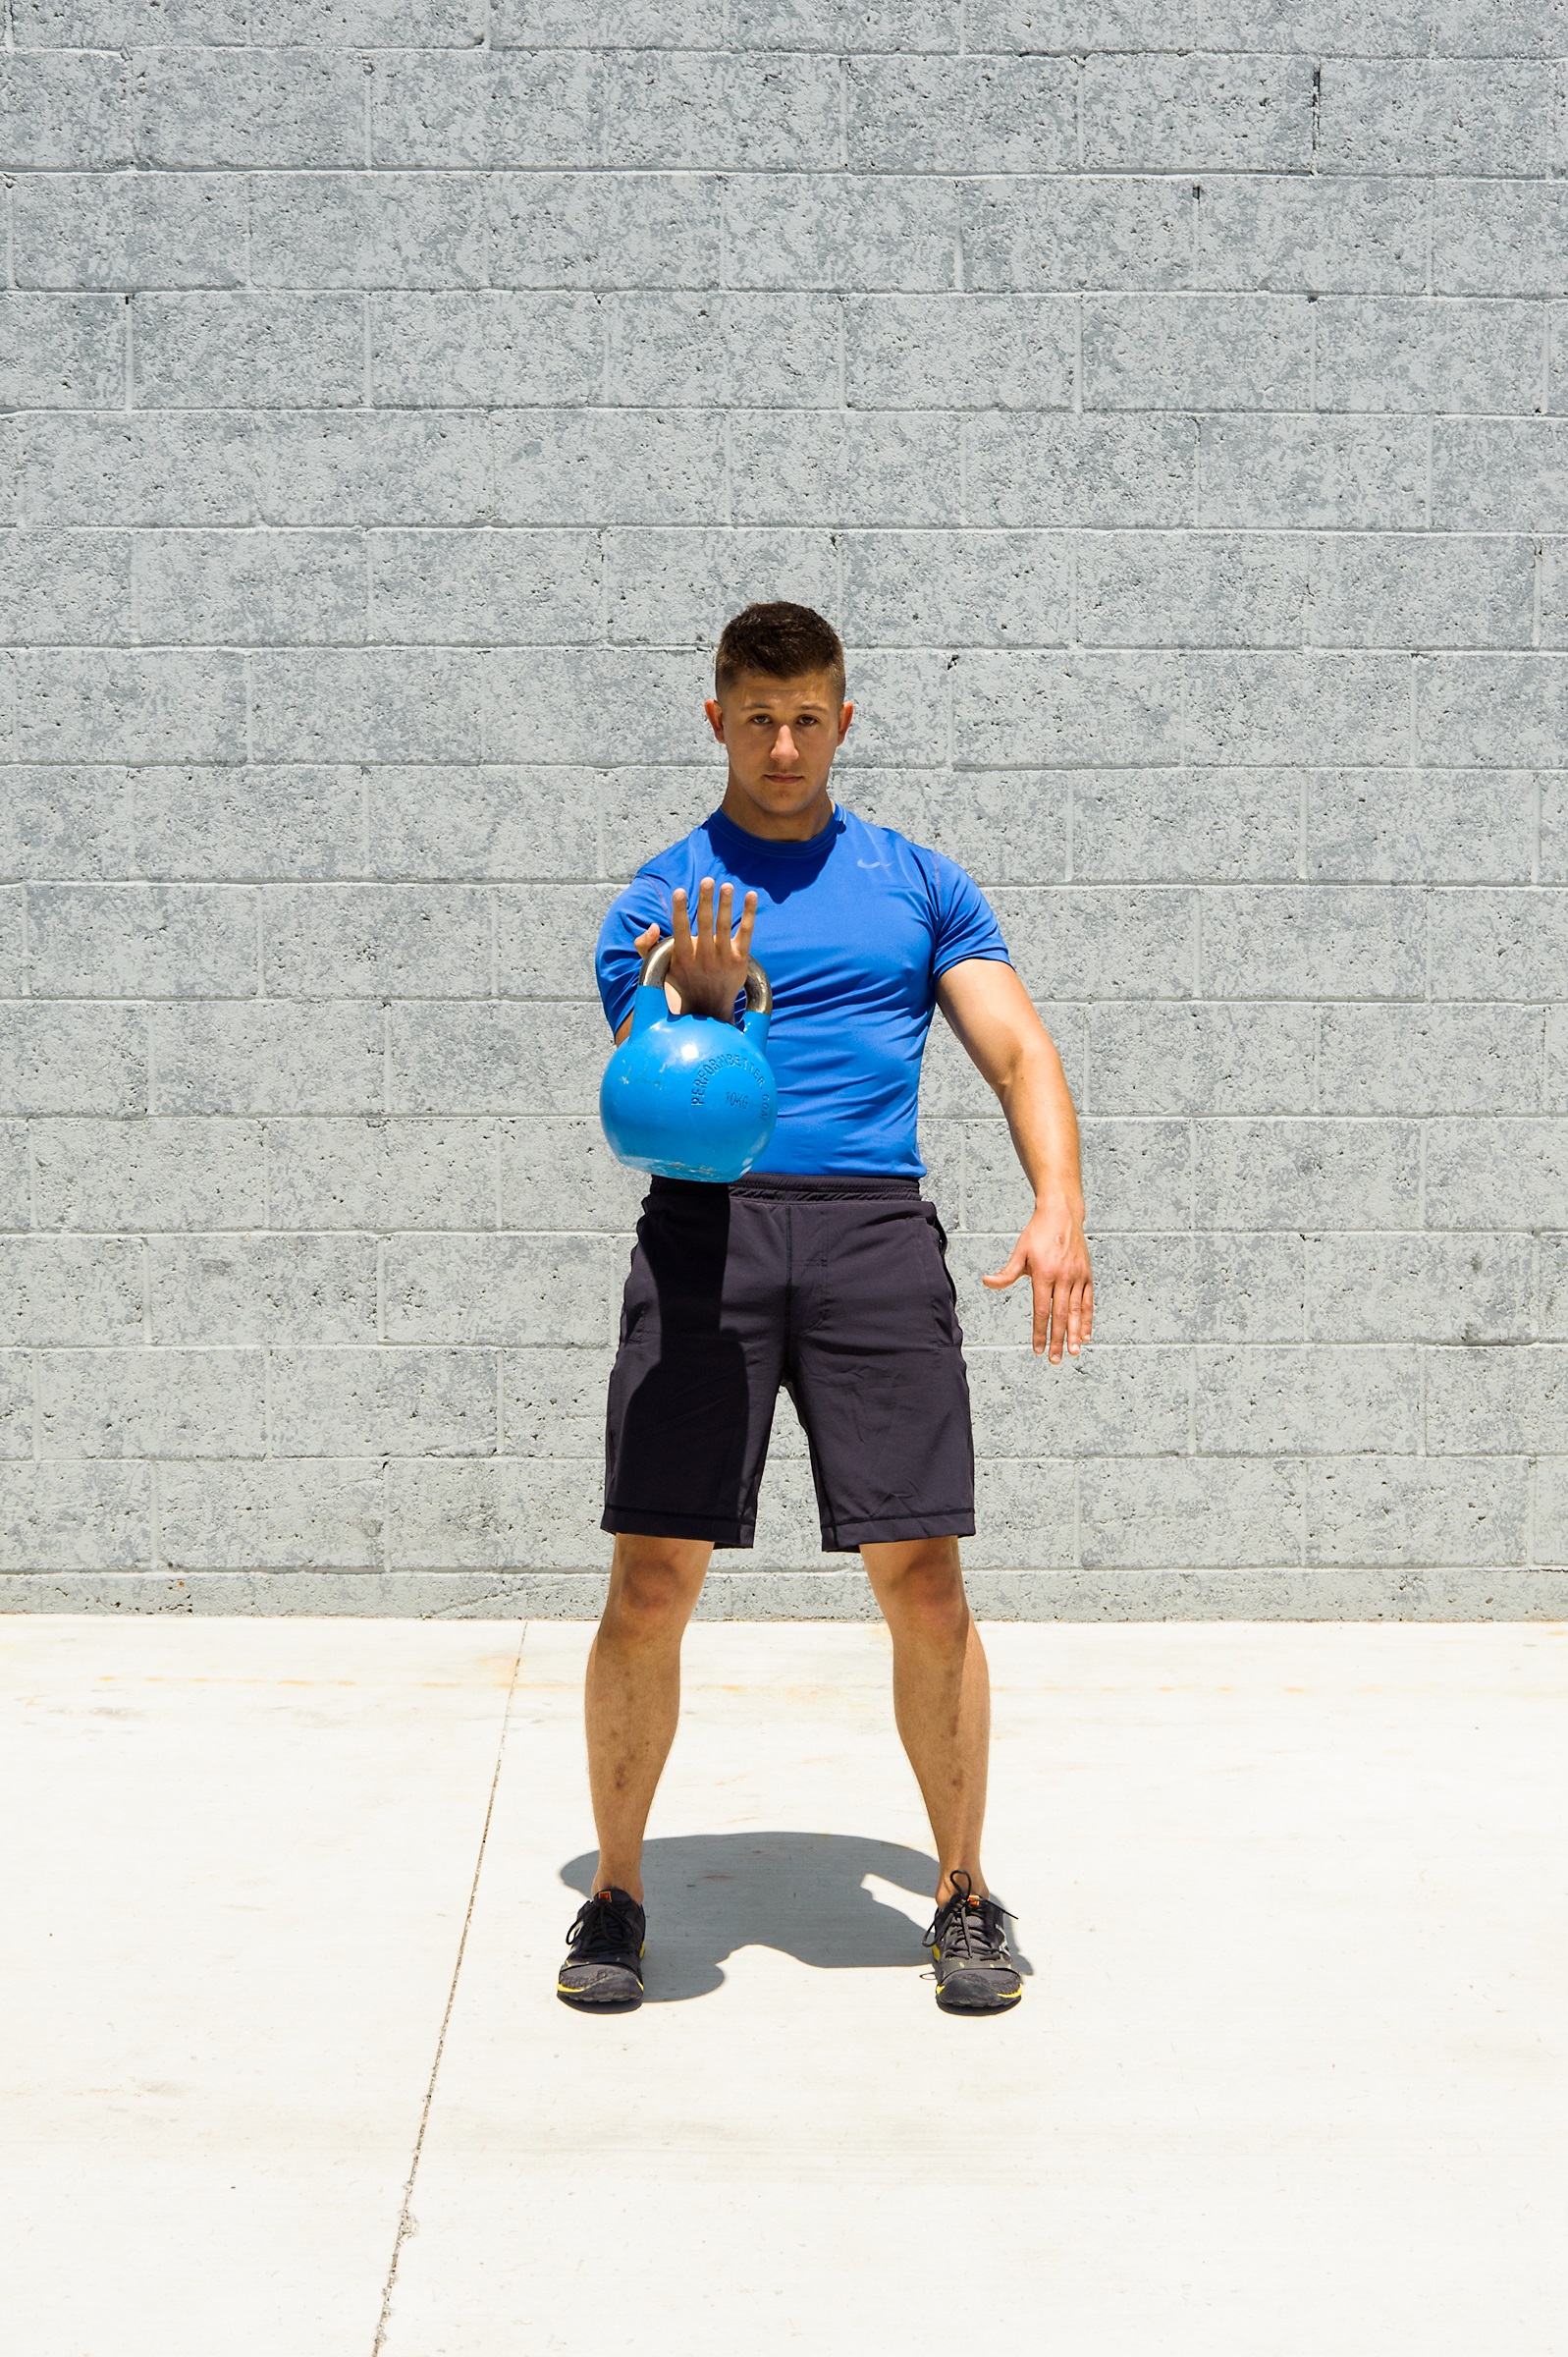
Figure 6.11h
This rack position works well with the single kettlebell but is much more difficult with double kettlebells because of the flexibility demands and limited range of motion of the doubles. The goal of the rack position is to be comfortable and stable in the position and able to control the top portion of the clean. Now complete the lift by turning your palm faceup and deflecting the force by moving the shoulders back (see figure 6.11h).

Figure 6.11i
Remember you are standing inside a chimney, so the kettlebell can only move down, not forward. Your elbow stays braced to your body. As the kettlebell is falling, just before the elbow reaches full extension, pull the hand back to catch with the fingers, then tighten the grip to complete the backswing (see figure 6.11i). As in the swing, you can use any of the three positions in the bottom portion of the clean—thumb forward, thumb backward, or neutral thumb. Continue this smooth pendulum motion throughout the set.
When performing this exercise, use anatomical breathing with three or more breathing cycles. Starting from the rack position, inhale as you deflect back and drop the kettlebell into the downswing, exhale at the back of the downswing, inhale during the transition into the forward swing, exhale at completion of the forward swing, inhale with hand insertion, and exhale as the kettlebell lands in the rack position. This equals three breath cycles. During a long set, or anytime you are very tired during a set, you can take additional recovery breaths while the kettlebell is resting in rack position.
Key Principles
• Begin hand insertion at approximately hip level and ensure that the angle of the hand as it begins insertion is 45 degrees. Note that hand insertion is also used in the snatch and many other lifts. The starting and ending of each rep use the same hand position as the swing, and the hand moves in and out of the kettlebell during the up and down phases of the movement.
• Experiment with a variety of thumb positions to find the configuration that feels most comfortable for you.
Single Press
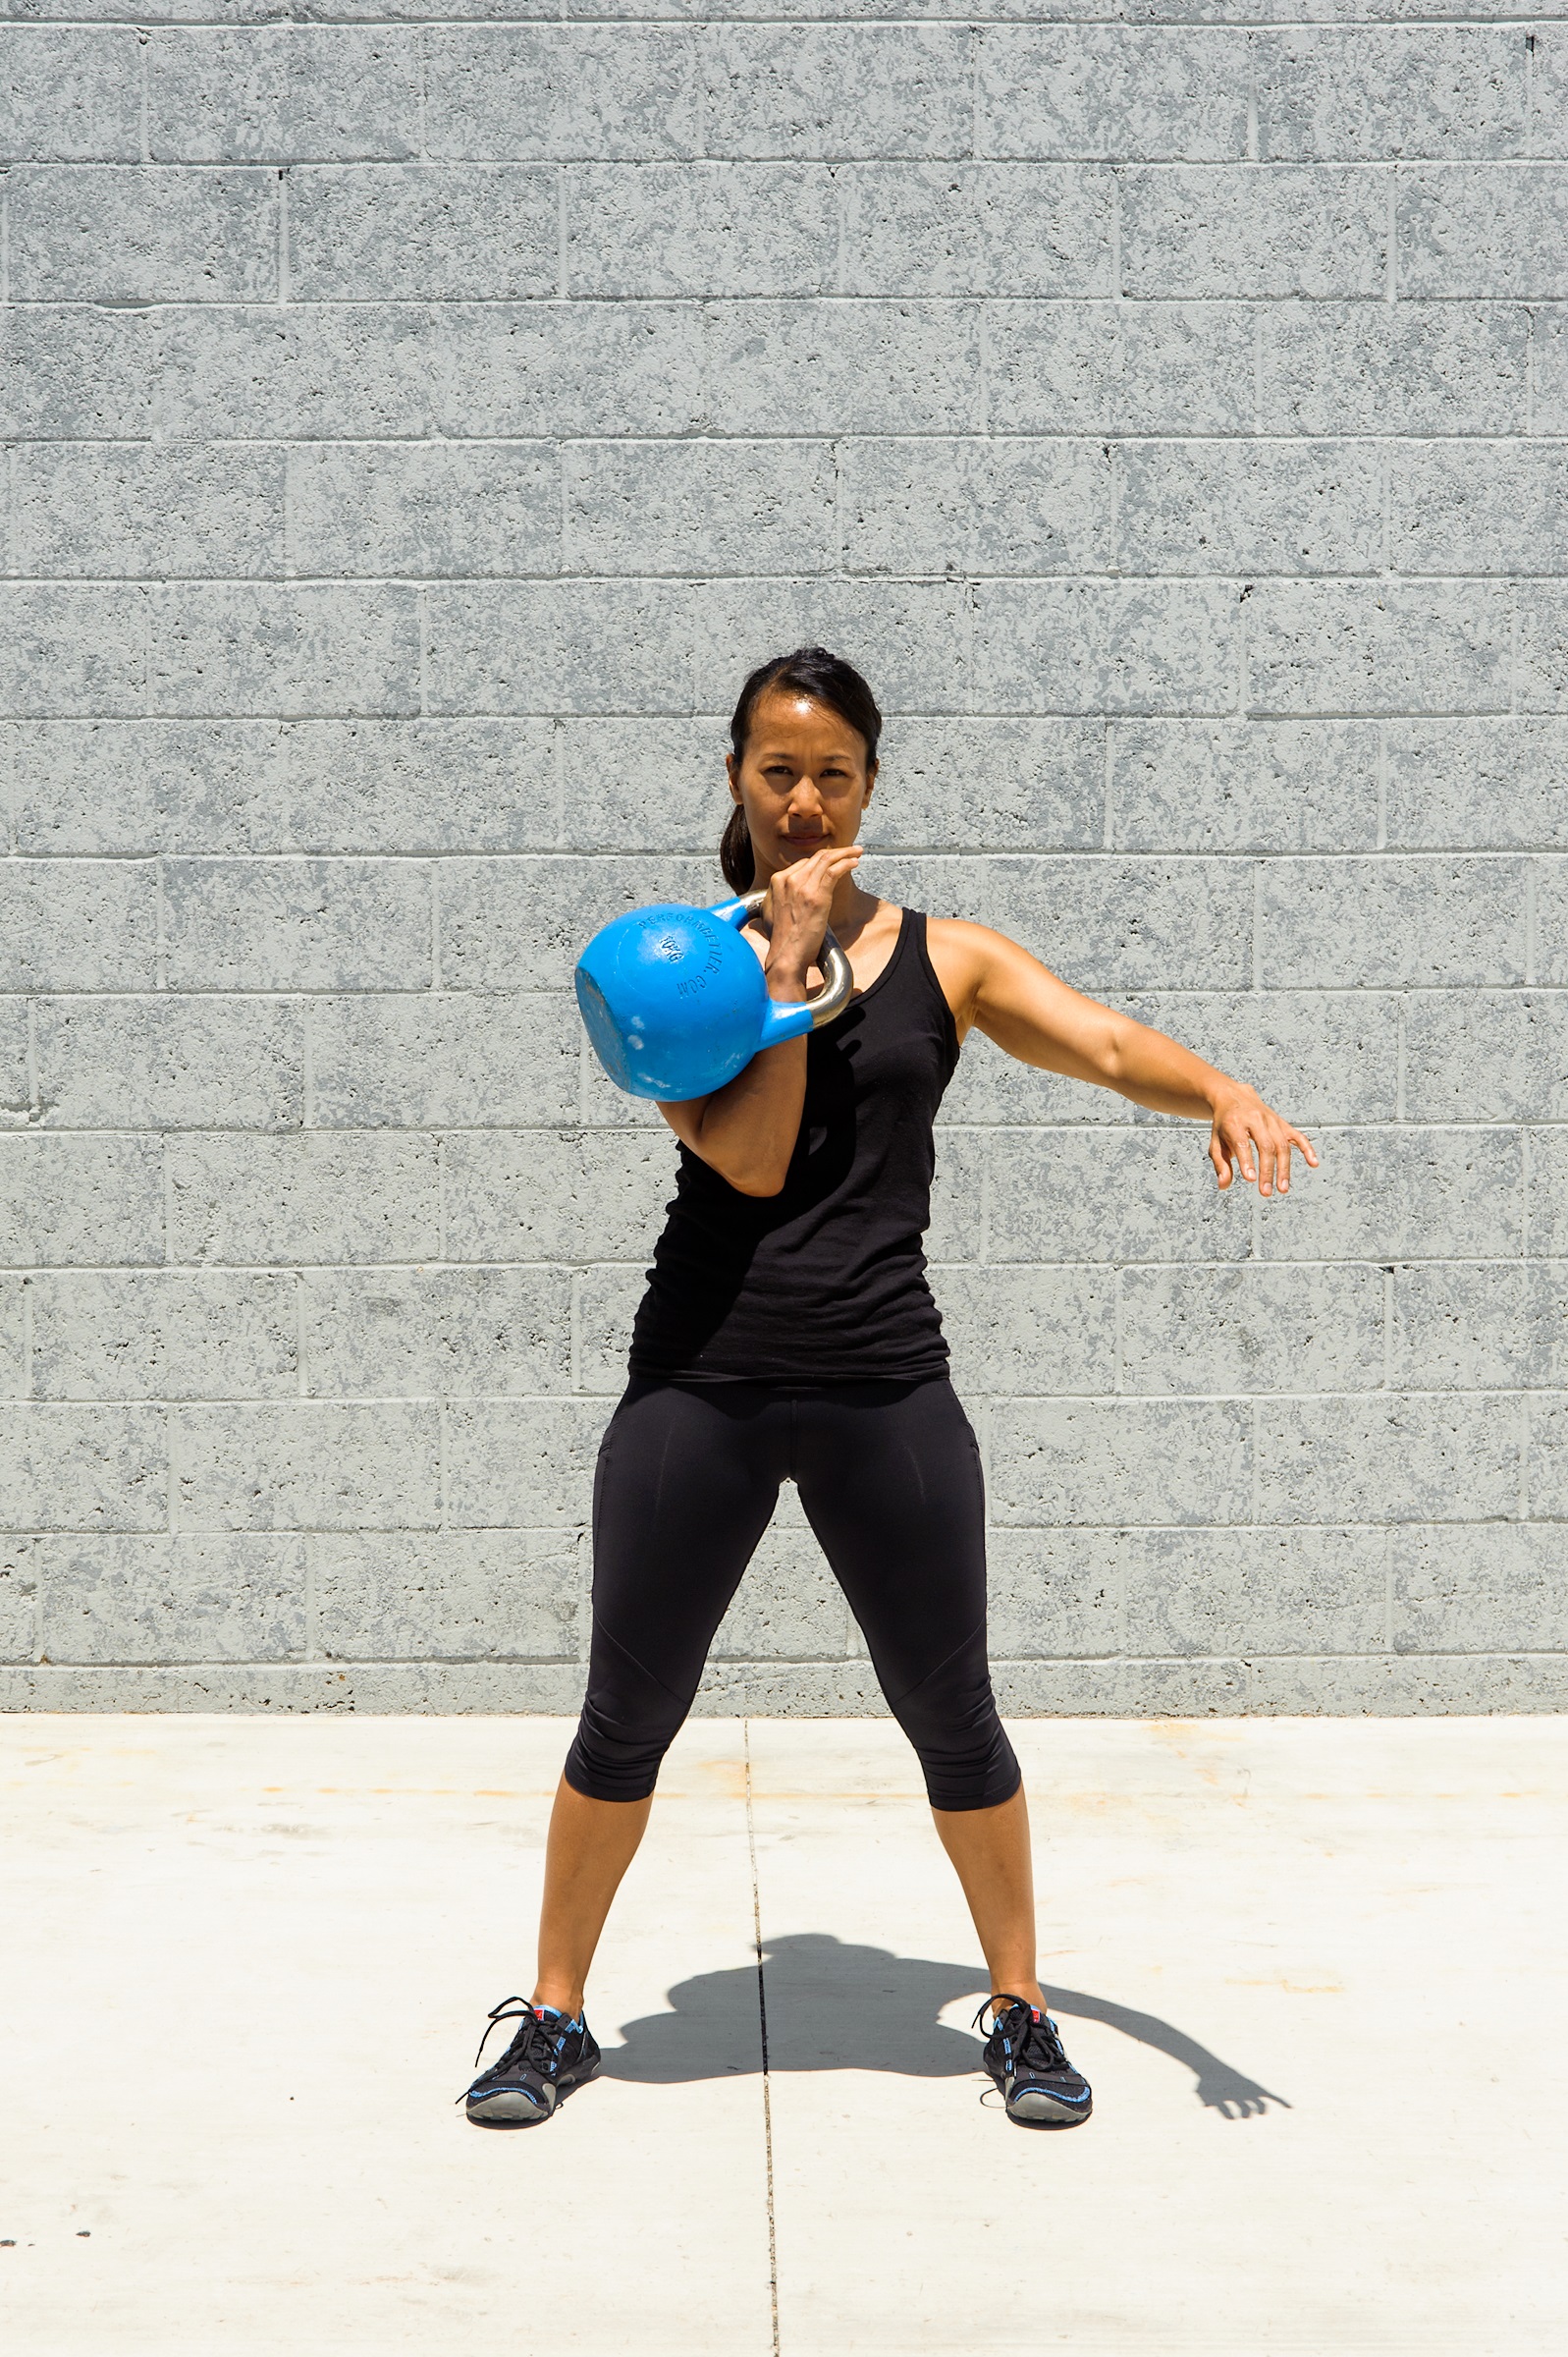
Figure 6.19a
The single press is a total upper-body movement that is the beginning progression for more advanced overhead exercises. It teaches proper alignment in the overhead position while simultaneously conditioning the arms, shoulders, and back, and it is the foundational lift for vertical pushing or pressing movements.
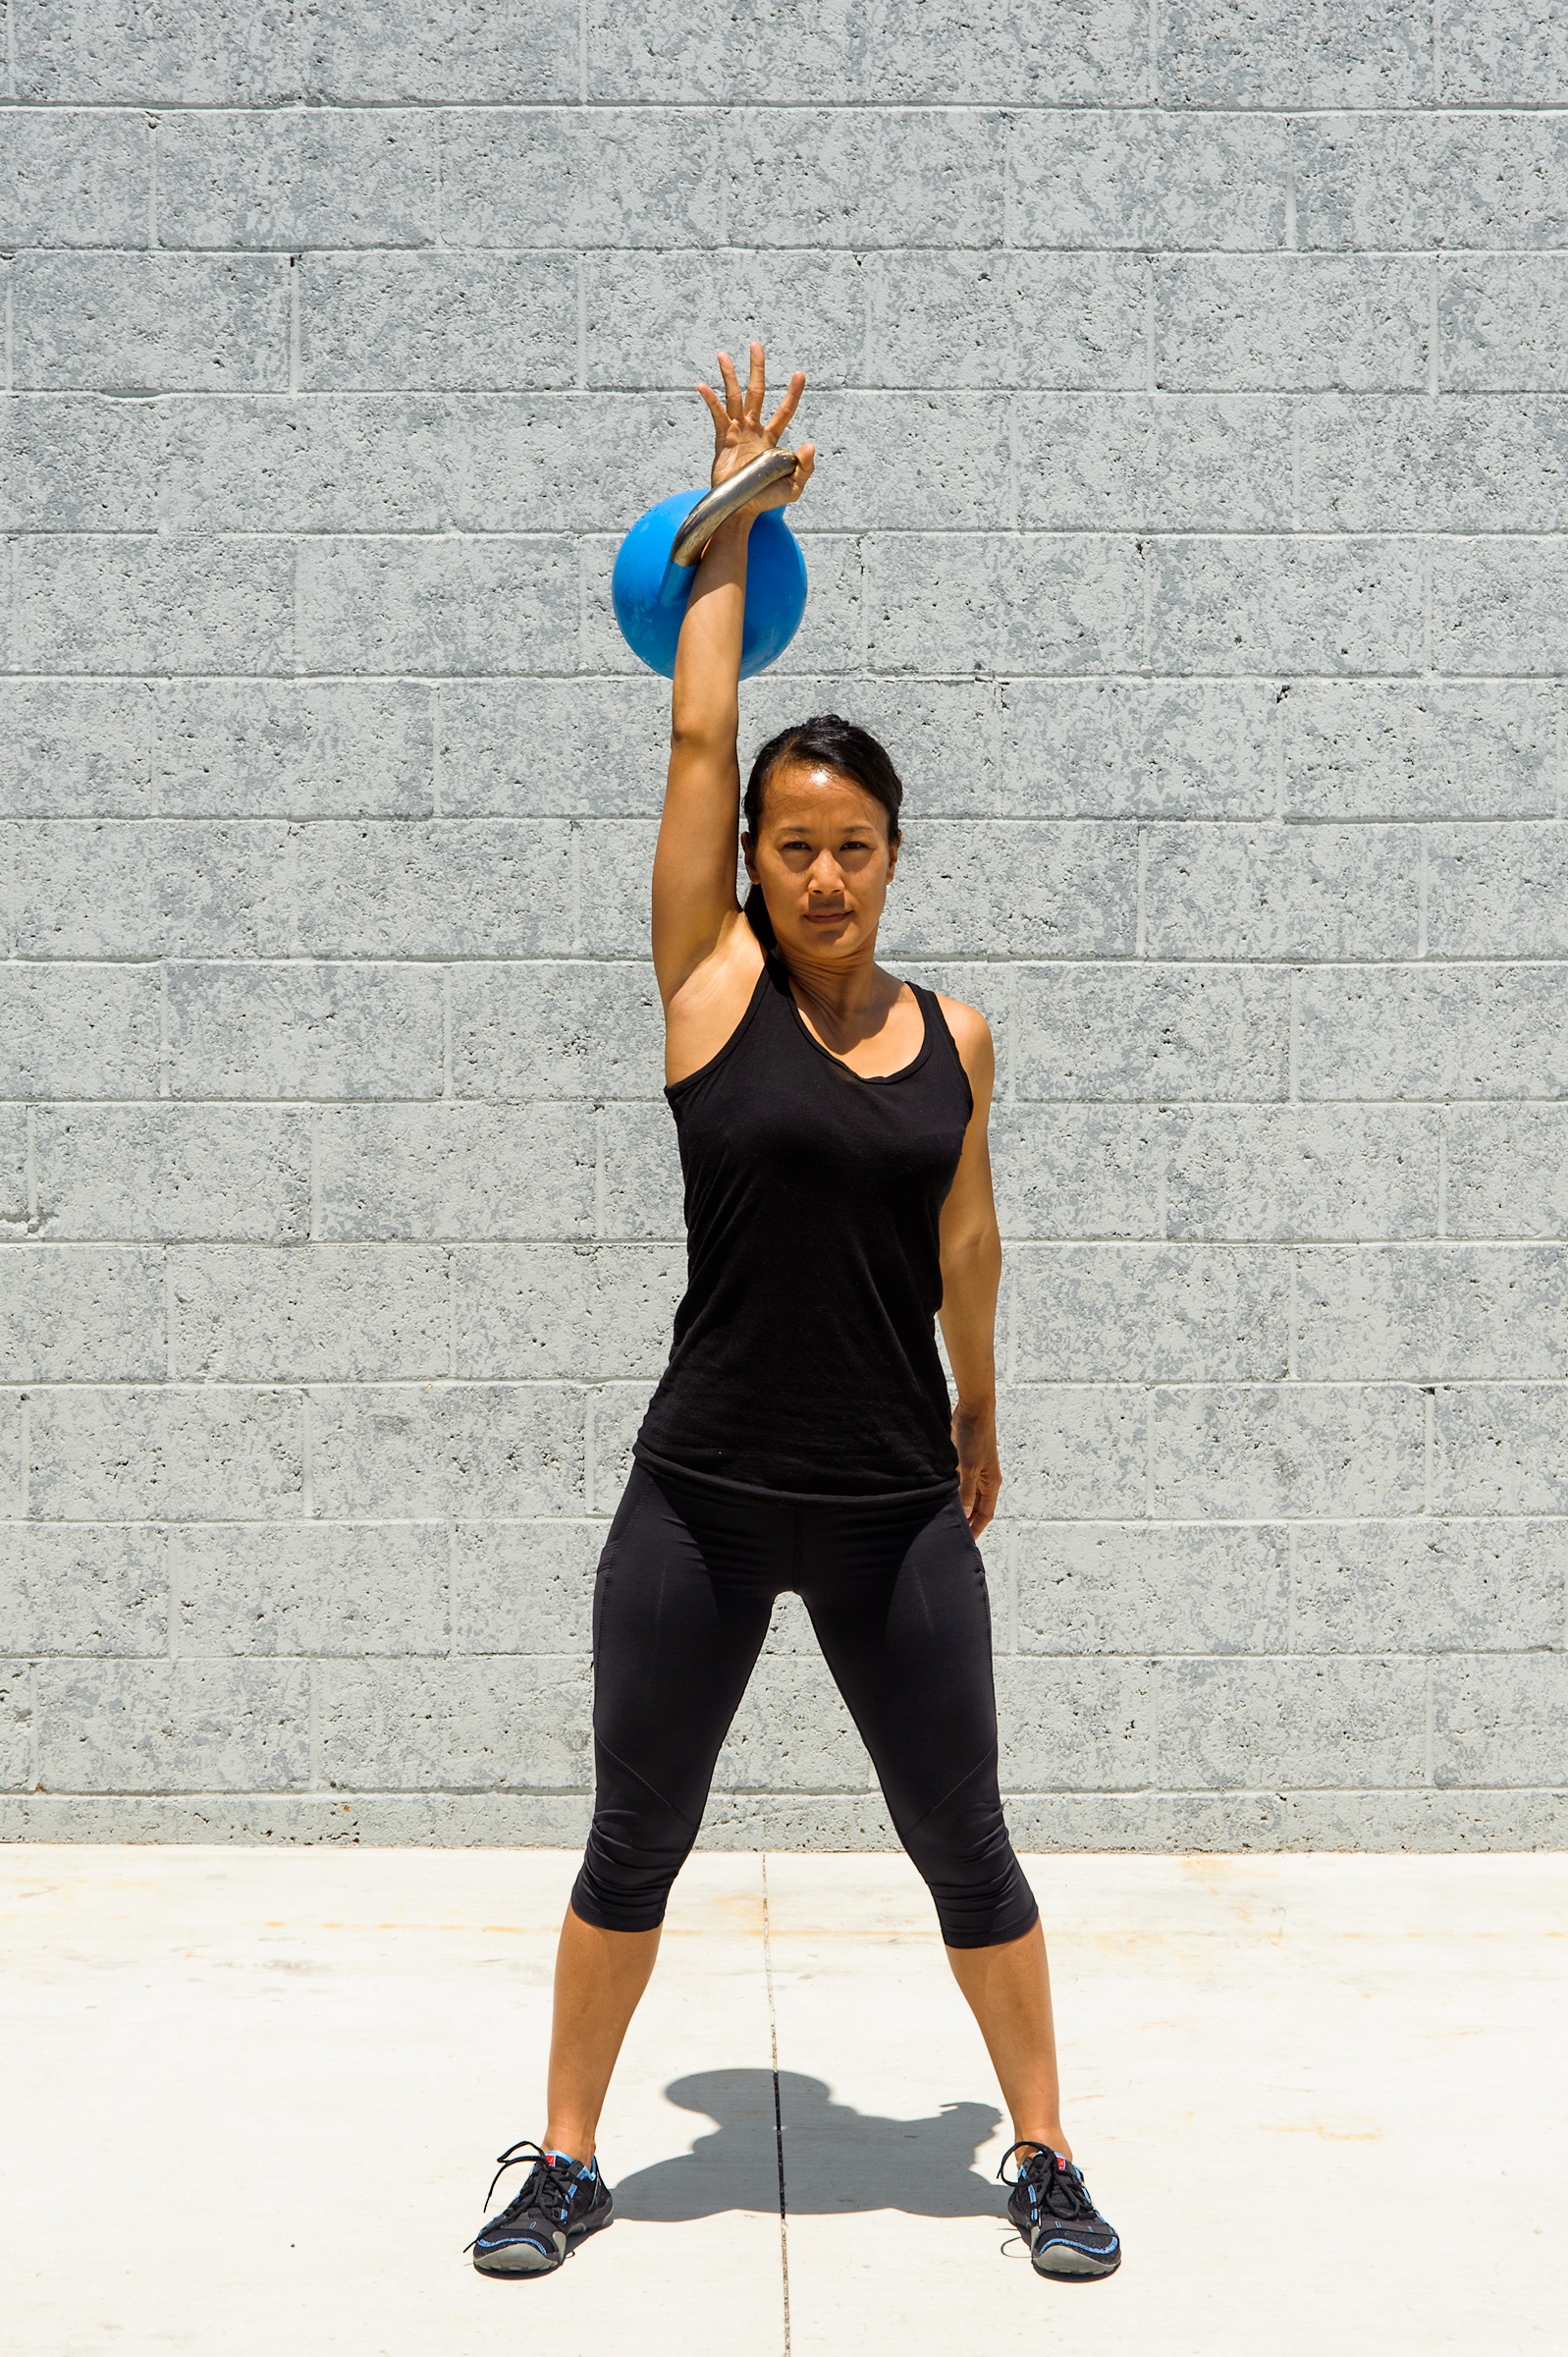
Figure 6.19b
To perform this exercise, clean a single kettlebell to your chest into the rack position (see figure 6.19a). This is the start position for the press. Before pressing up, compress your rib cage on the side of the pressing arm. As you recoil to the downward compression, press the kettlebell directly up until your elbow is completely extended in the lockout position (see figure 6.19b).

Figure 6.19c
In this overhead position, the optimal position of the hand and shoulder is such that your thumb is pointing directly back. A slight rotation of the palm is acceptable, but avoid overrotating so that you have the most efficient path, which is a straight line. Any additional rotation or deviation from the straight line is wasted effort and nonoptimal alignment.

Figure 6.19d
To lower the kettlebell, move your body back slightly so that the kettlebell can fall directly down the centerline and all the way to the hip (see figure 6.19c) and back to the rack position to complete the lift (see figure 6.19d). The drop from the overhead lockout position back to rack position should be a smooth, relaxed movement. Imagine you are being supported from a string and a puppeteer is lifting your arm and kettlebell. When the string is cut, the kettlebell just free-falls back to the rack position. With practice you will be able to absorb the force from the drop so that the kettlebell smoothly slides into place.
When performing this exercise, use anatomical breathing with four breathing cycles. Starting from the rack position, inhale deeply before the initial compression, and then exhale as you drop or flex your thoracic spine. Inhale as you bump with the rib cage, and exhale as you lock out. Take one full breath cycle while in lockout and add more recovery breaths if needed. Inhale as you begin to drop the kettlebell, and exhale as it lands back in the rack position.
Key Principles
• The rack is important in creating a virtual bench—the rack position is a position of both rest and power generation, ensuring connectivity between the arm and the torso so there is a solid power transfer.
• Use the whole body to press versus just the shoulders. Due to the influence of bodybuilding, many people think that the correct way to press is via isolating the deltoid muscles. The focus of kettlebell training is movement efficiency instead of isolation, so you want to distribute the work among multiple movers. Thus, it’s important to create an initial compression and then a bumping action of the spine to add power and work capacity to the movement. Imagine your rib cage as an accordion that opens and closes as you press up and drop down.
Squat
The squat is a primal movement pattern and one of the most important strength and conditioning exercises for all-around good function and health. Watch a young child and you will see that she can squat with perfect mechanics without any instruction at all. To train the squat, it is important to have correct movement before adding kettlebells or any other external load. The goals for a quality squat movement are as follows:
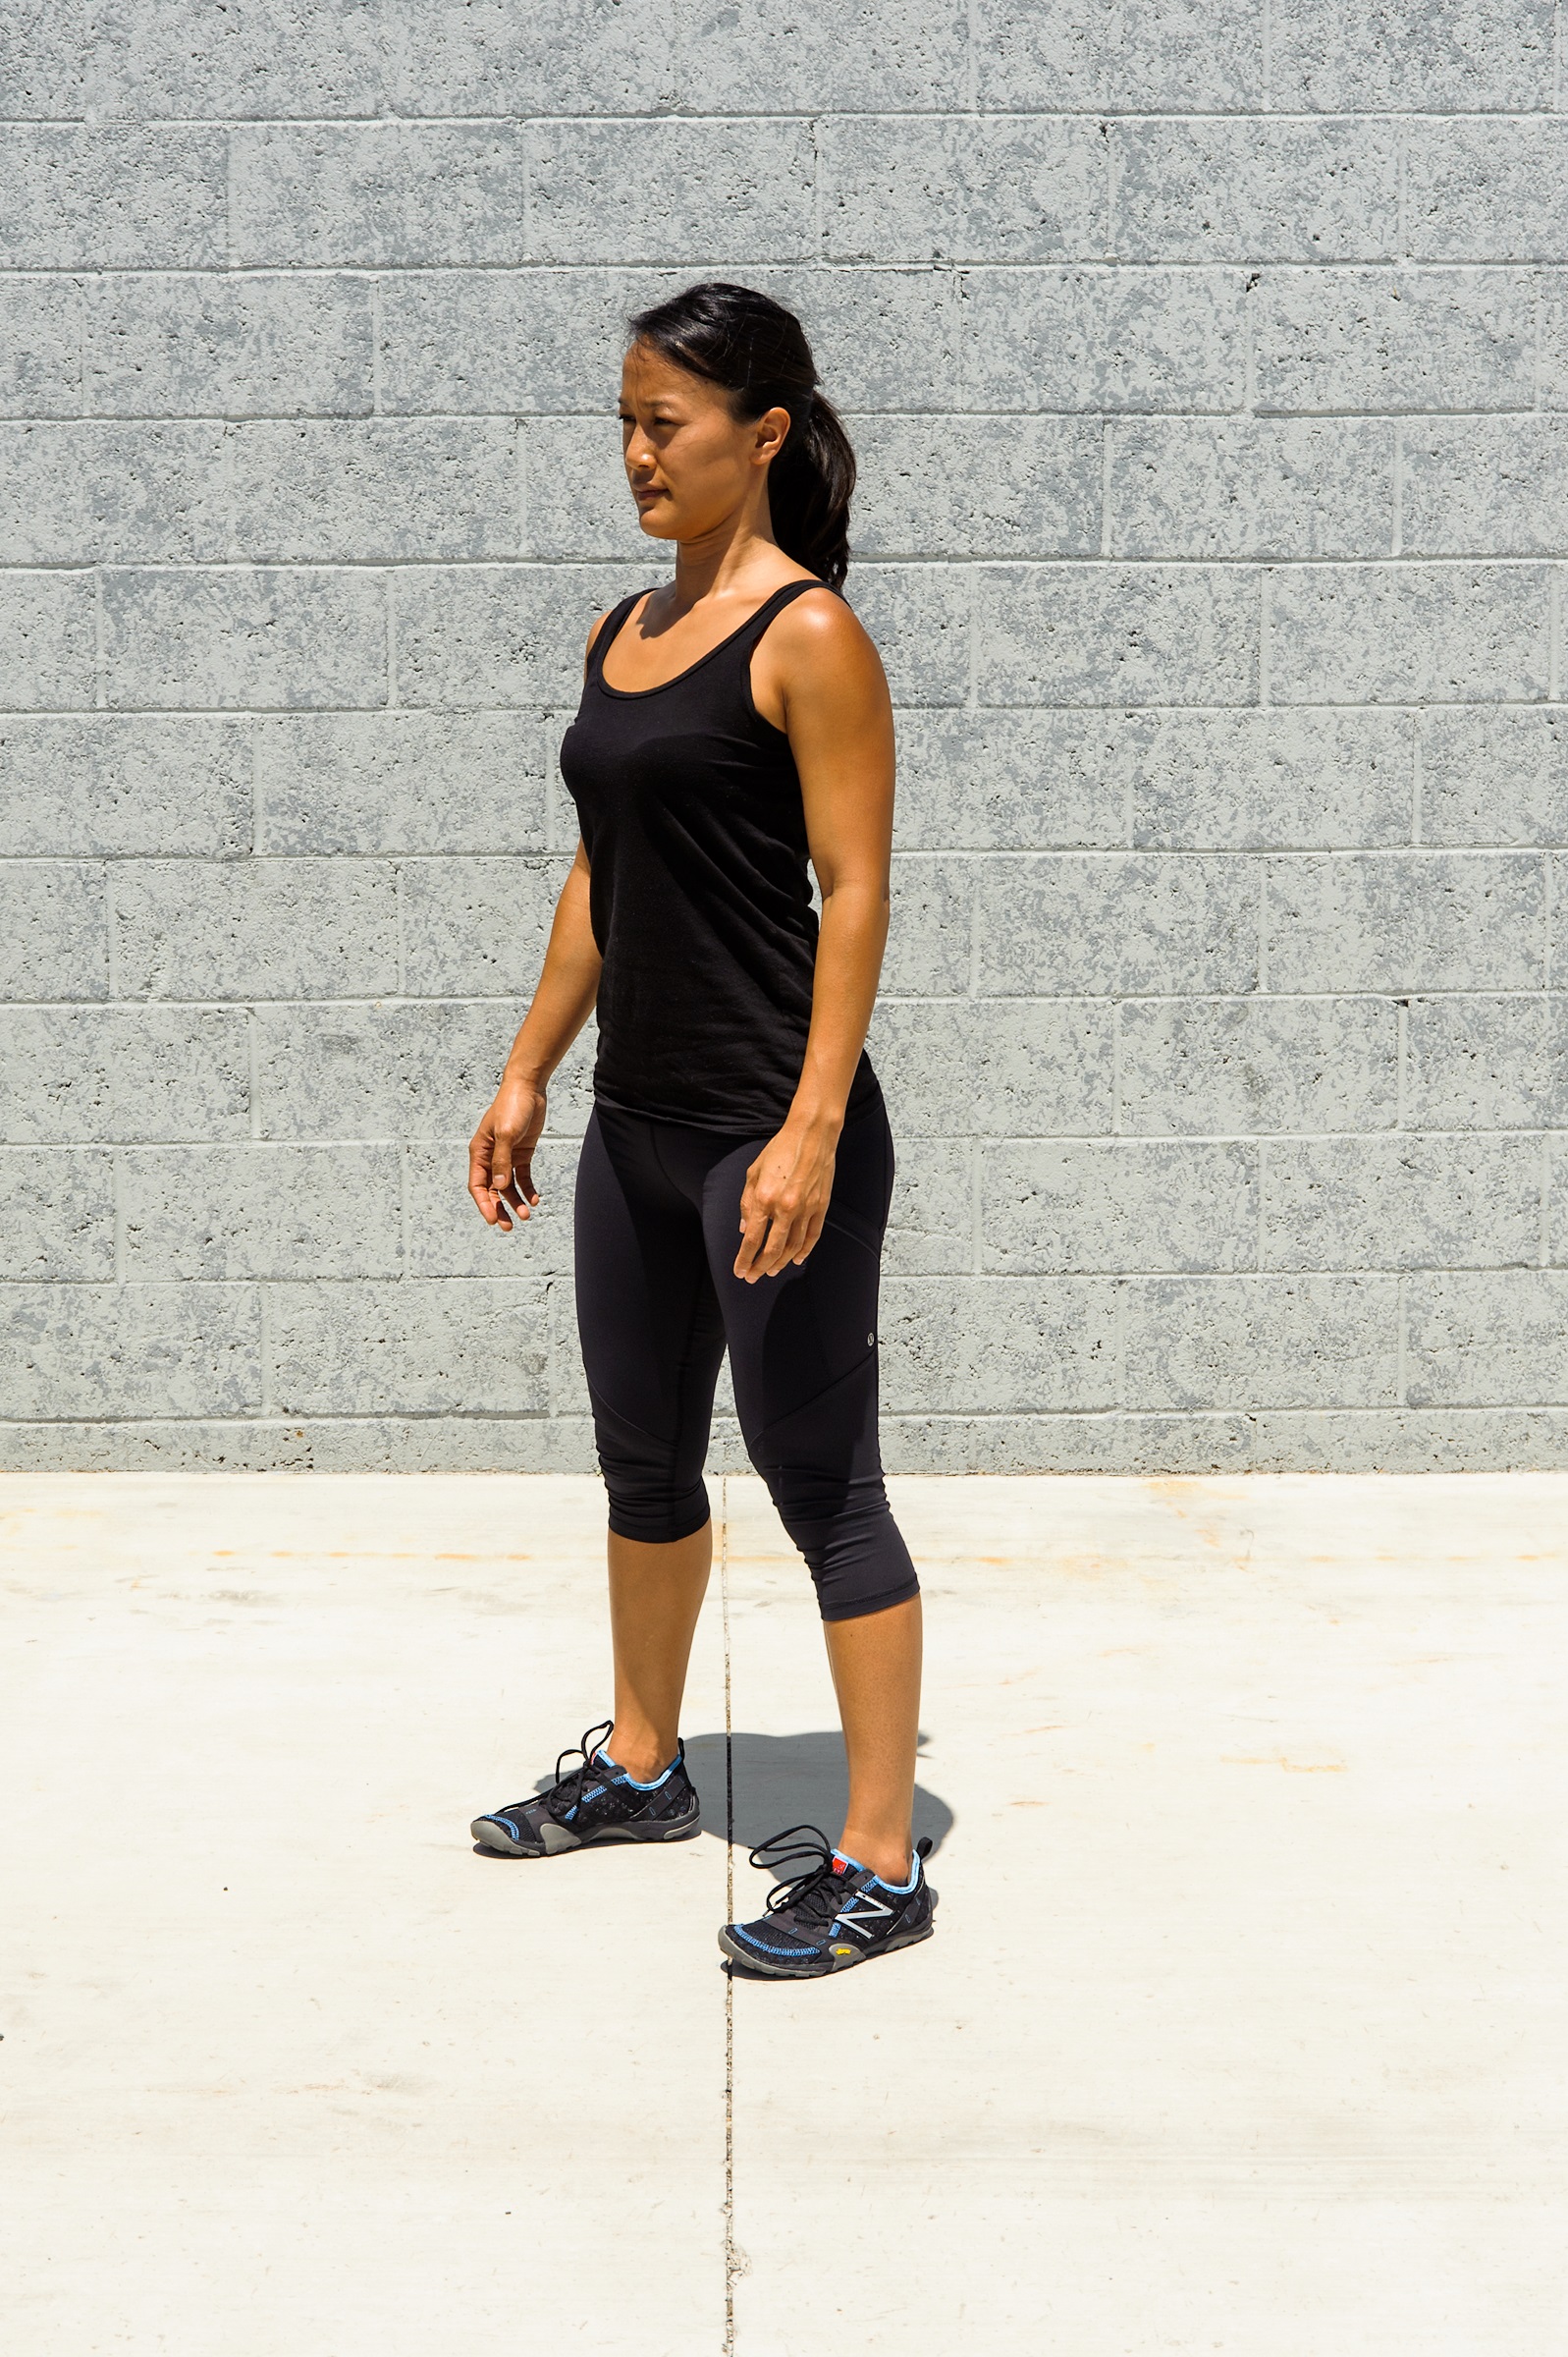
Figure 6.22a
• Feet flat on the ground
• Knees aligned vertically over the feet with no inward collapsing of the knees (valgus collapse)
• Hips sit back to carry some of the load so that the load is not placed excessively on the knees
• Trunk upright as much as possible, if not completely vertical
• Balanced and stable body in both the upward and downward portions of the movement
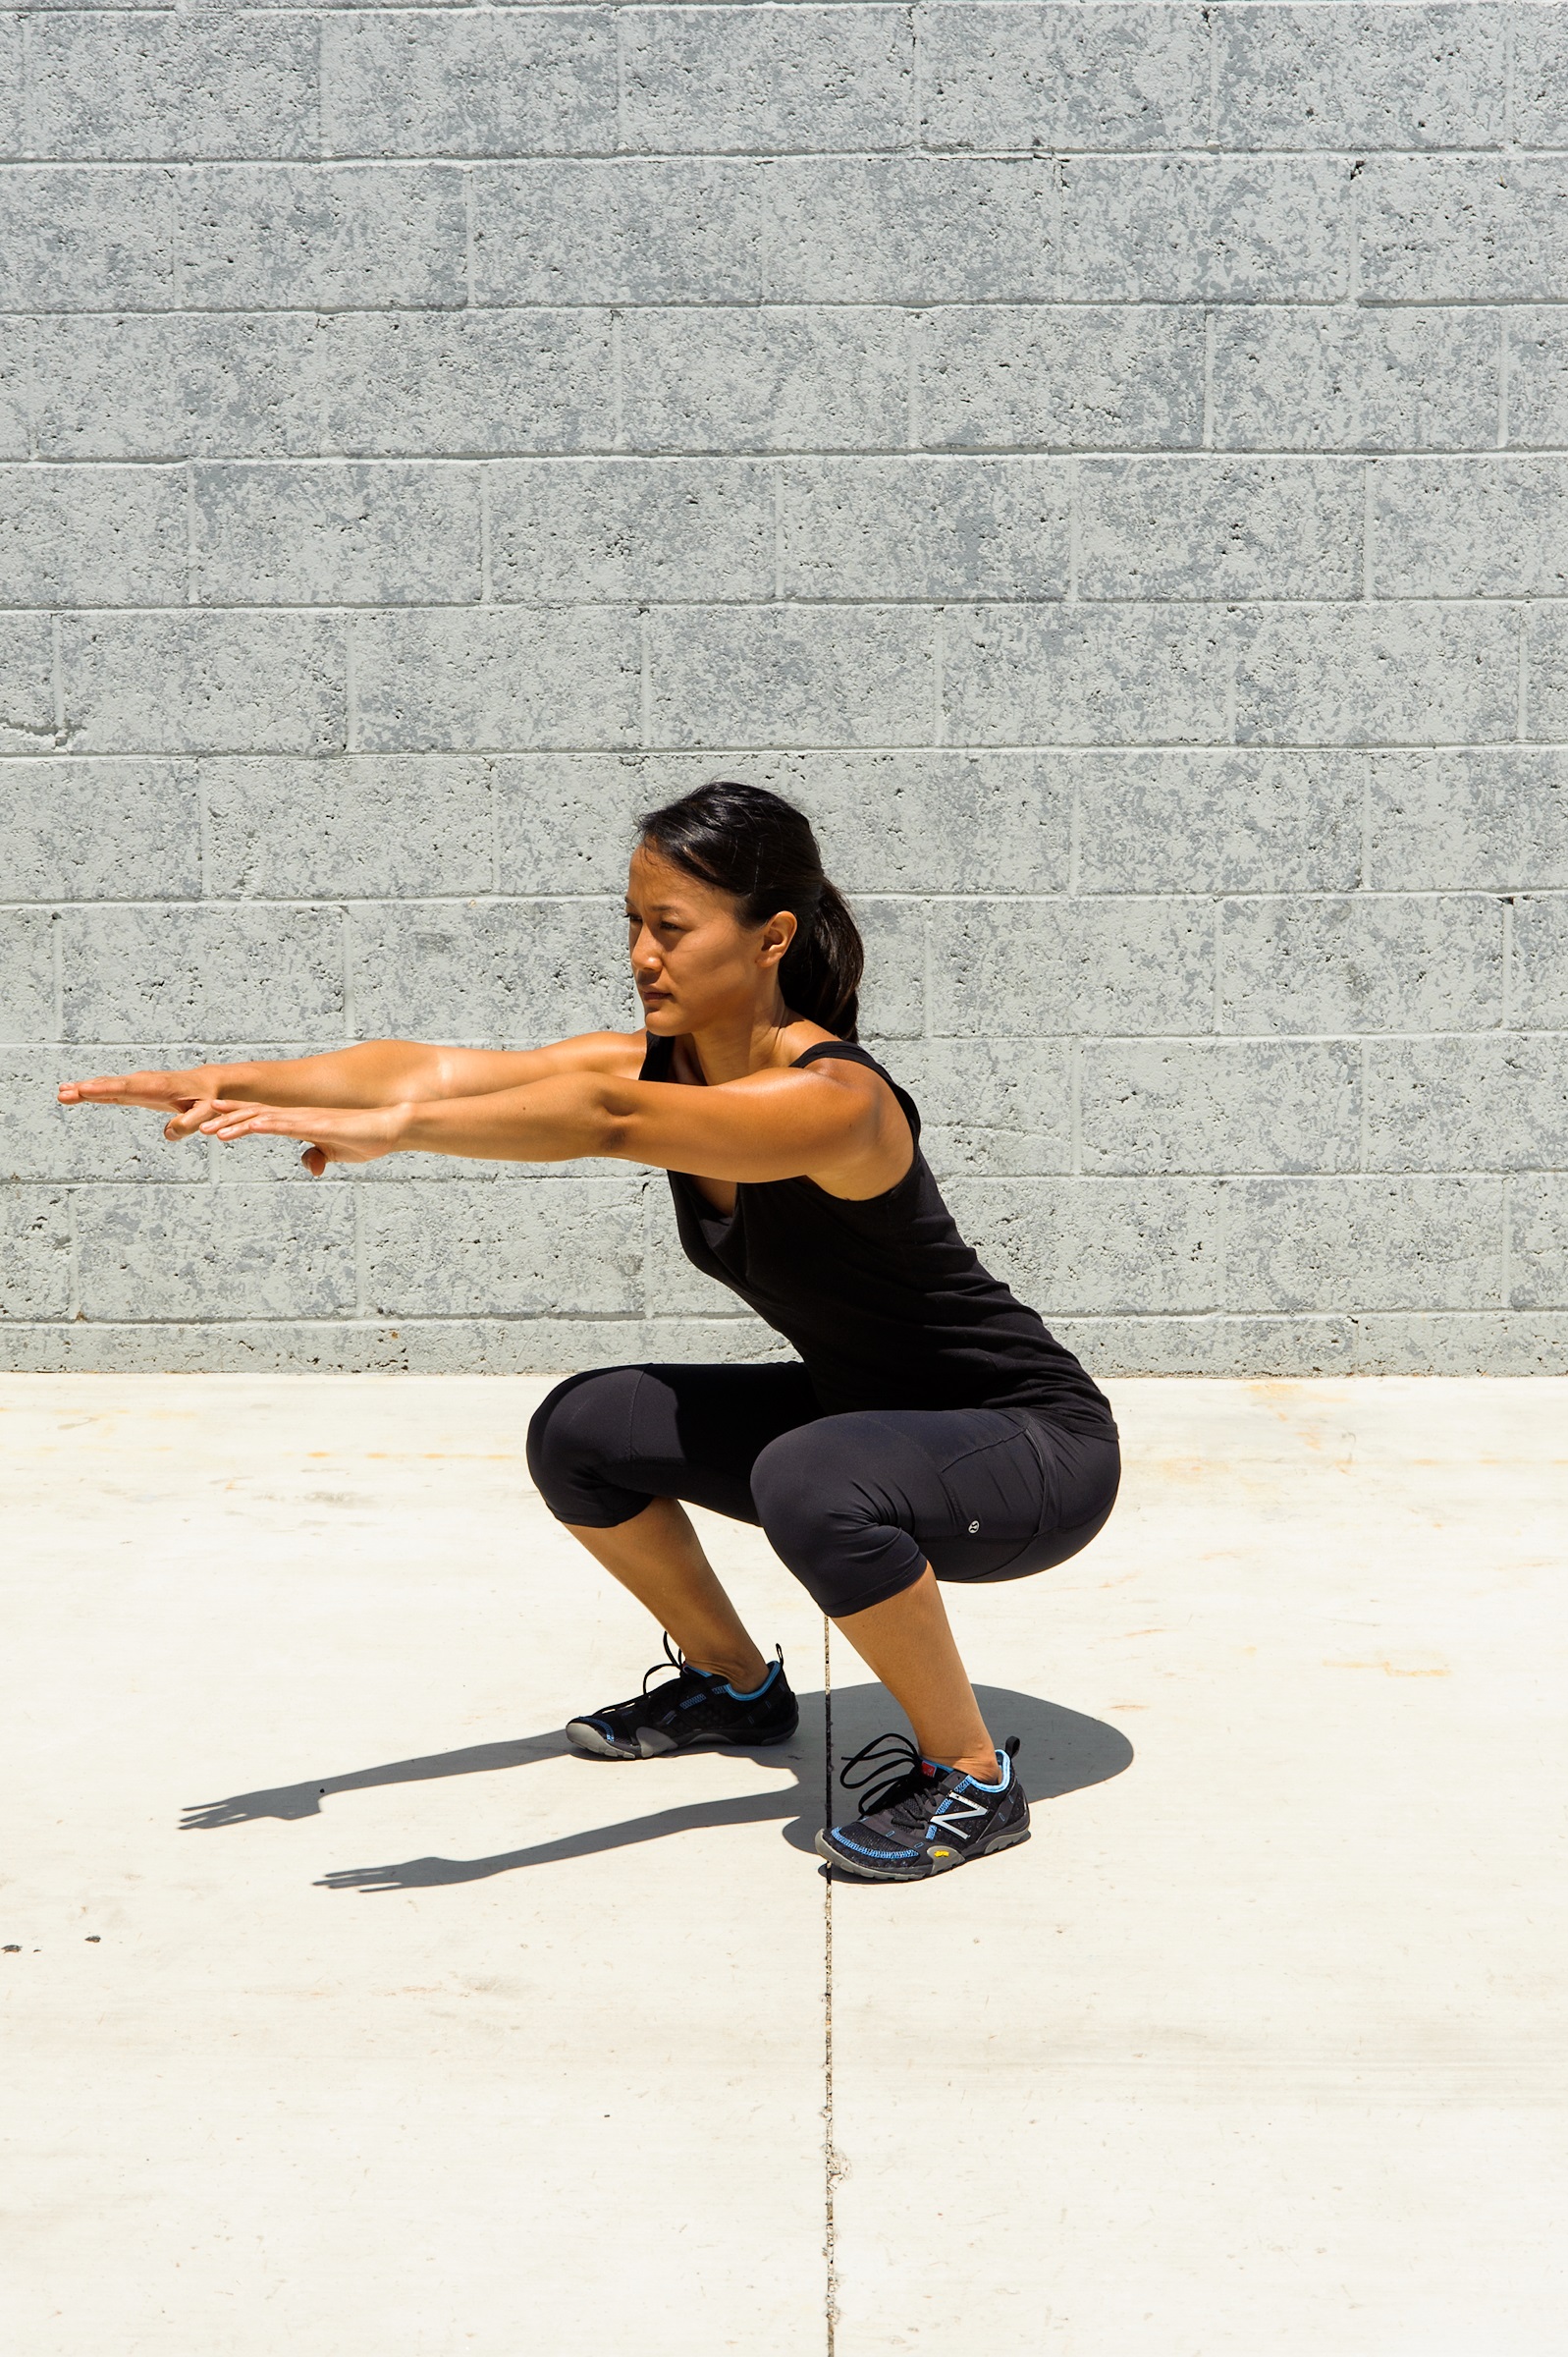
Figure 6.22b
To perform this exercise, stand with your feet about shoulder-width apart with the toes pointing forward (see figure 6.22a). In some cases, tightness in the hip joints will require that the toes are turned out to the sides. If this applies to you, it is OK to do so up to about 30 degrees. Sit back by leading with the hips as if you were sitting on a chair or box (review the box squat in the Introductory Kettlebell Moves section earlier in this chapter). Actively descend into the bottom position by pulling yourself down with your hip flexors as you drop your center of mass until the tops of your thighs are parallel with the floor or slightly below parallel (see figure 6.22b).
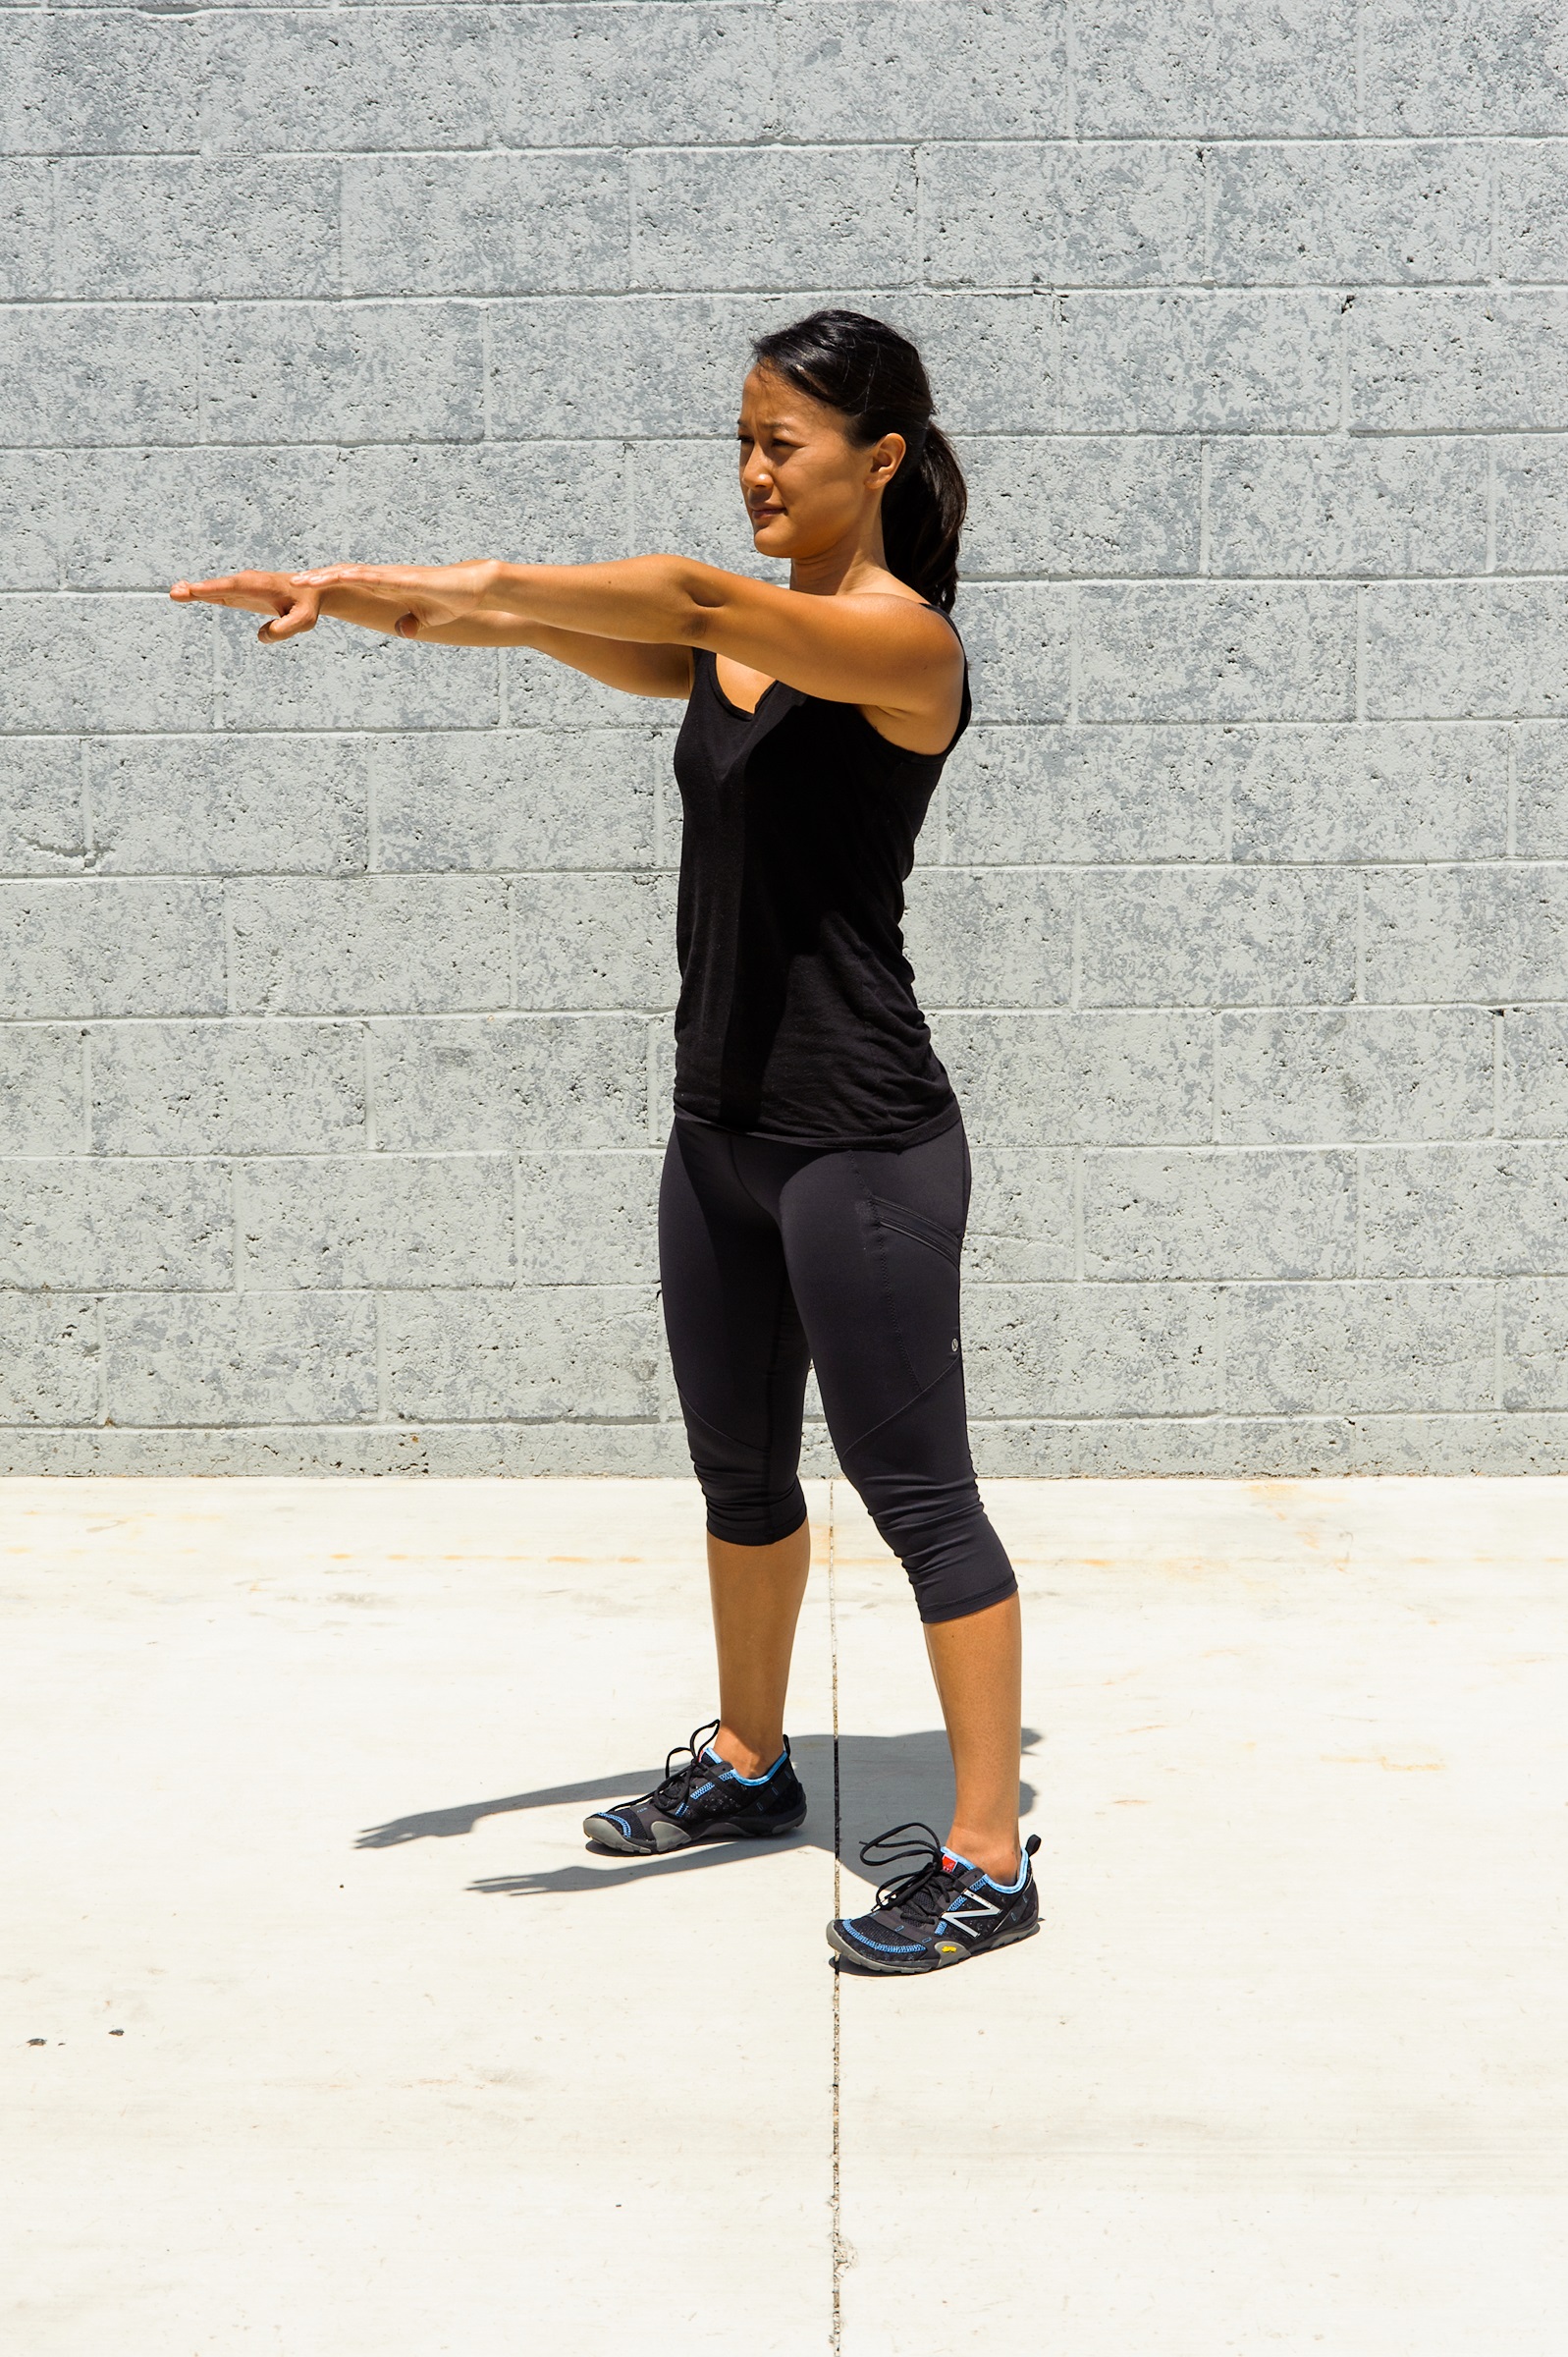
Figure 6.22c
Open the hips to achieve maximal depth. Try to avoid flexing your trunk forward too much. Pushing your arms out in front of you serves as a counterbalance to help you sit back with the trunk. Throughout the movement, your feet stay flat on the floor. From the bottom position, push your feet firmly into the floor and extend straight up, straightening the legs fully (see figure 6.22c). Once you have the feel of this movement, and if you have no pain or discomfort, you can begin loading. Paradoxical or anatomical breathing can be used depending on weight and volume.
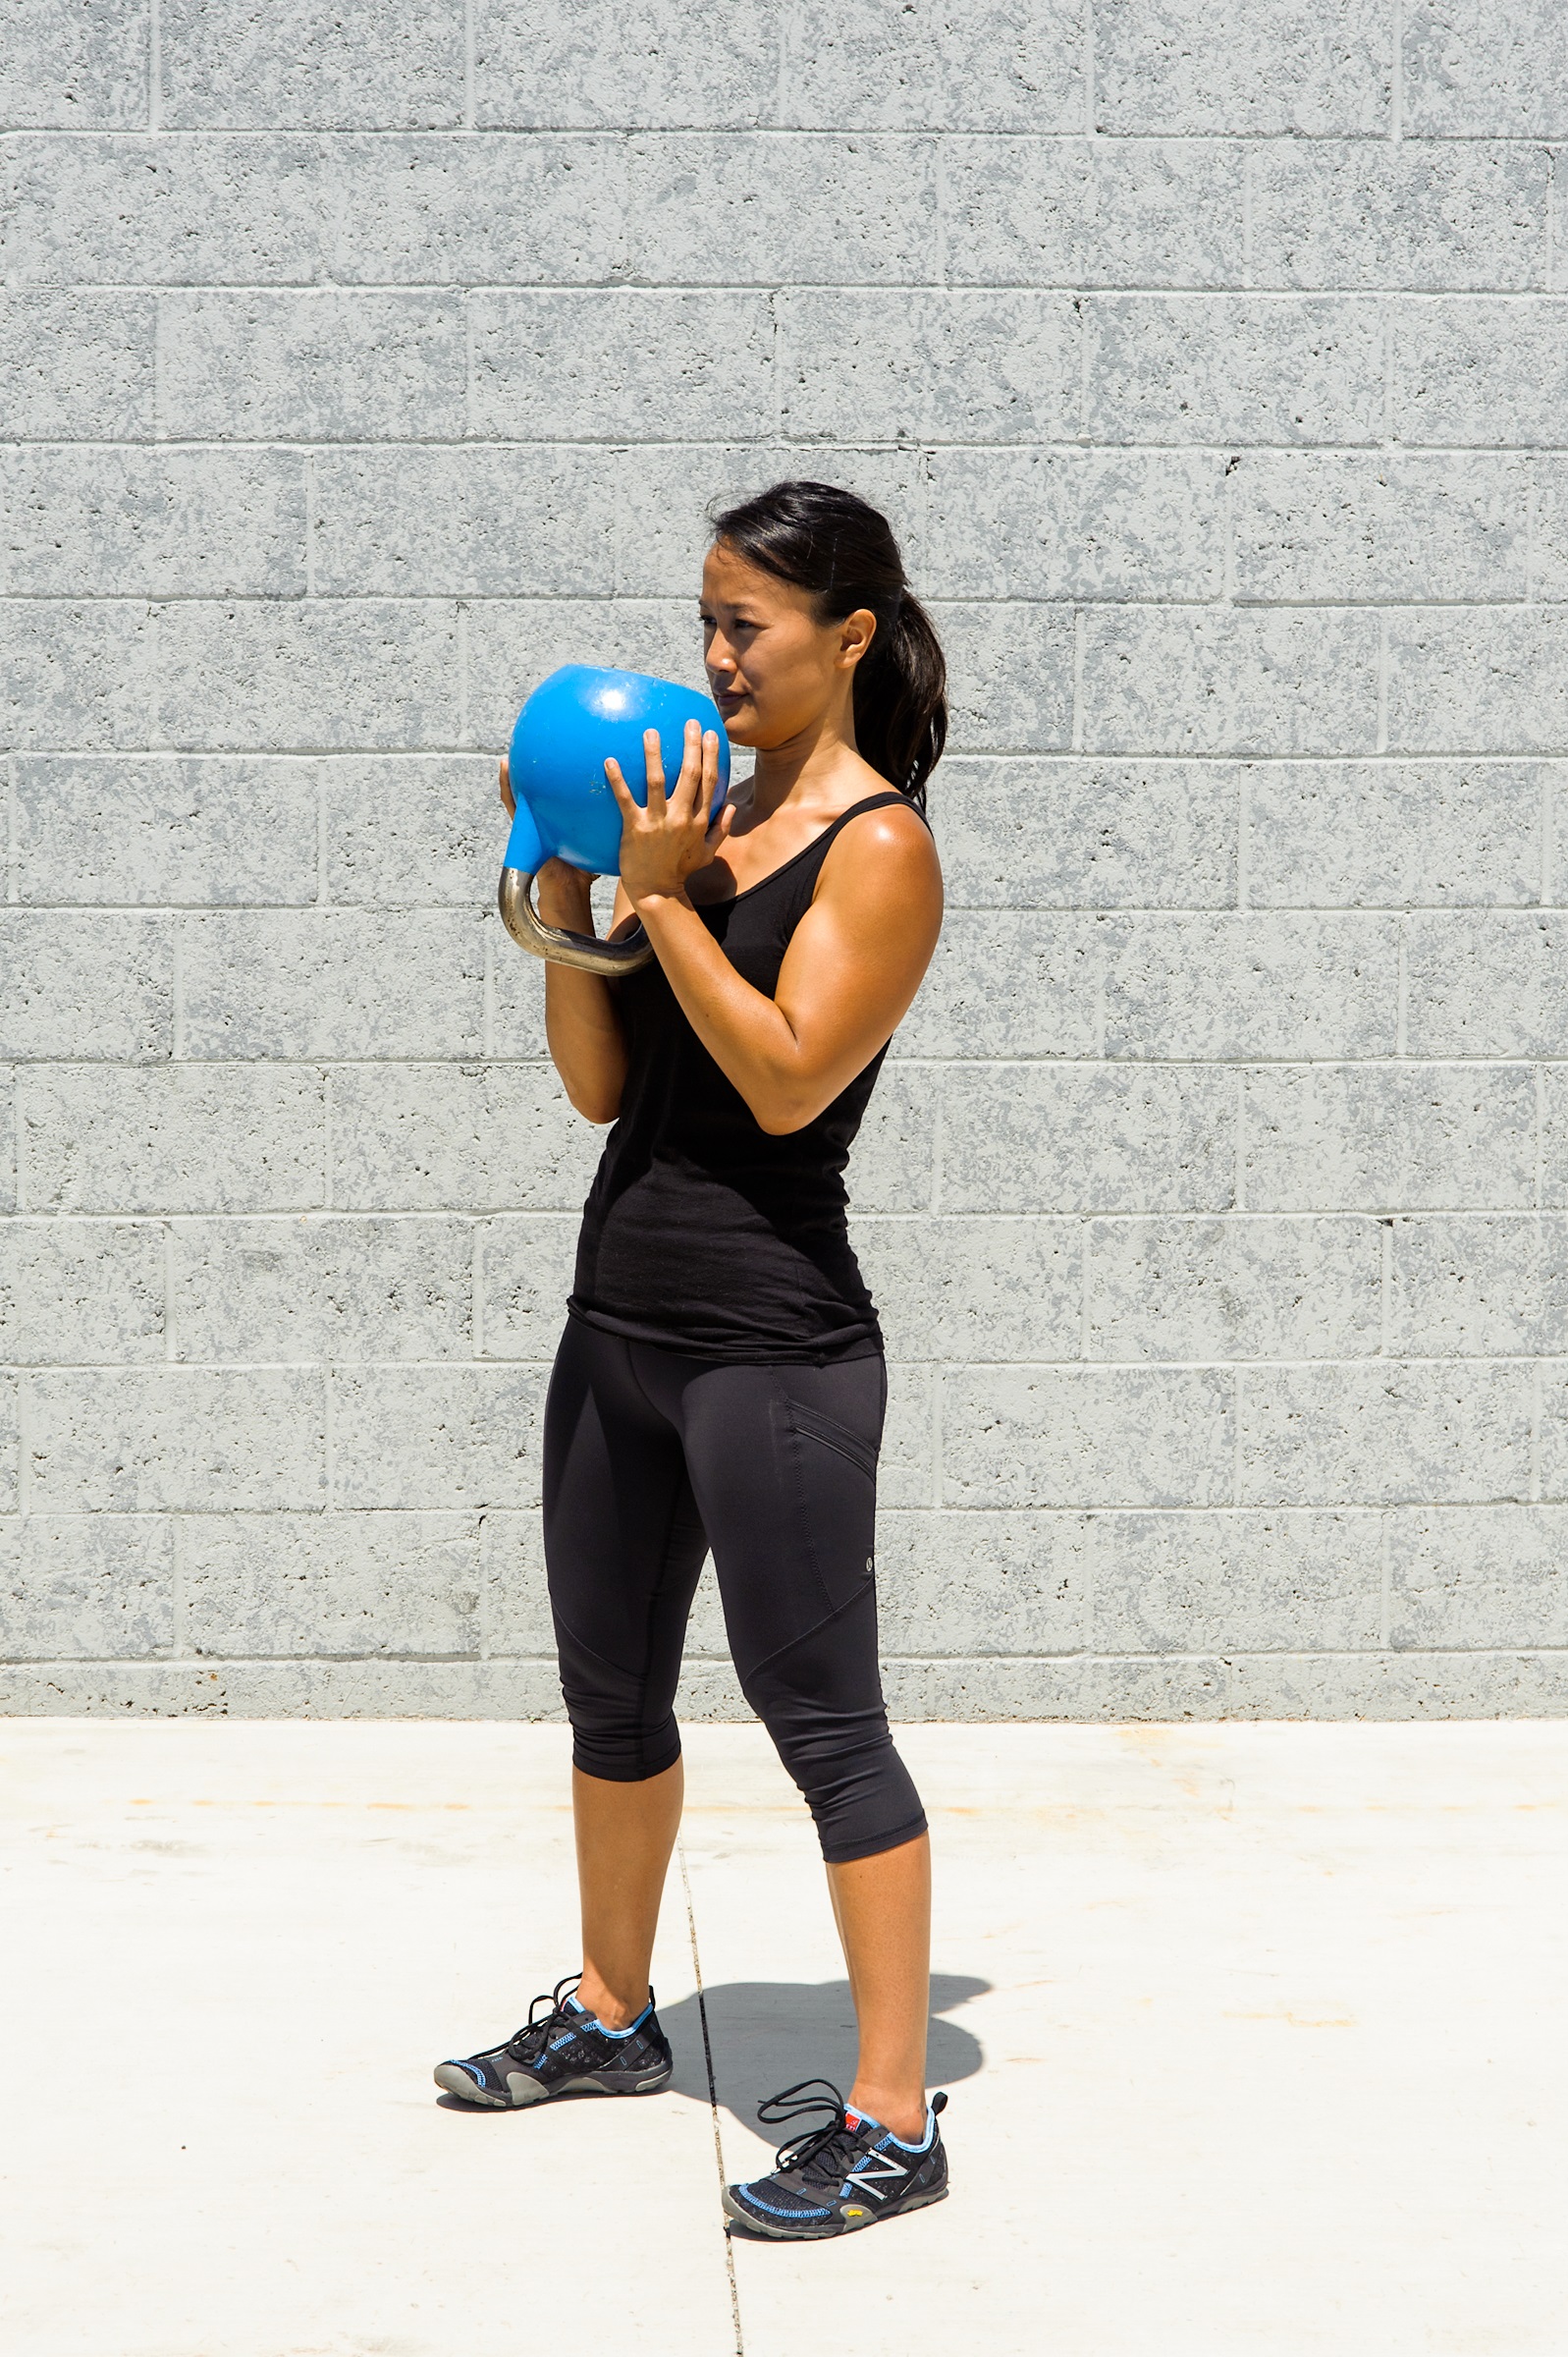
Figure 6.23a
Progressing in the squat is best done in stages. Stage 1 is called the goblet squat, which uses a single kettlebell held with two hands. Hold a kettlebell in front of you with both hands facing palms up and with your forearms against your body (see figure 6.23a).
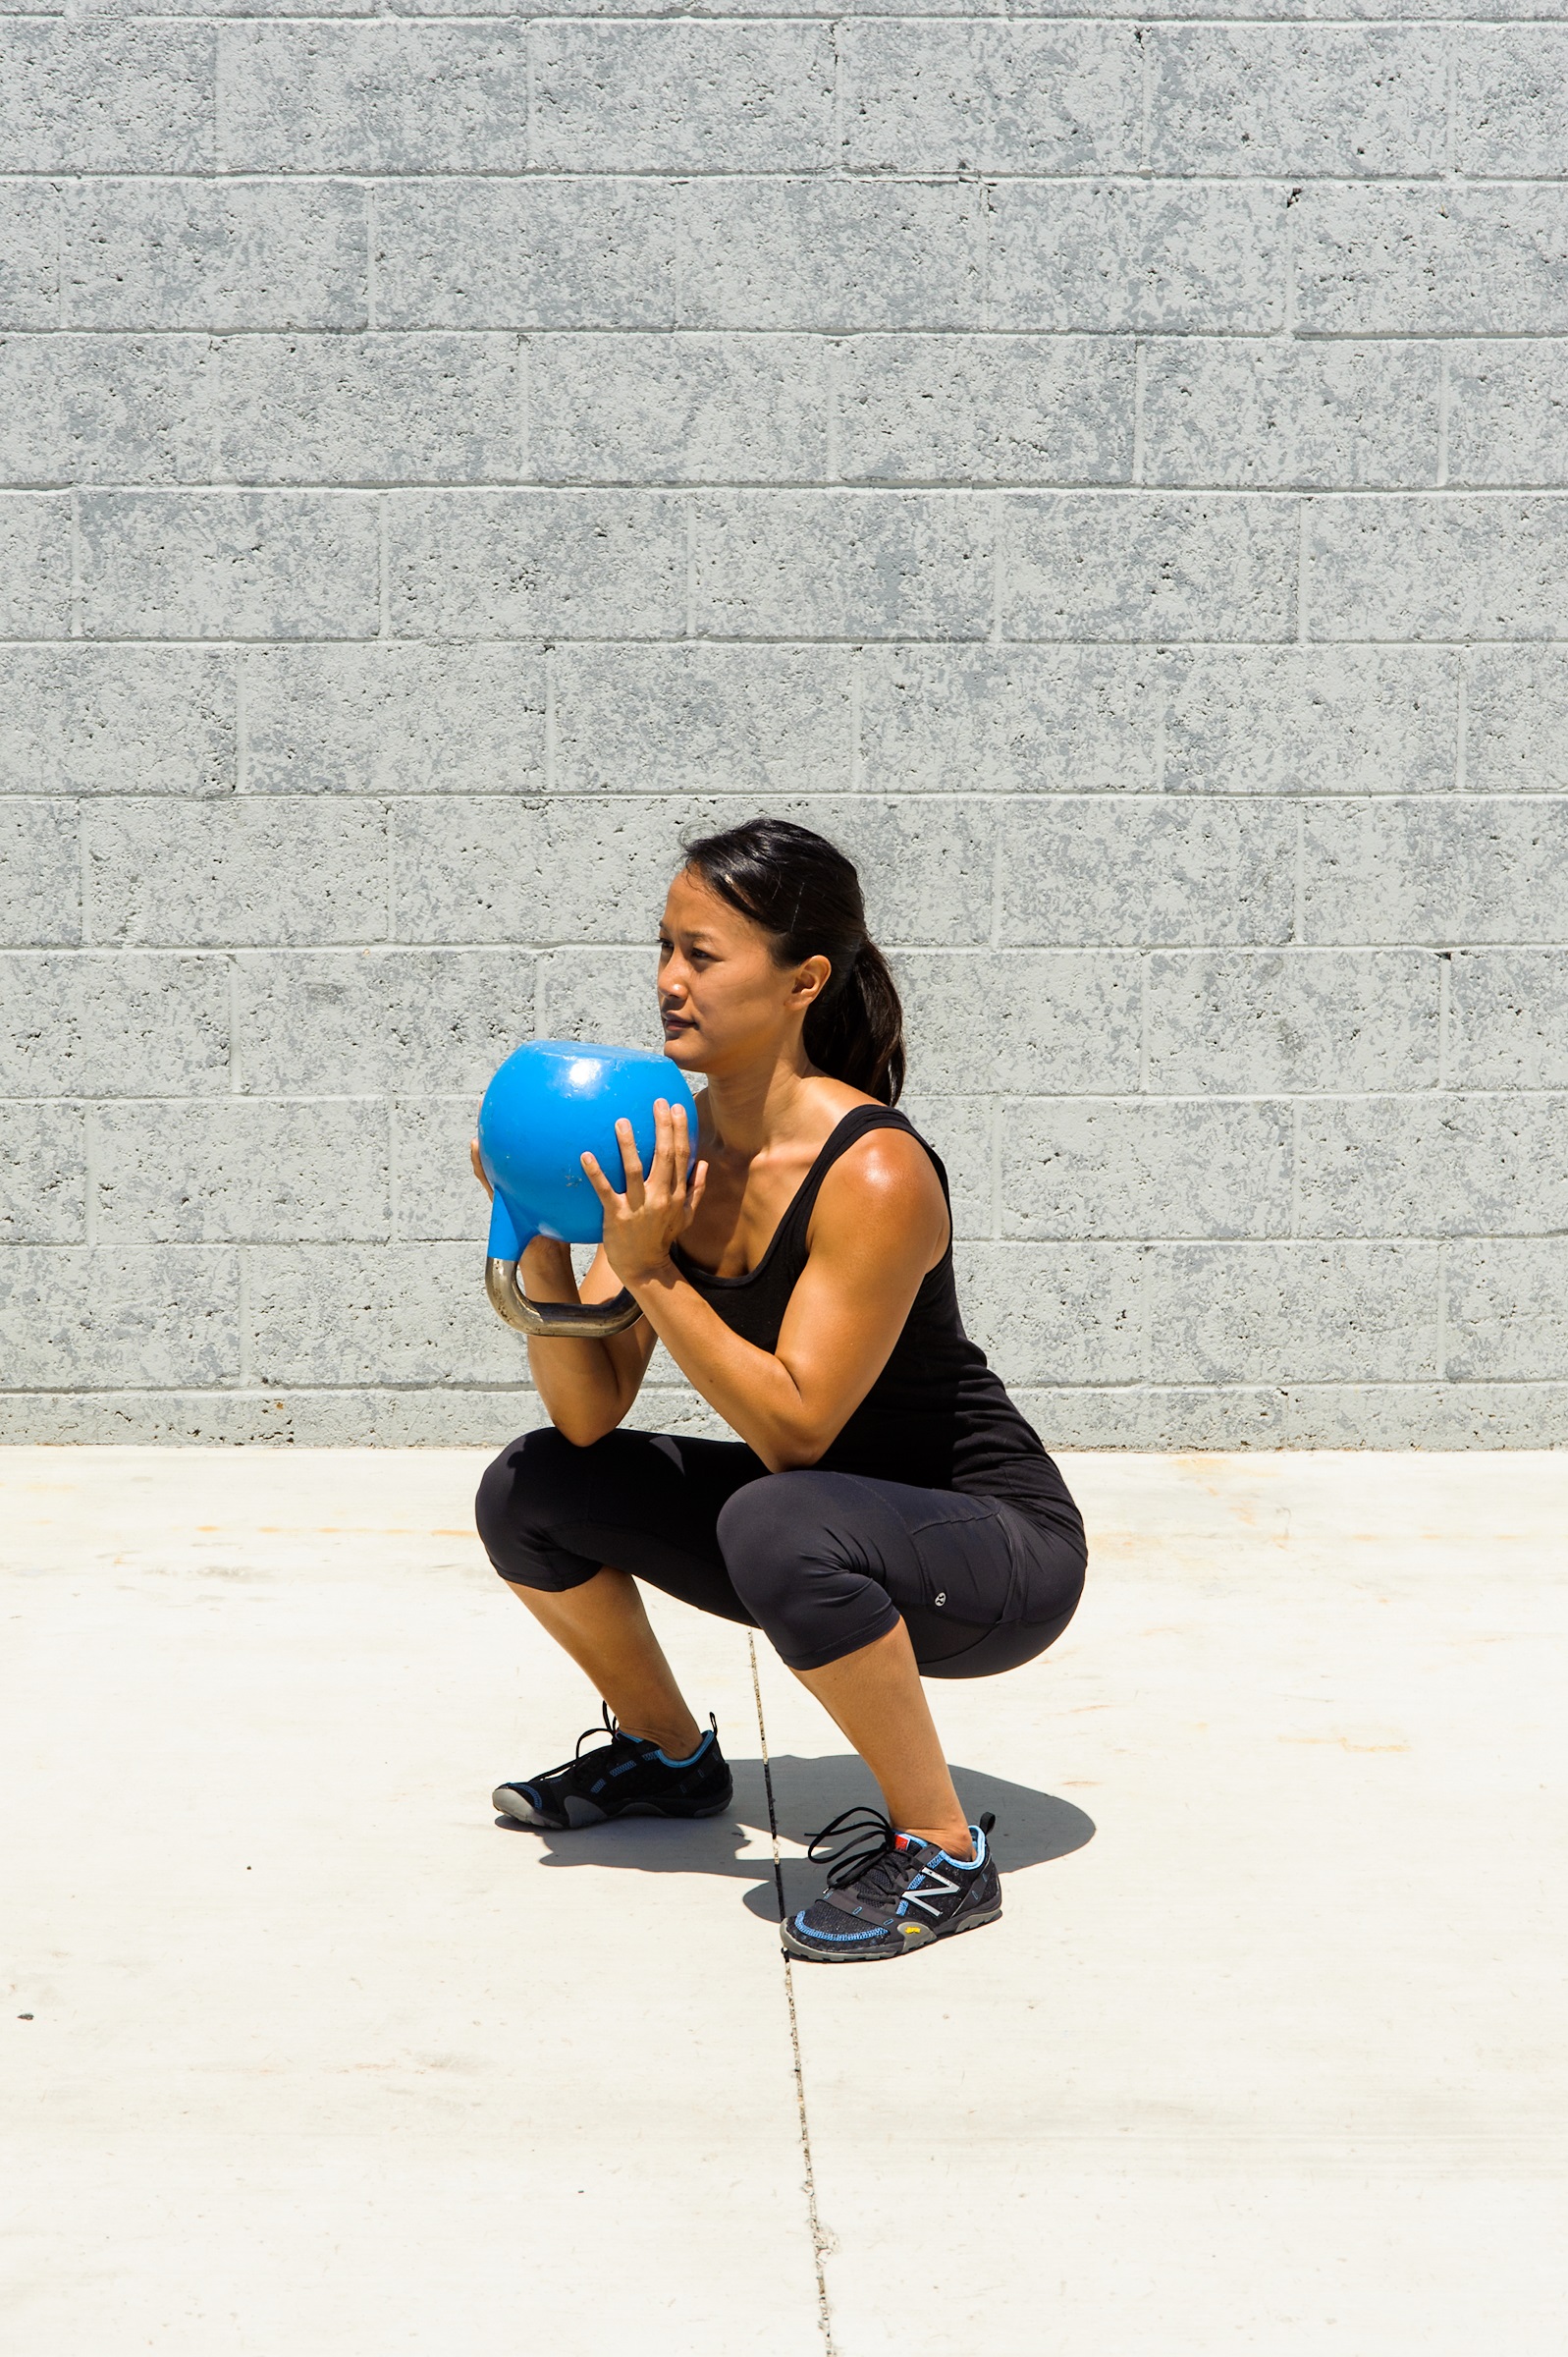
Figure 6.23b
The shape of the hands looks like a goblet or giant drinking glass. Squat down (see figure 6.23b) and stand up while holding the kettlebell in front of you (6.23c).
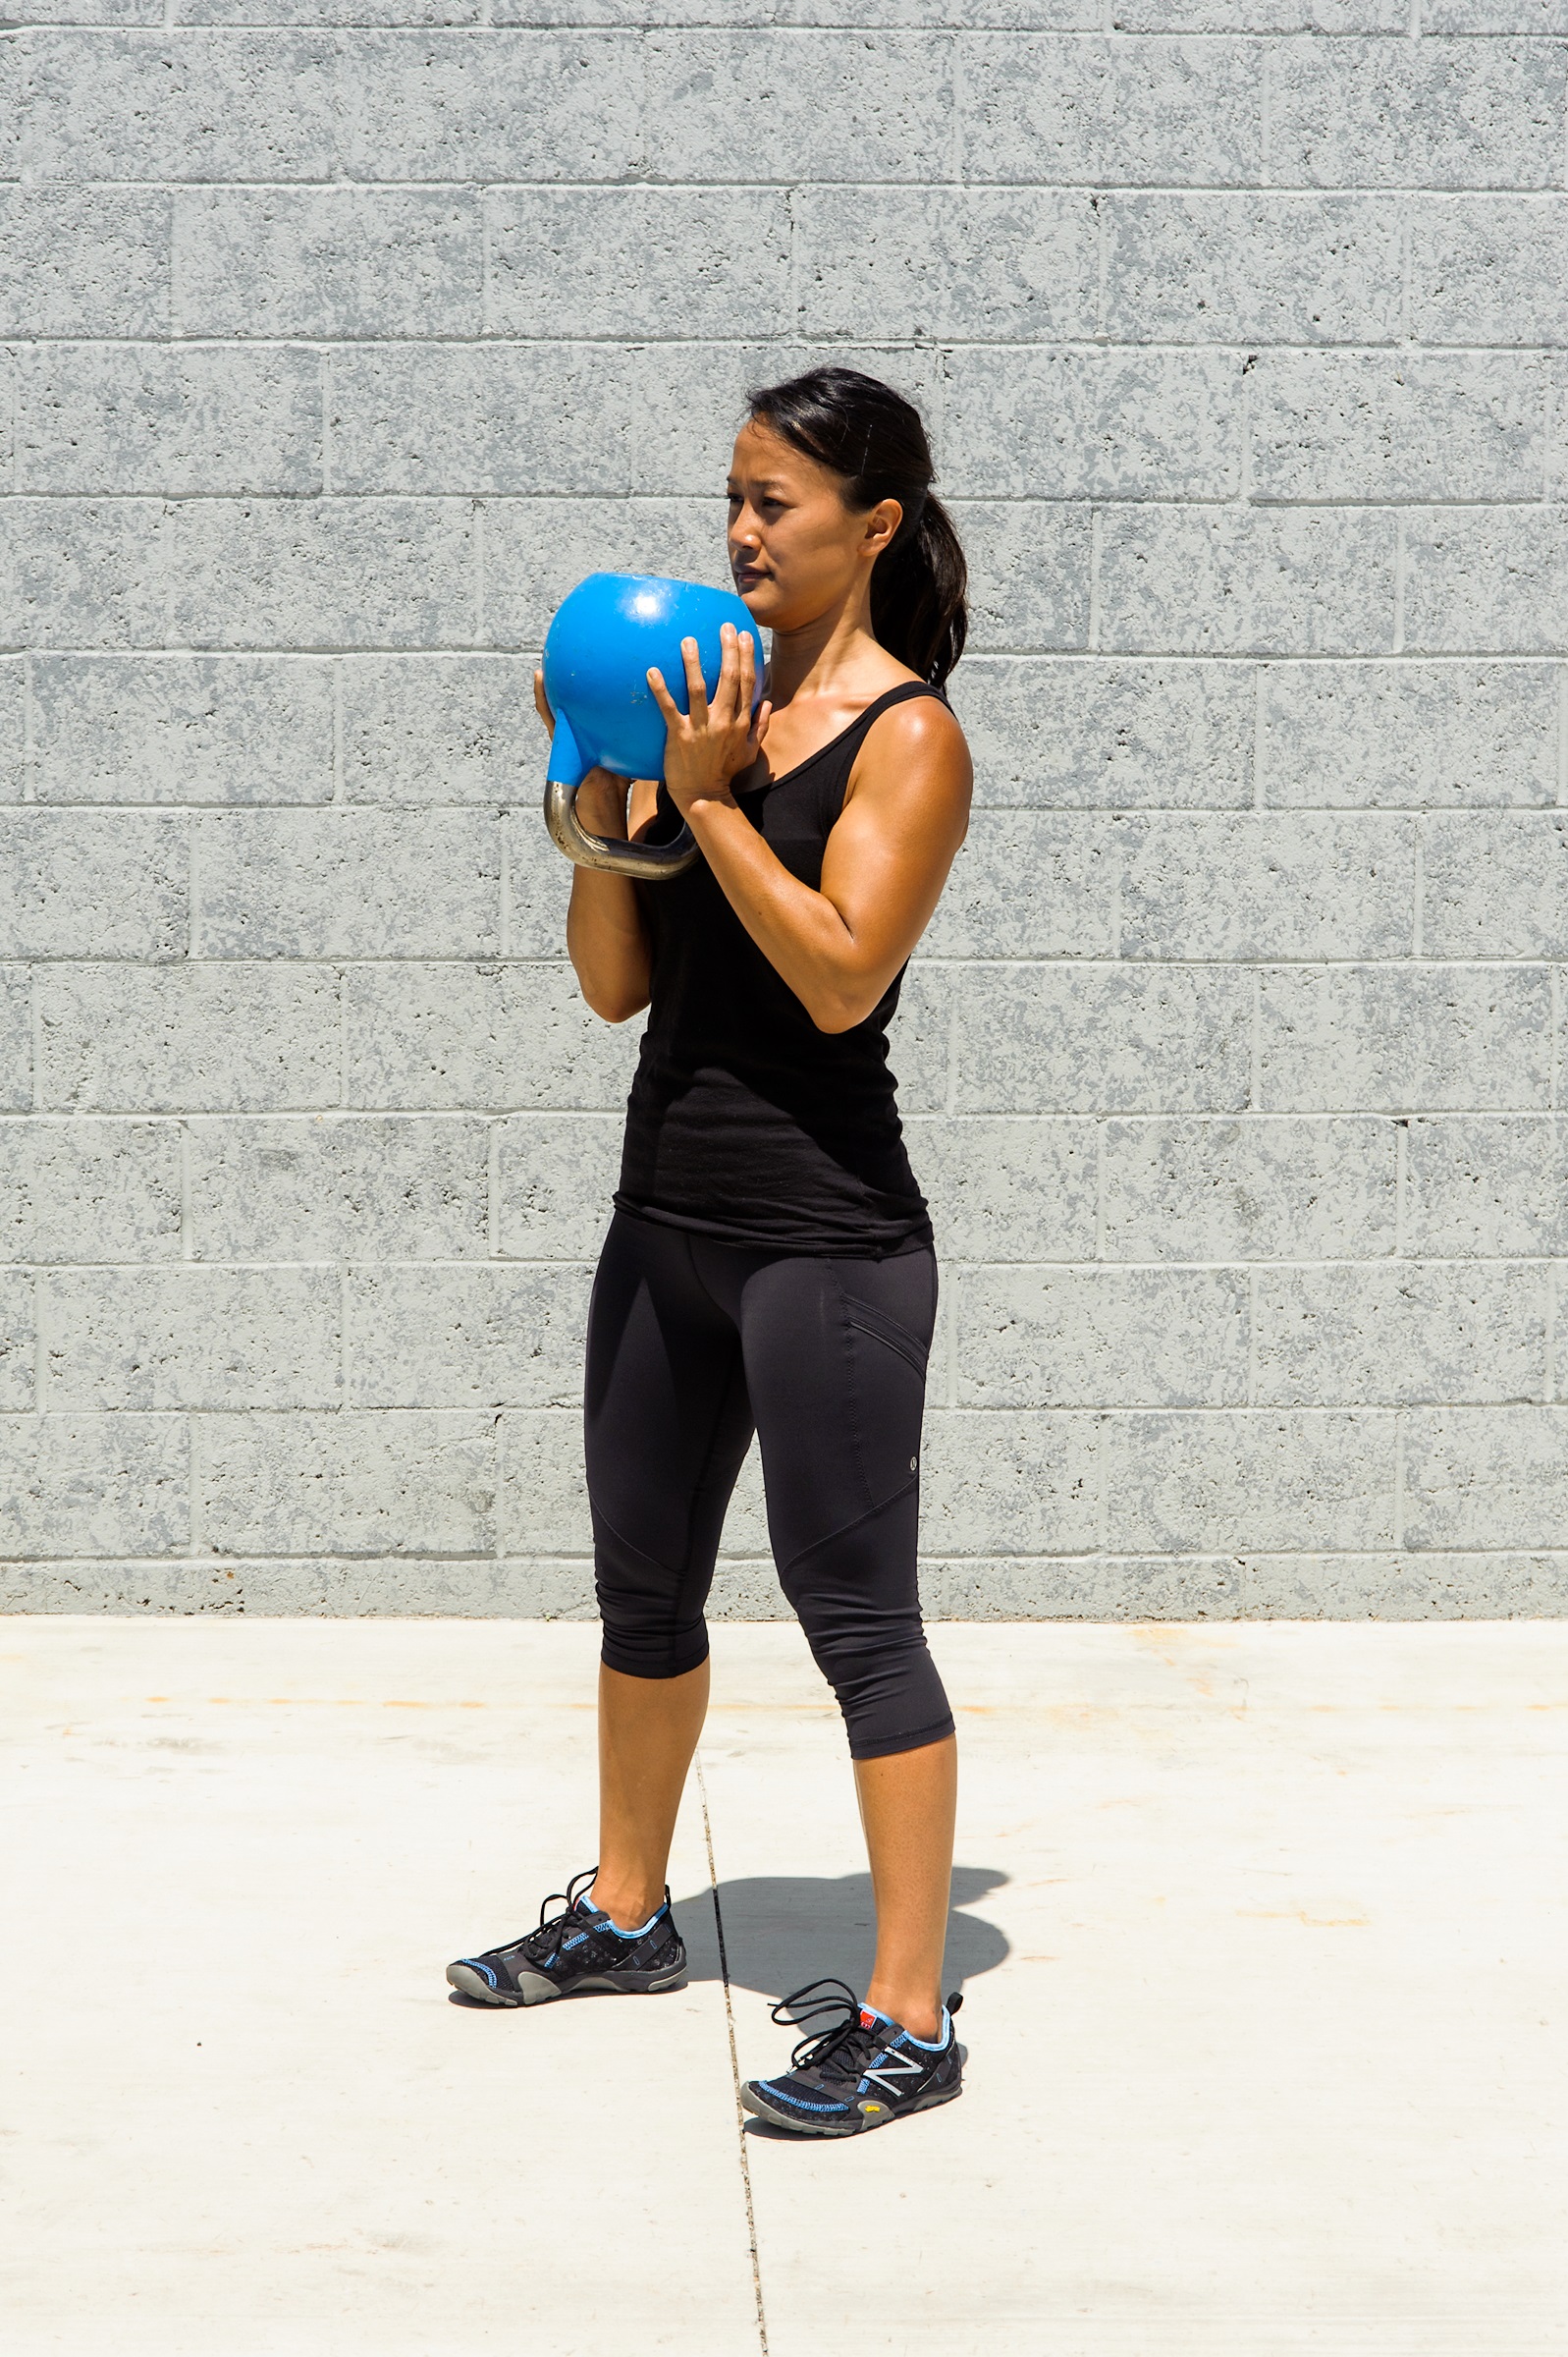
Figure 6.23c
Many people find that holding a light kettlebell in the goblet position makes the squat easier because the front-loaded position acts as a counterbalance, enabling you to sit further back.
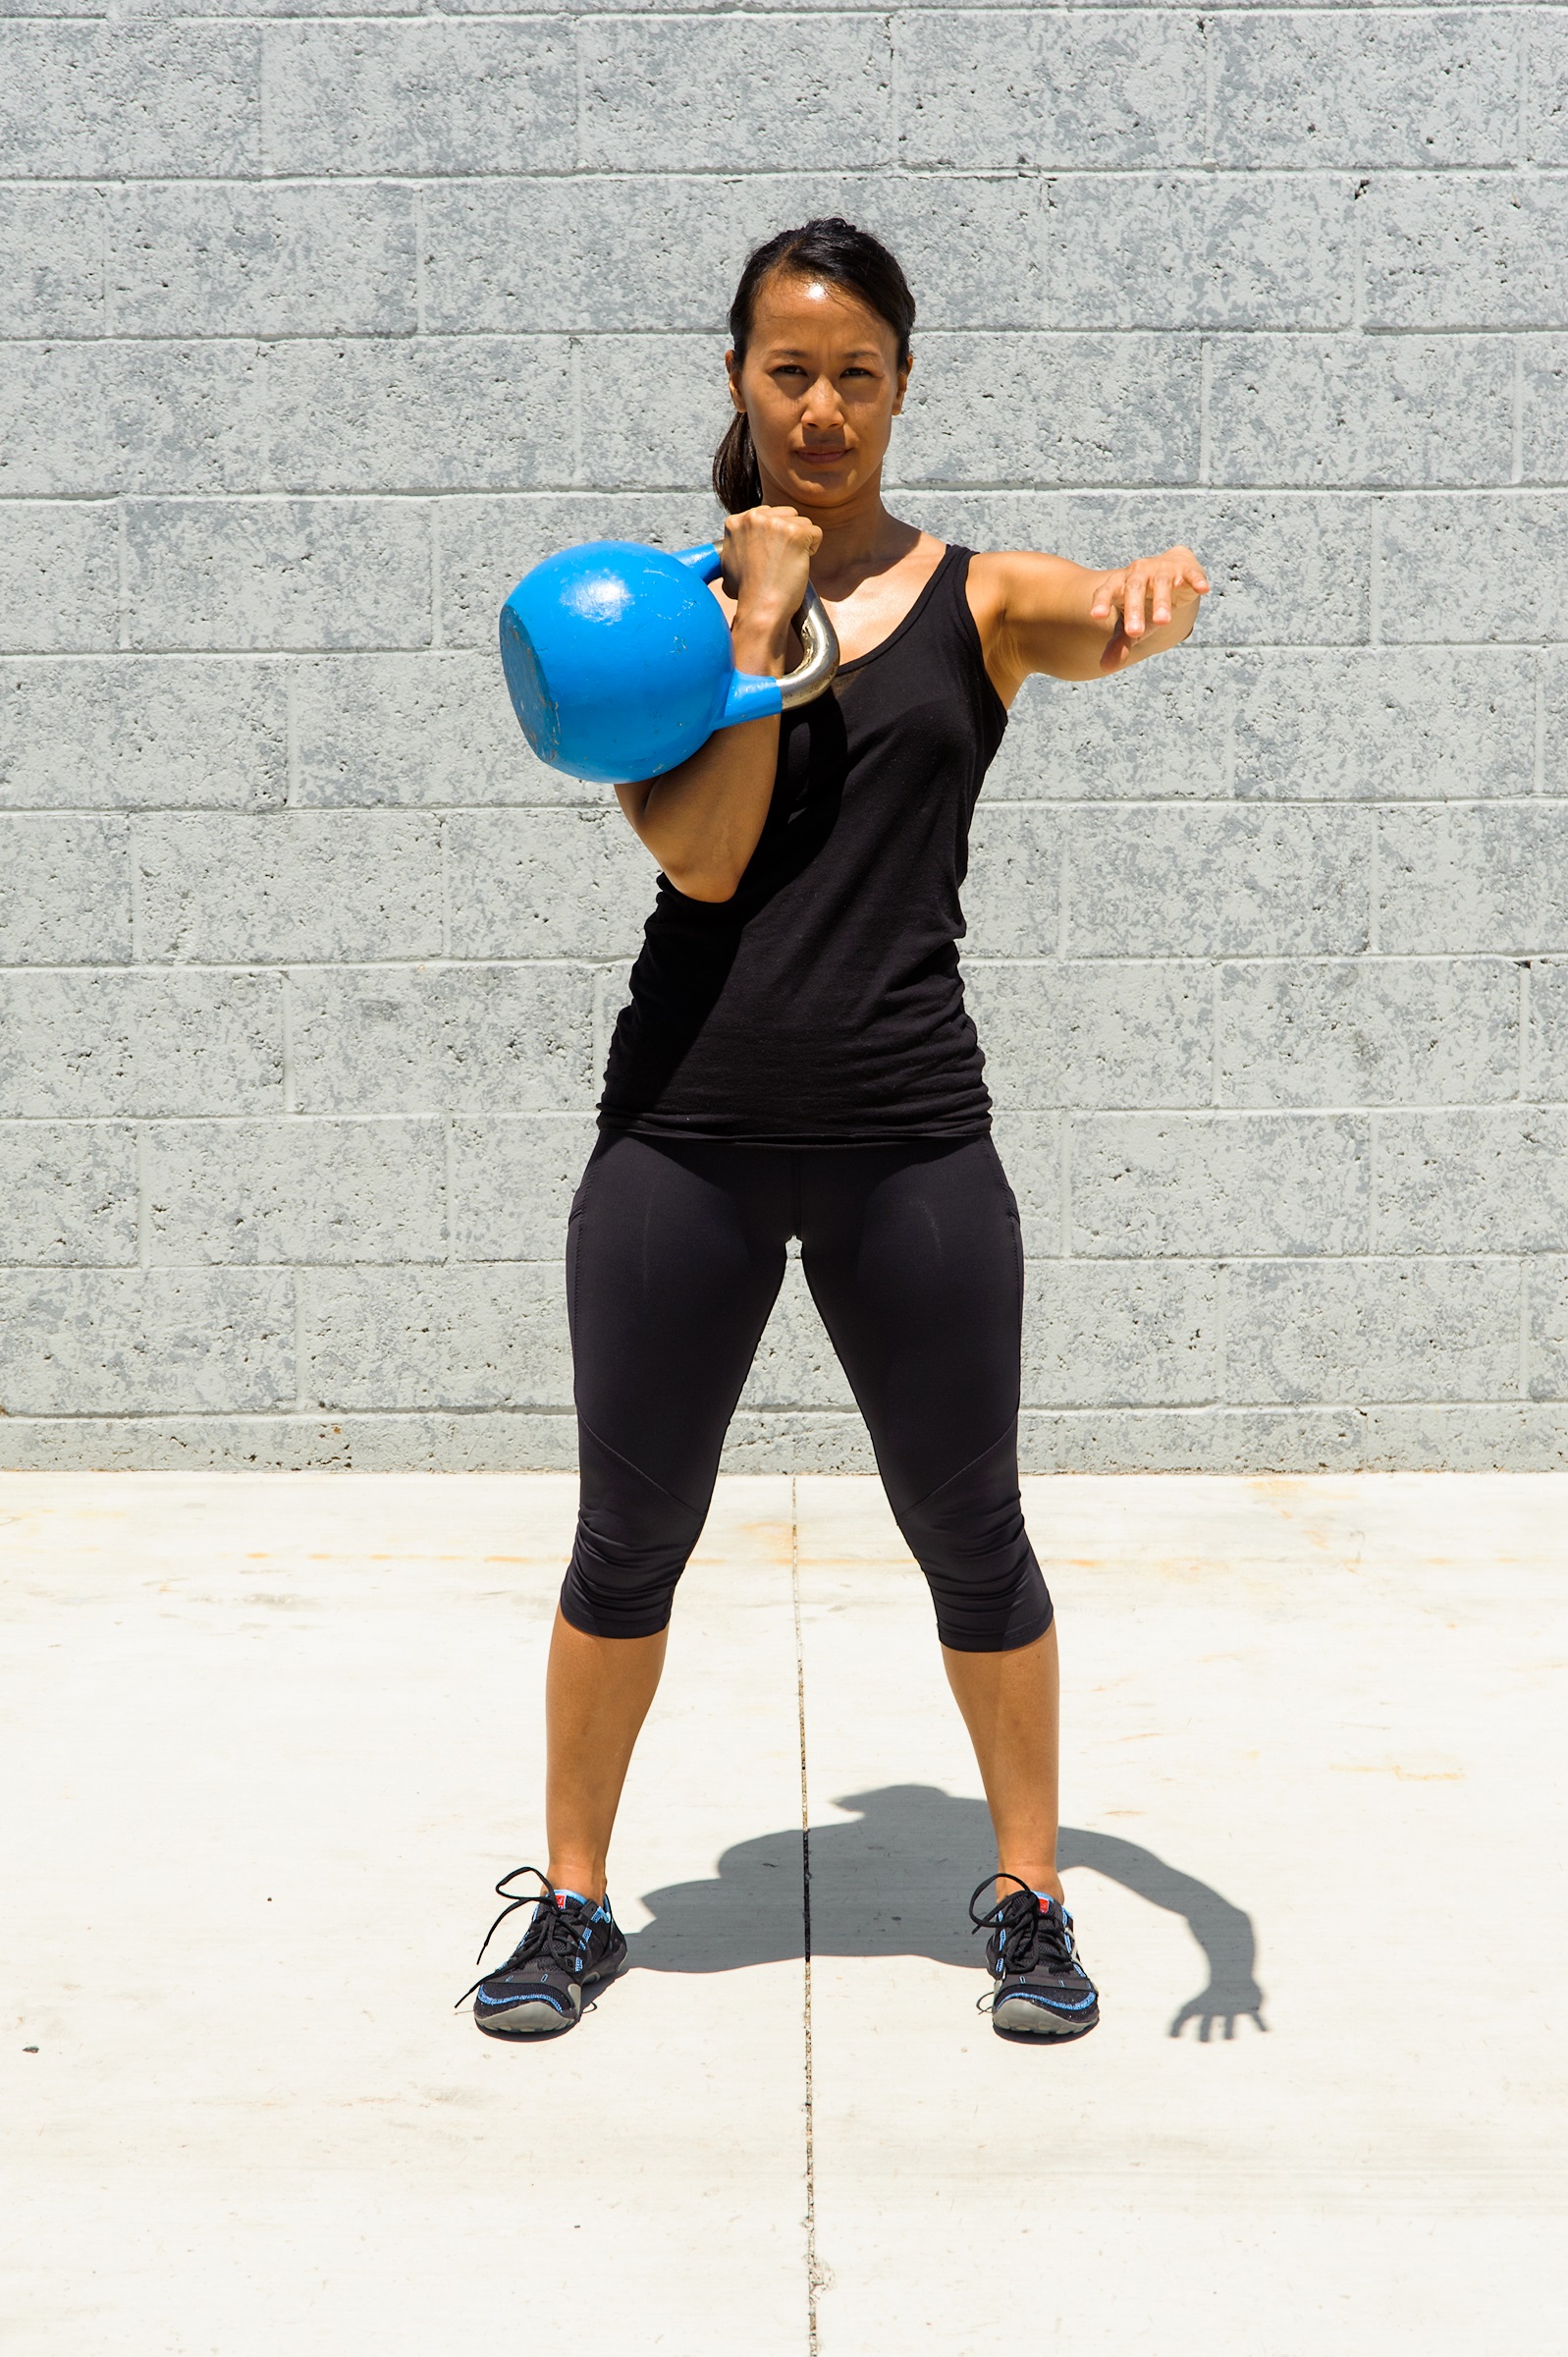
Figure 6.24a
To progress from the goblet squat to stage 2, the front squat, clean one kettlebell to the rack position (see figure 6.24a).
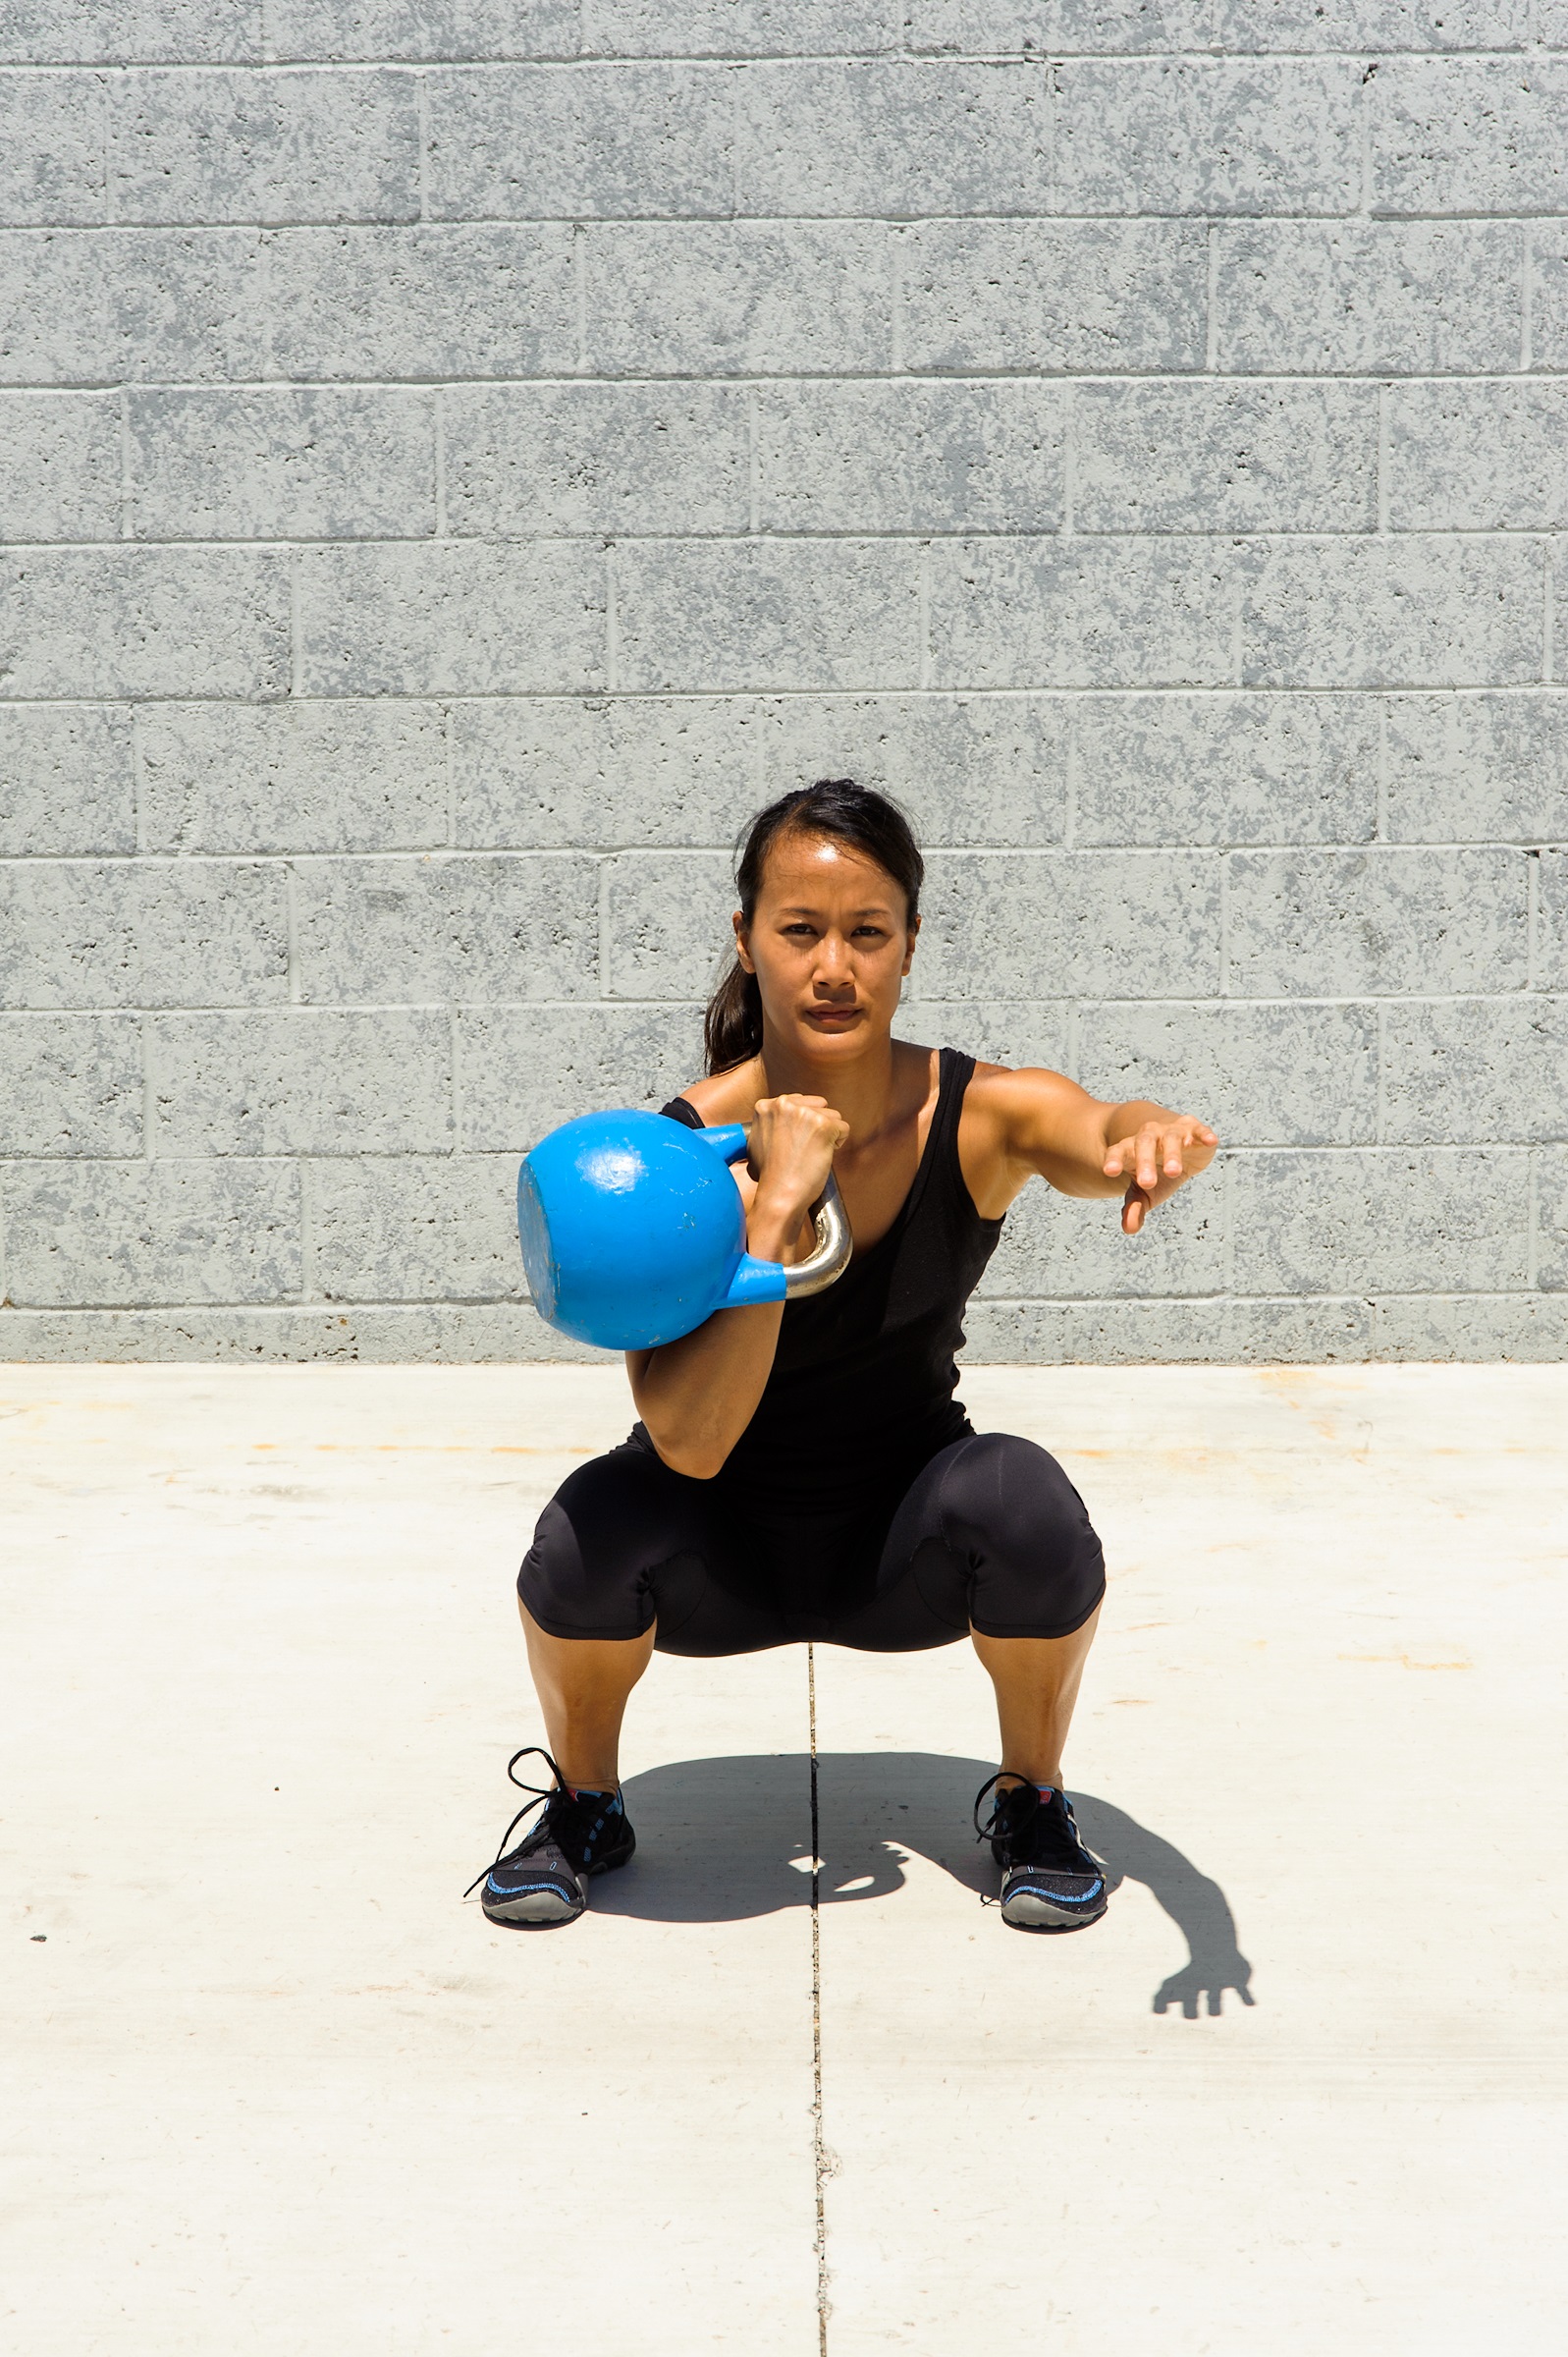
Figure 6.24b
Keep the arm against the body as you squat down (see figure 6.24b) and stand up. This is the front squat. Your nonleaded hand will be out to the side acting as a counterbalance. In the next chapter you will learn the front squat with double kettlebells.
Key Principles
• Initiate the movement in the hips, not in the knees.
• The trunk remains as upright as possible throughout.
• Aim for maximal range of motion at the top and bottom positions of the squat.
The six classical kettlebell lifts of the swing, clean, press, push press, snatch, and squat form the foundation of your kettlebell training and are the most important lifts to practice and master. By learning them well, you will develop a strong base to build upon, and because the key concepts of kettlebell lifting are contained within these classical lifts, learning new lifts will be much easier.
Check out our interview with Steve Cotter here.
Kettlebell Training is written by Steve Cotter, the founder and director of the International Kettlebell and Fitness Federation (IKFF). Cotter consults with numerous professional sport teams, including the Texas Rangers. Kettlebell Training is now available in bookstores everywhere, as well as online at HumanKinetics.com.

Read More
6 Secrets to 6 Pack Shortcuts
Four Tips to Building Better Abs
Workout Exercises You Don’t Do, But Damn Well Should
About Dr. Eric J. Leech
Eric has written for over a decade. Then one day he created Urbasm.com, a site for every guy.